Create a Web API with JWT Authentication and ASP.NET Core Identity


Photo by Jef Willemyns on Unsplash
Table of contents
- 1. Create a Web API
- JWT Token
- 2. Add Authorization
- 1. Install Nuget package Microsoft.AspNetCore.Authentication.JwtBearer
- 2. Add token config in appsettings.json
- 3. Create model classes for authorization
- 4. Create an AuthController for user login
- 5. Add [Authorize] attribute on ArticlesController
- 6. Add Authentication middleware
- 7. Add endpoint to validate a token
- 8. Add endpoint to register new user
- 9. Add endpoint to refresh expired token
- 3. Add Identity and Database
- 4. Test with Postman
Hi there! Let us see how to create a Web API in .NET 6.0 with JWT Authentication and ASP.NET Core Identity. Implementing authentication in any app is rarely an easy task, but don't worry , we will get there, slow and steady :)
If you are in a bit of a hurry, you can find the final code here.
We will follow the below sequence in our development process.
Create a Web API
Add Authentication
Add Identity and Database
Test with Postman
.NET version: 6.0 (SDK version 6.0.8)
IDE: VS Code
1. Create a Web API
First of all, we will create a Web API application.
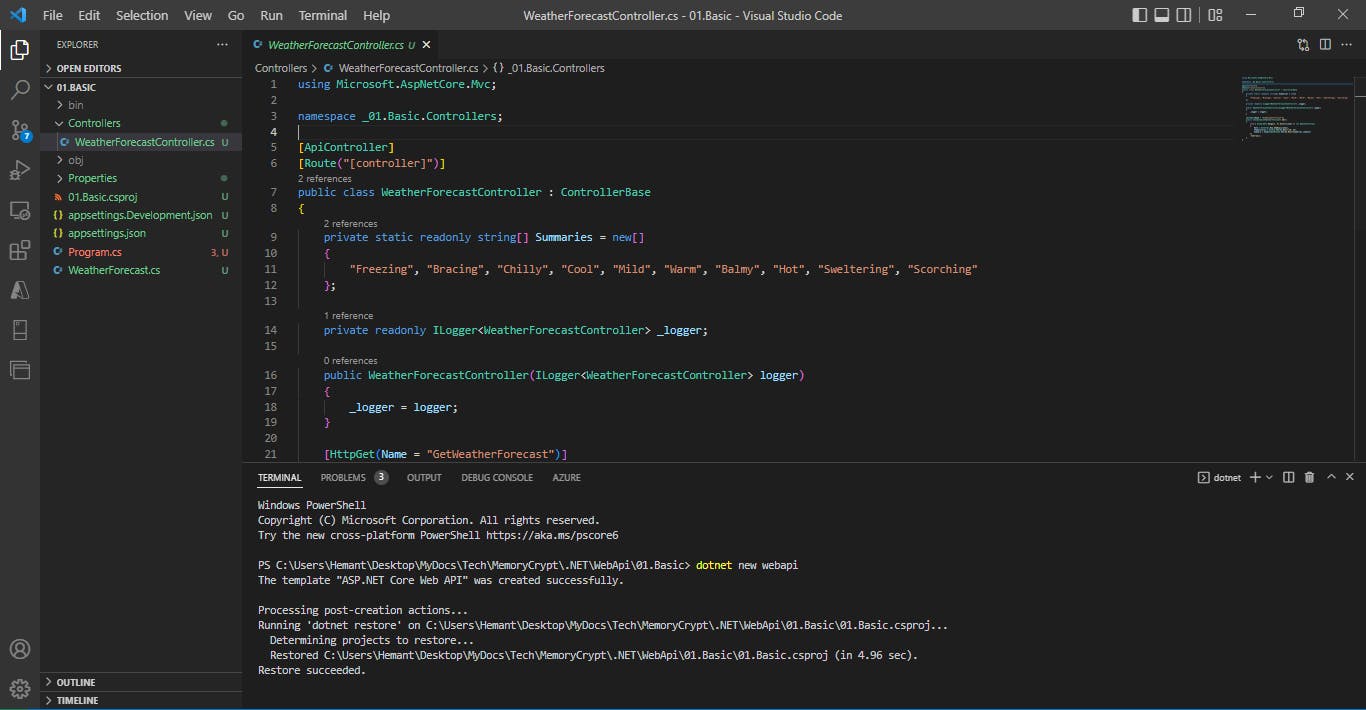
Step 1. Create a new project in Visual Studio Code
Open VSCode -> Go to Terminal -> Type below command
dotnet new webapi
This will create the basic template for a web api project.
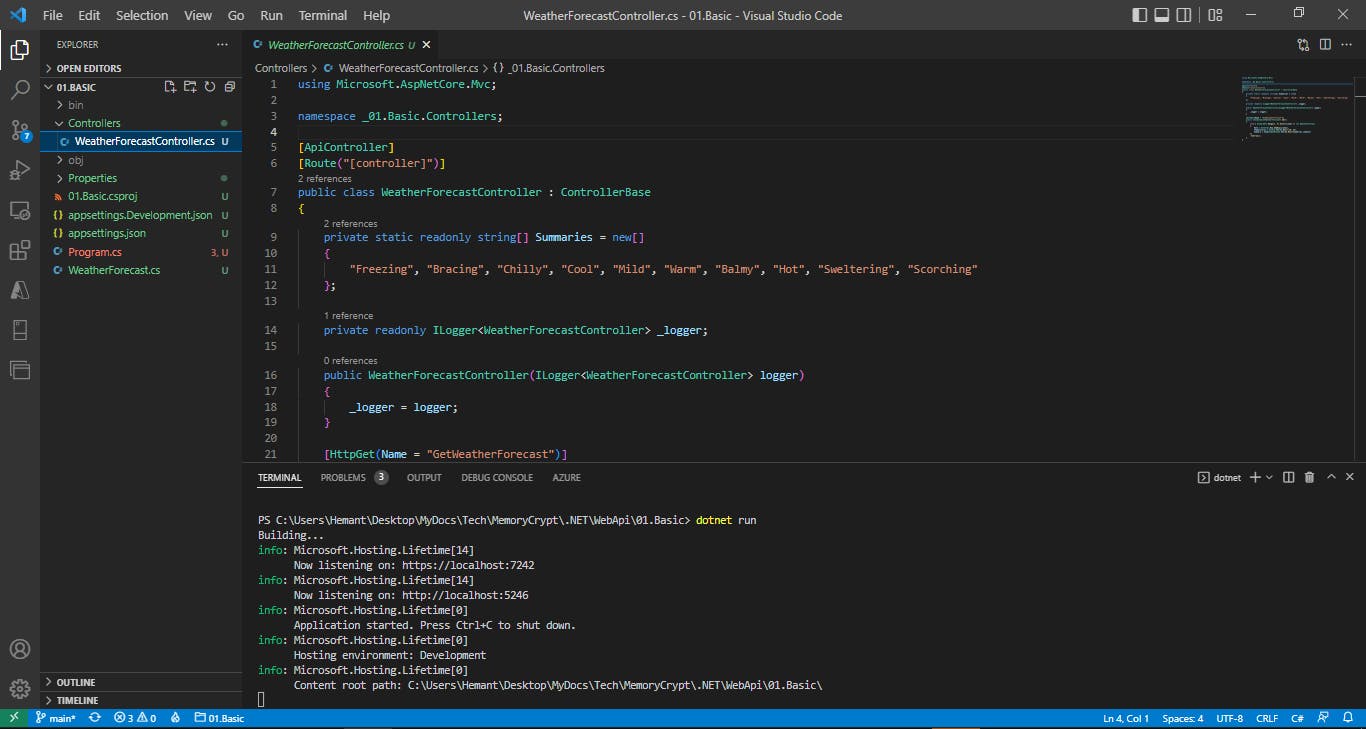
Let us run this default api once to see it is working. Run the below command
dotnet run
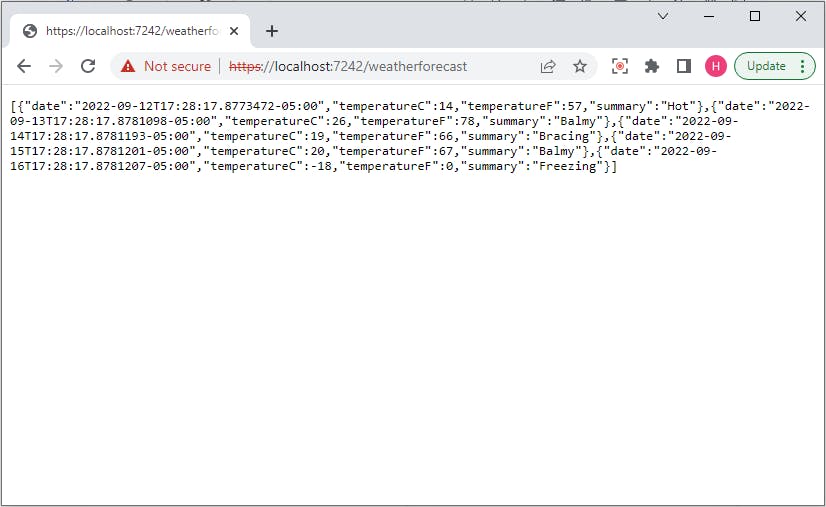
Click on the localhost url that is shown in the Terminal, it will redirect you to your default browser (for me that is Chrome)
Type the controller name weatherforecast after the default url. You should be able to see weather data like shown below
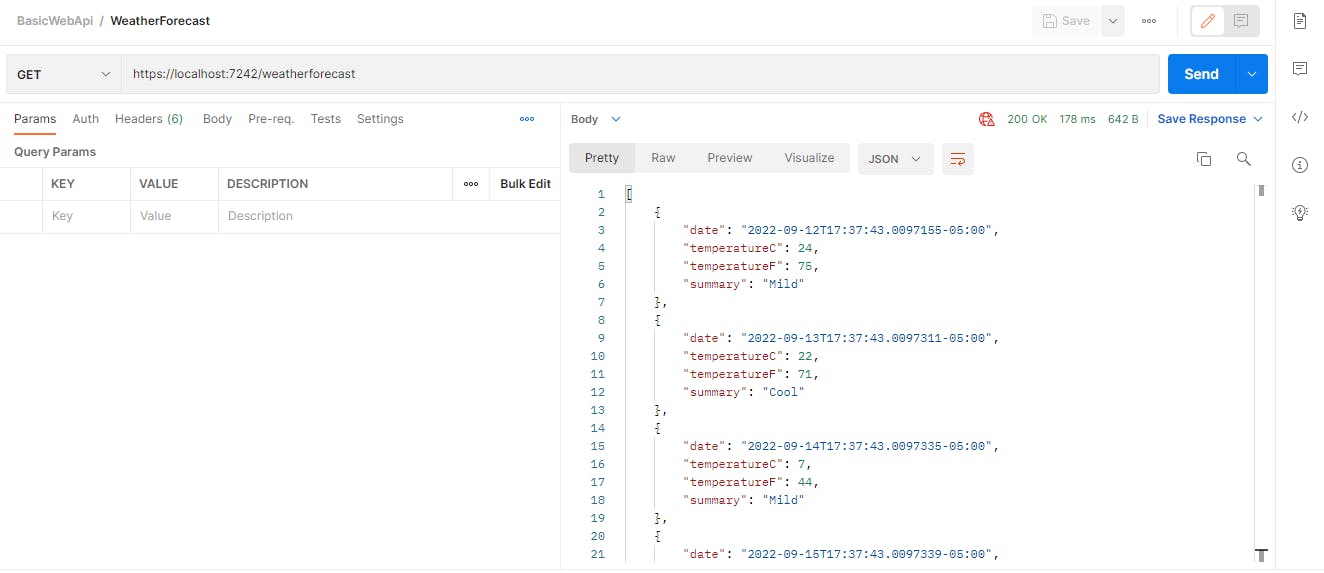
You can also ping this url via Postman and see the data in a more readable format
Step 2. Add Model class
For this project, we will create an Article class. Our CRUD operations will be working on objects of this class.
public class Article
{
    public string? Id { get; set; }
    public string Title { get; set; }
    public string Author { get; set; }
    public string Content { get; set; }
    public int Views { get; set; }
    public int UpVotes { get; set; }
}
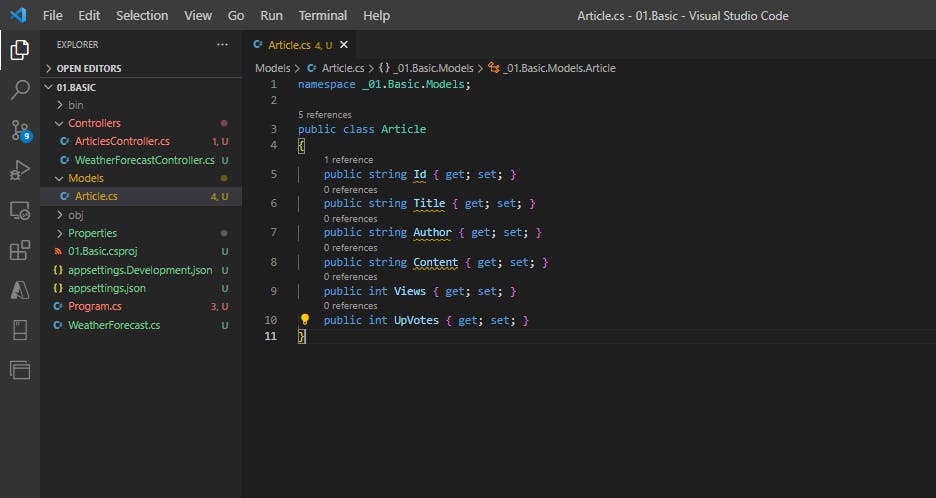
Note - we made Id as nullable string later on, because otherwise we were getting Id is a required field error.
Step 3. Add Basic CRUD Operations
We will add the basic Create, Read, Update and Delete operations in our Web API. To keep things simple, we will not use a real database right now, rather we will use in-memory objects. We will add database later on.
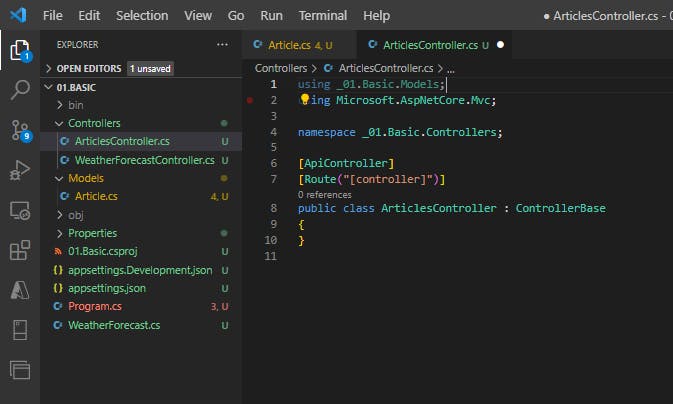
Add an ArticlesController
[ApiController]
[Route("[controller]")]
public class ArticlesController : ControllerBase
{

}
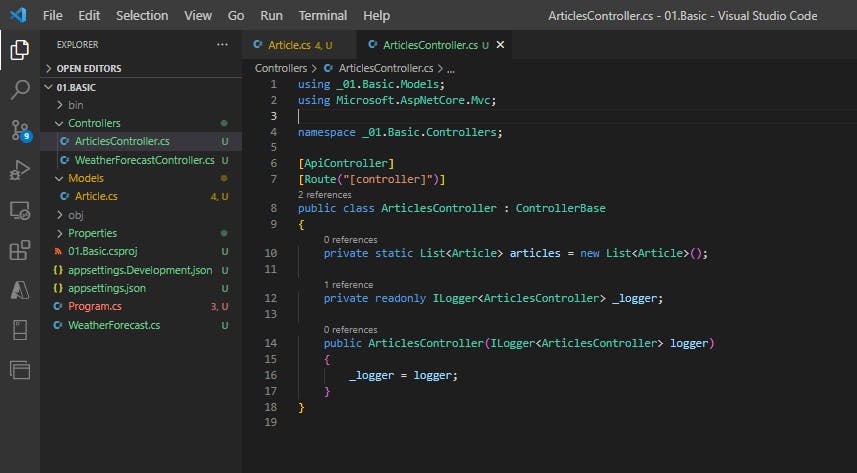
Add an empty collection as dummy dataset
We will now add a static collection of articles on which we will perform our CRUD operations. We will also add a basic logger.
[ApiController]
[Route("[controller]")]
public class ArticlesController : ControllerBase
{
    private static List<Article> articles = new List<Article>();

    private readonly ILogger<ArticlesController> _logger;

    public ArticlesController(ILogger<ArticlesController> logger)
    {
        _logger = logger;
    }
}
CREATE Operation
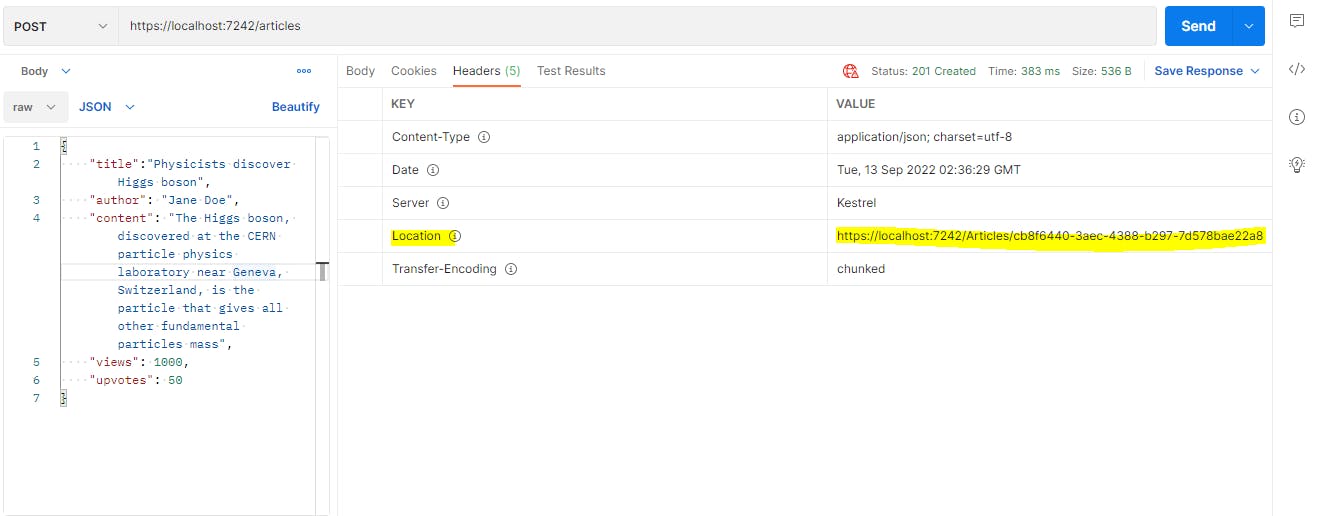
This operation will create a new record in database. The verb we will use is HttpPost. The status code returned is 201. It also returns the url location in header which we can use to fetch this record in future. The response body shows the newly created object.
    [HttpPost]
    public ActionResult<Article> InsertArticle(Article article)
    {
        article.Id = Guid.NewGuid().ToString();
        articles.Add(article);
        return CreatedAtAction(nameof(GetArticles), new {id = article.Id}, article);
    }
Here, CreatedAtAction is a built-in method that returns an HTTP 201 (Created) status code along with a location header pointing to the newly created resource. It's commonly used to indicate that a resource has been successfully created and provide a URL to access that resource.
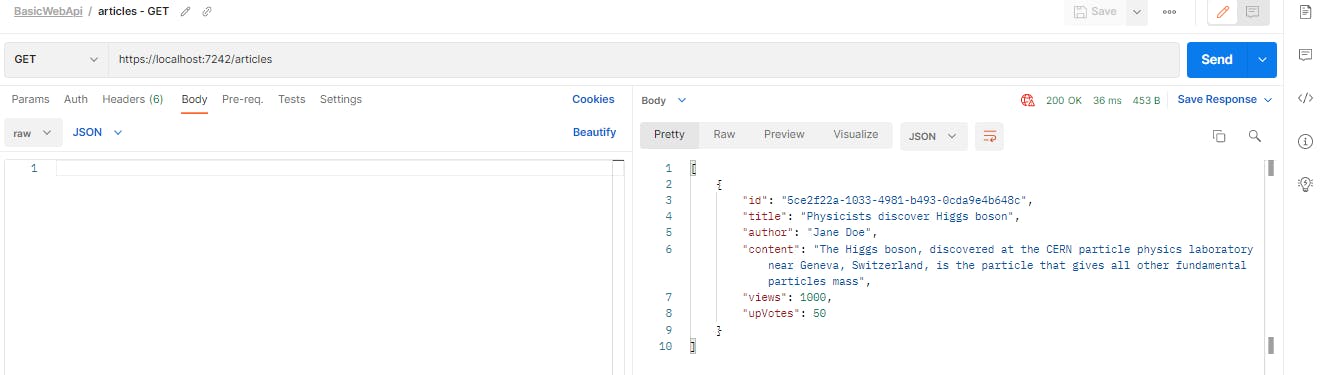
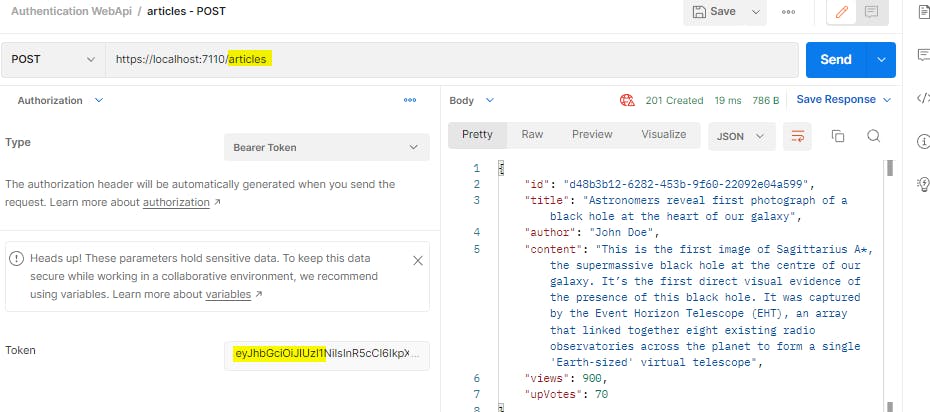
Now let us send a Create request via Postman. Our Method will be set to POST.
We will use the below json in our request's body
{
    "title":"Physicists discover Higgs boson",
    "author": "Jane Doe",
    "content": "The Higgs boson, discovered at the CERN particle physics laboratory near Geneva, Switzerland, is the particle that gives all other fundamental particles mass",
    "views": 1000,
    "upvotes": 50
}
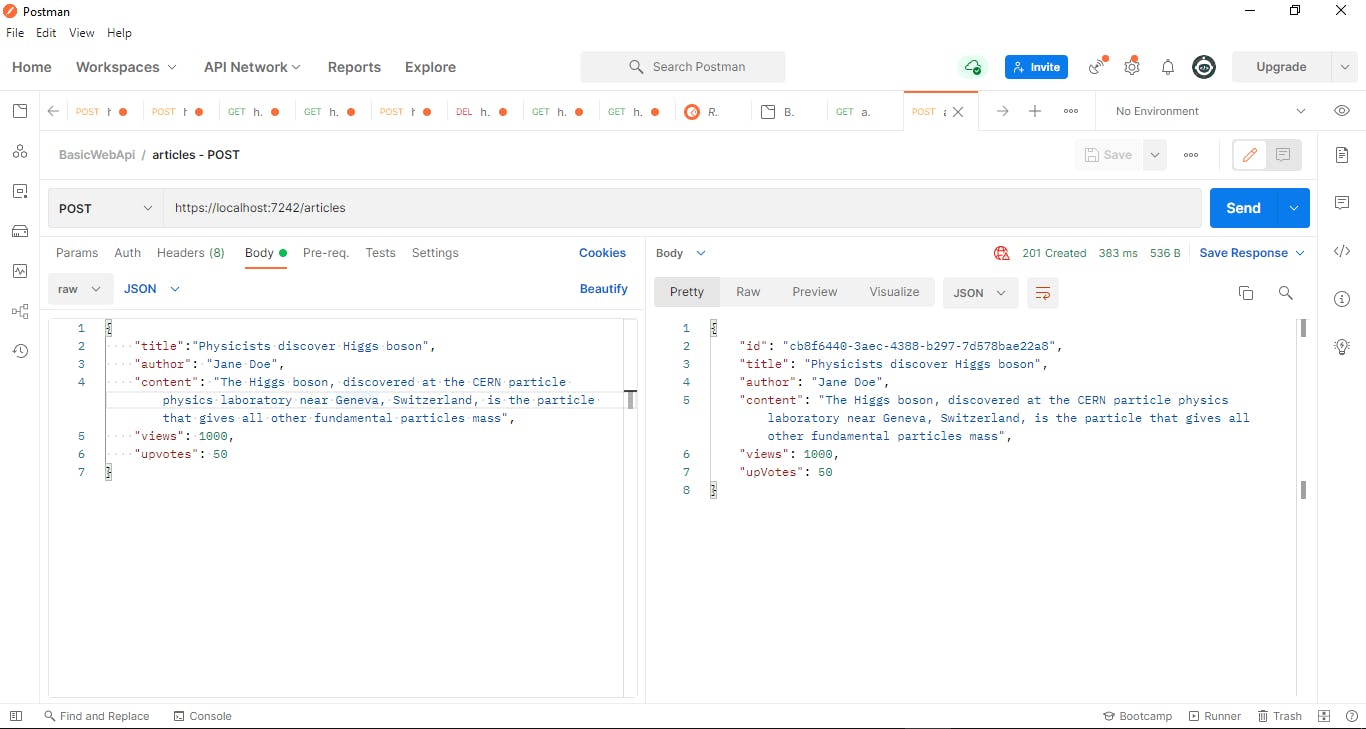
If we check the headers in response, we can see the location field, pointing to the url which can fetch this newly inserted record.
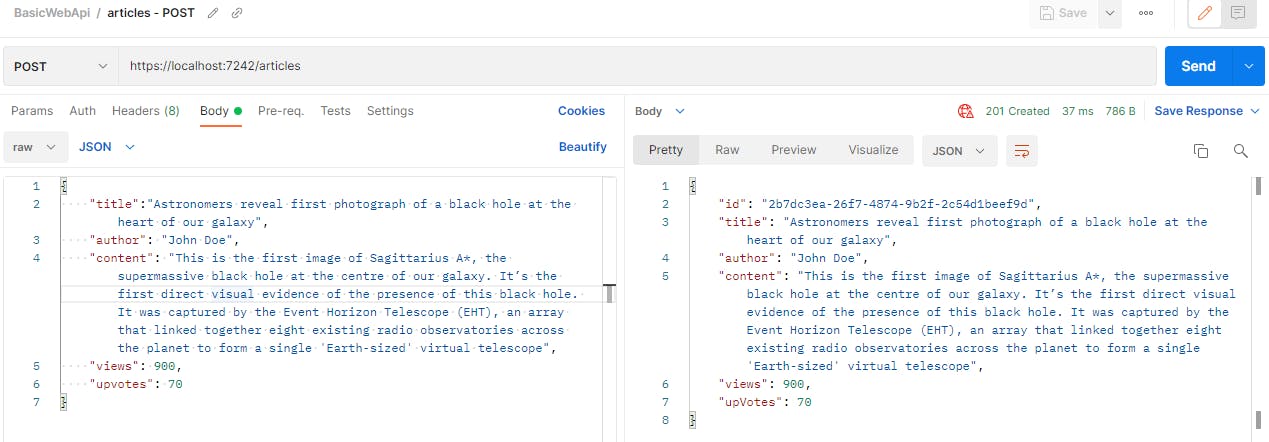
Let us add one more article
{
    "title":"Astronomers reveal first photograph of a black hole at the heart of our galaxy",
    "author": "John Doe",
    "content": "This is the first image of Sagittarius A*, the supermassive black hole at the centre of our galaxy. It’s the first direct visual evidence of the presence of this black hole. It was captured by the Event Horizon Telescope (EHT), an array that linked together eight existing radio observatories across the planet to form a single 'Earth-sized' virtual telescope",
    "views": 900,
    "upvotes": 70
}
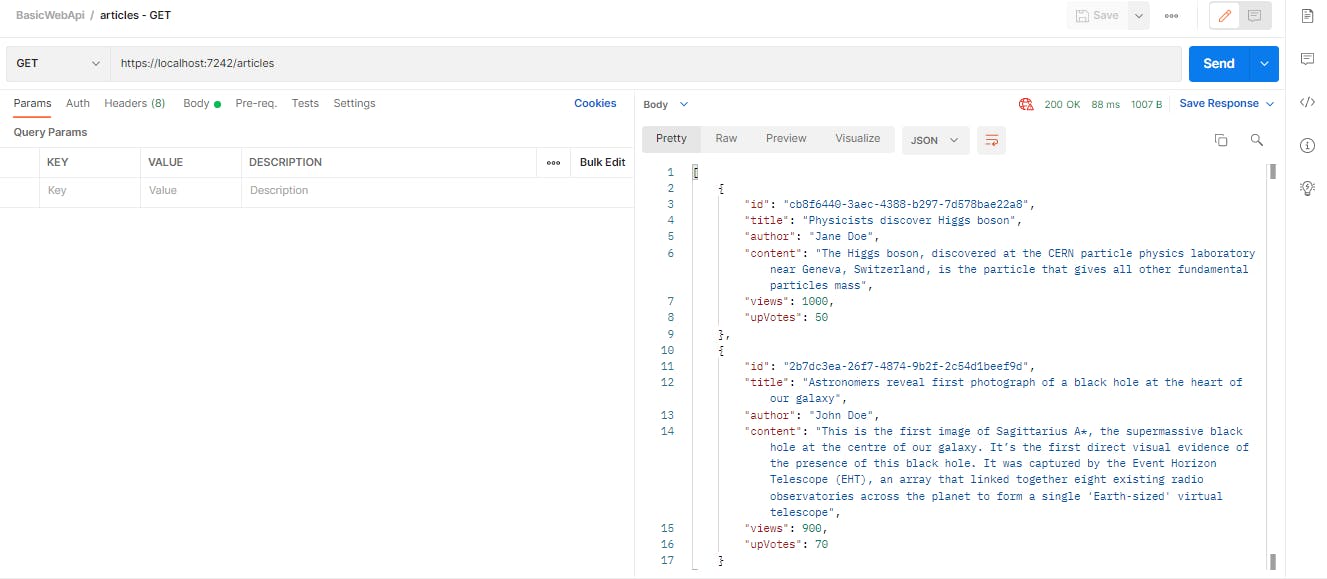
READ Operation
This operation will read one or more records from database. The verb we will use is HttpGet. The status code returned is 200. We will add two endpoints:
GET articles/ GET articles/{id}
[HttpGet]
public ActionResult<IEnumerable<Article>> GetArticles()
{
return Ok(articles);
}
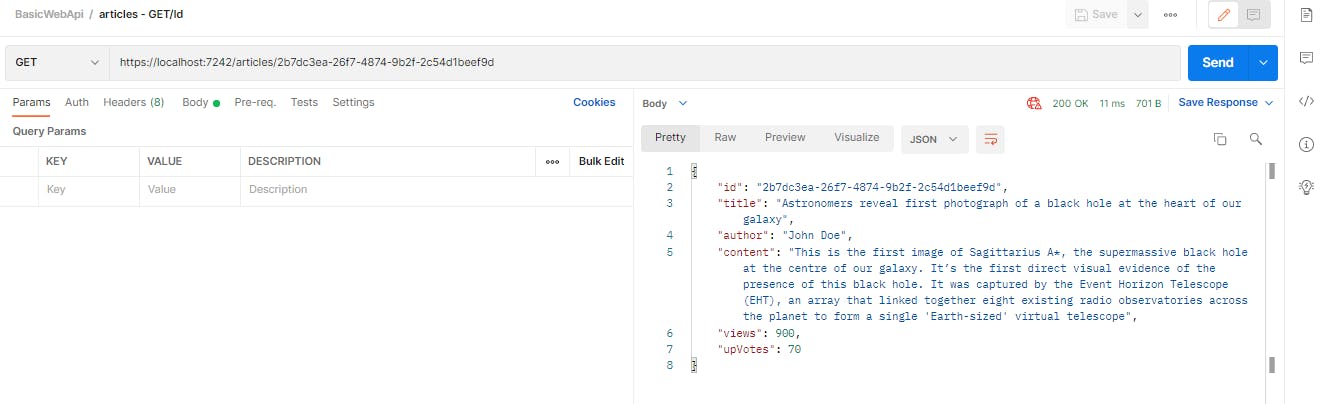
[HttpGet("{id}")]
public ActionResult<Article> GetArticles(string id)
{
var article = articles.FirstOrDefault(a => a.Id.Equals(id));
if(article==null)
{
return NotFound();
}
return Ok(article);
}
Executing GET operation
Executing GET operation with a specific id
UPDATE Operation
This operation will update an existing record in database. The verb we will use is HttpPut. The return code is 204 (No Content)
    [HttpPut("{id}")]
    public ActionResult<Article> UpdateArticle(string id, Article article)
    {
        if(id != article.Id)
        {
            return BadRequest();
        }

        var articleToUpdate = articles.FirstOrDefault(a => a.Id.Equals(id));

        if(articleToUpdate==null)
        {
            return NotFound();
        }

        articleToUpdate.Author = article.Author;
        articleToUpdate.Content = article.Content;
        articleToUpdate.Title = article.Title;
        articleToUpdate.UpVotes = article.UpVotes;
        articleToUpdate.Views = article.Views;

        return NoContent();
    }
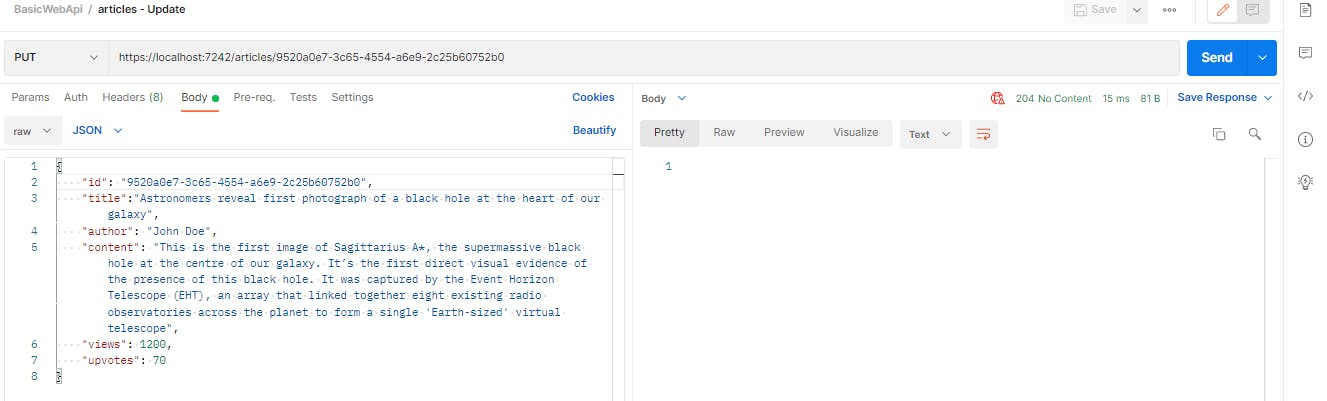
Let us send an Update request. We will run the update query for the below record

We will change the views field's value to 1200. Our method will be set to PUT.
{
    "title":"Astronomers reveal first photograph of a black hole at the heart of our galaxy",
    "author": "John Doe",
    "content": "This is the first image of Sagittarius A*, the supermassive black hole at the centre of our galaxy. It’s the first direct visual evidence of the presence of this black hole. It was captured by the Event Horizon Telescope (EHT), an array that linked together eight existing radio observatories across the planet to form a single 'Earth-sized' virtual telescope",
    "views": 1200,
    "upvotes": 70
}
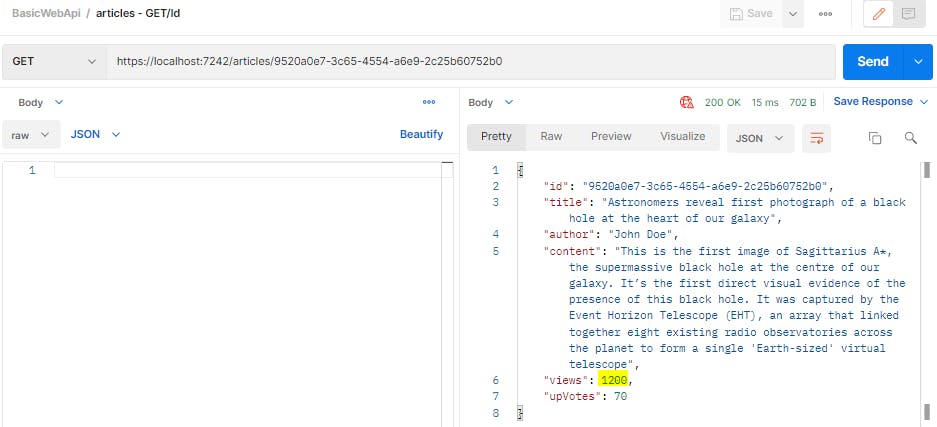
We can see that the response status is 204, so the update was successful. Now let's run the GET request to check the updated record.
DELETE Operation
This operation will delete a record from database. The verb we will use is HttpDelete. The return code is 204 (No content)
    [HttpDelete("{id}")]
    public ActionResult DeleteArticle(string id)
    {
        var articleToDelete = articles.FirstOrDefault(a => a.Id.Equals(id));

        if(articleToDelete == null)
        {
            return NotFound();
        }

        articles.Remove(articleToDelete);

        return NoContent();
    }
Let us delete the below record.

We will be using the DELETE method.

Now if we run the GET request, we won't see the record we deleted just now
The postman collection containing all the requests can be downloaded here
The project with this basic Web Api is available here
JWT Token
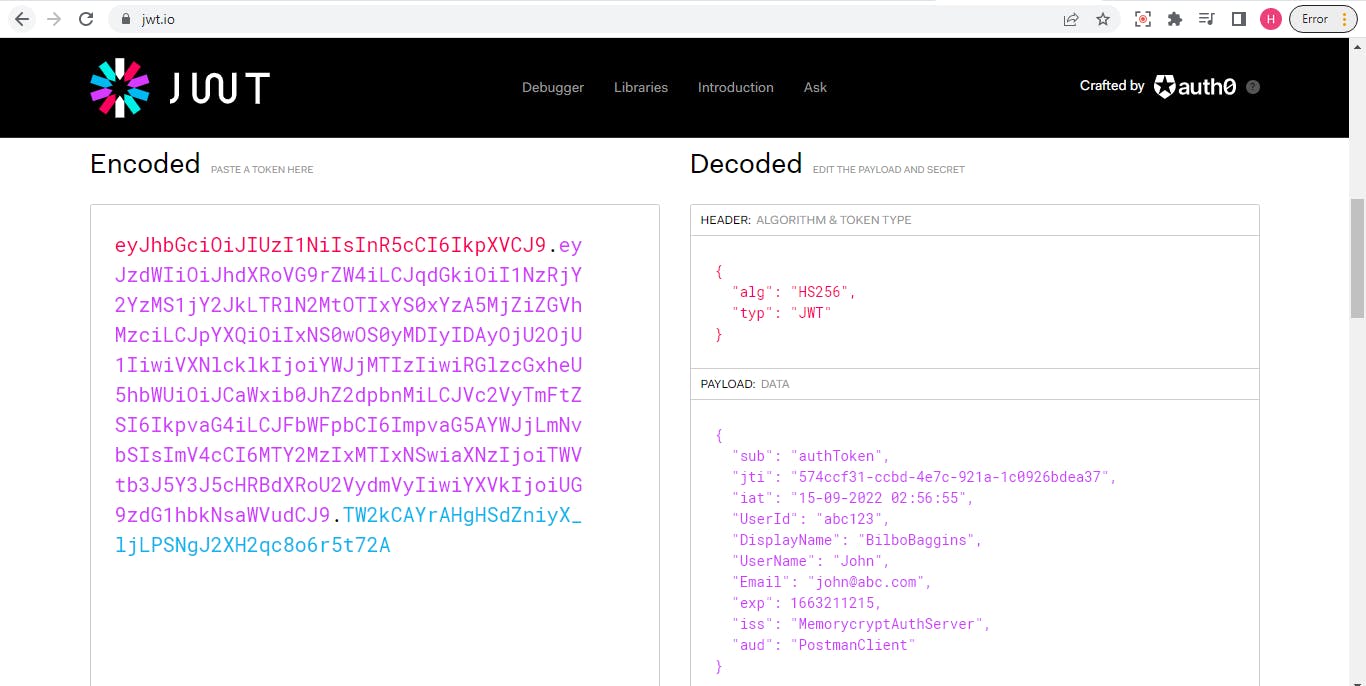
A JWT token (JSON Web Token) is represented as a string consisting of three parts separated by periods ("."): header.payload.signature.
Below is a JWT token in encoded format:
eyJhbGciOiAiSFMyNTYiLCAidHlwIjogIkpXVCJ9.eyJzdWIiOiAiMTIzNDU2Nzg5MCIsICJuYW1lIjogIkpvaG4gRG9lIiwgImlhdCI6IDE1MTYyMzkwMjJ9.2zqT7jP7aFNBv0kf8N_XOwVMz4EmnhYMai_qHh-bDQY
This encoded JWT token consists of three parts separated by periods ('.'):
Header (Base64Url-encoded):
eyJhbGciOiAiSFMyNTYiLCAidHlwIjogIkpXVCJ9Payload (Base64Url-encoded):
eyJzdWIiOiAiMTIzNDU2Nzg5MCIsICJuYW1lIjogIkpvaG4gRG9lIiwgImlhdCI6IDE1MTYyMzkwMjJ9Signature (This is a placeholder; the actual signature is a cryptographic hash):
2zqT7jP7aFNBv0kf8N_XOwVMz4EmnhYMai_qHh-bDQY
And below is the same token in decoded format:
{
  "header": {
    "alg": "HS256",
    "typ": "JWT"
  },
  "payload": {
    "sub": "1234567890",
    "name": "John Doe",
    "iat": 1516239022
  },
  "signature": "HMACSHA256SignatureHere"
}
Let's break down each part:
1. Header
The header typically consists of two parts: the type of the token (JWT) and the signing algorithm used (e.g., HMAC SHA256 or RSA). It is encoded as a JSON object and then Base64Url-encoded to form the first part of the token.
Example Header:
{
  "alg": "HS256",
  "typ": "JWT"
}
2. Payload
The payload contains the claims, which are statements about an entity (typically, the user) and additional data. There are three types of claims: registered, public, and private claims. Registered claims are predefined and include properties like iss (issuer), sub (subject), aud (audience), exp (expiration time), and iat (issued at time). Public claims are defined by the JWT specification, while private claims are application-specific.
Example Payload:
{
  "sub": "1234567890",
  "name": "John Doe",
  "iat": 1516239022
}
3. Signature
The signature is created by taking the encoded header, the encoded payload, a secret key, and the specified algorithm from the header, and then signing the resulting string. This signature is used to verify that the sender of the JWT is who it says it is and to ensure that the message wasn't tampered with during transmission.
Example Signature:
HMACSHA256(
  base64UrlEncode(header) + "." +
  base64UrlEncode(payload),
  secret
)
2. Add Authorization
Let us add authorization to our Web Api now. Again, we will not be using a real database for now, to keep things simple.
Below are the steps we will follow:
Install Nuget package
Microsoft.AspNetCore.Authentication.JwtBearerAdd token config in appsettings.json
Create User model class for authorization
Create an AuthController for user login
Add
[Authorize]attribute on ArticlesControllerAdd Authentication middleware
Add endpoint to validate a token
Add endpoint to register new user
Add endpoint to refresh expired token
1. Install Nuget package Microsoft.AspNetCore.Authentication.JwtBearer
You can visit this link to see how to install nuget package in VSCode - stackoverflow.com/questions/40675162/instal..
Your csproj file should have this reference once you have installed the package
<PackageReference Include="Microsoft.AspNetCore.Authentication.JwtBearer" Version="6.0.9" />
2. Add token config in appsettings.json
Currently, the appsettings.json file looks like this
{
   "Logging": {
    "LogLevel": {
      "Default": "Information",
      "Microsoft.AspNetCore": "Warning"
    }
  },
  "AllowedHosts": "*"
}
Let us add the auth config
{
  "token": {
    "key": "TWVtb3J5Q3J5cHQ=",
    "issuer": "MemorycryptAuthServer",
    "audience": "PostmanClient",
    "subject": "authToken"
  },
  "Logging": {
    "LogLevel": {
      "Default": "Information",
      "Microsoft.AspNetCore": "Warning"
    }
  },
  "AllowedHosts": "*"
}
Here, the key field contains the secret key using which we will encode our tokens. You can provide any Base64 encoded string as your key.
The issuer, audience, and subject fields are used by JWT token creation logic, and embedded in every token that is generated.
Key (or Secret Key): The key is a secret piece of information that is used to sign and verify JWTs. In the context of JWT authentication in .NET Core, this key is used to sign the JWTs on the server side and to verify the authenticity of received JWTs on the client side. The key can be a symmetric key (shared secret) or an asymmetric key pair (public and private keys).
Issuer (iss): The issuer is a claim in the JWT that identifies the entity that issued (created) the JWT. It typically contains a unique identifier or URL that can help verify the legitimacy of the JWT. In the context of .NET Core, when you generate a JWT on your server, you set the issuer claim to indicate your server's identity.
Audience (aud): The audience is a claim in the JWT that specifies the intended recipient of the JWT. It identifies the party for which the JWT is intended. In the context of .NET Core, this is often used to specify the consuming application or service that should accept and process the JWT.
Subject (sub): The subject is a claim in the JWT that identifies the subject of the JWT, i.e., the principal (usually a user) who is the main focus of the JWT's content. It can contain a unique identifier for the subject. In the context of .NET Core, the subject claim often represents the user for whom the token is issued.
3. Create model classes for authorization
We will create a LoginRequest class which can store incoming login request
public class LoginRequest
{
    [Required]
    public string Email { get; set; }

    [Required]
    public string Password { get; set; }
}
Next, we will create a User class which can store user data of existing users
public class User
{
    public string UserId { get; set; }
    public string UserName { get; set; }
    public string DisplayName { get; set; }
    public string Email { get; set; }
    public string Password { get; set; }
    public string MobileNumber { get; set; }
    public DateTime? DateOfBirth { get; set; }
    public string Address { get; set; }
    public string City { get; set; }
    public string State { get; set; }
    public string Country { get; set; }
}
Finally, we will create an AuthResponse class where we will store the auth token to be sent back to user
public class AuthResponse
{
    public string AccessToken { get; set; }
}
4. Create an AuthController for user login
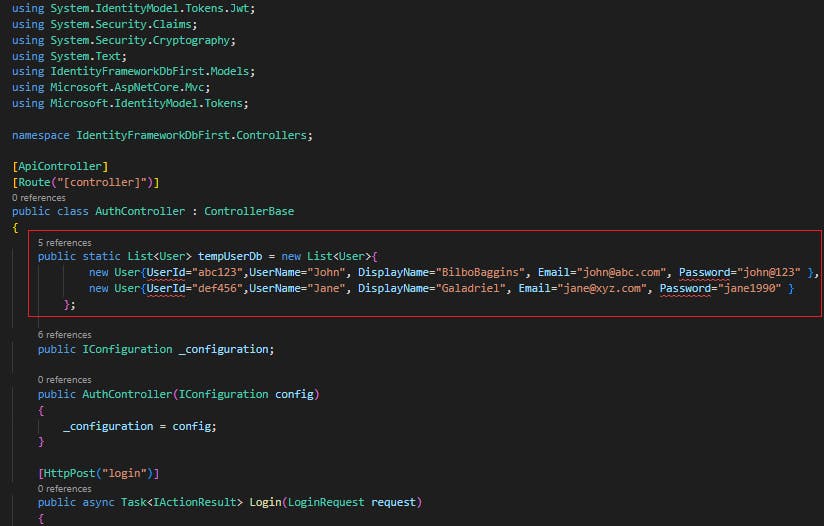
Now we will add the AuthController class. For now, this controller will fetch saved user details from in-memory objects rather than from database. We will deal with a real database later.
using System.IdentityModel.Tokens.Jwt;
using System.Security.Claims;
using System.Text;
using _02.Authentication.Models;
using Microsoft.AspNetCore.Mvc;
using Microsoft.IdentityModel.Tokens;
namespace _02.Authentication.Controllers;
[ApiController]
[Route("[controller]")]
public class AuthController : ControllerBase
{
public static List<User> tempUserDb = new List<User>{
new User{UserId="abc123",UserName="John", DisplayName="BilboBaggins", Email="john@abc.com", Password="john@123" },
new User{UserId="def456",UserName="Jane", DisplayName="Galadriel", Email="jane@xyz.com", Password="jane1995" }
};
public IConfiguration _configuration;
public AuthController(IConfiguration config)
{
_configuration = config;
}
[HttpPost("login")]
public async Task<IActionResult> Login(LoginRequest request)
{
if (!ModelState.IsValid)
{
return BadRequestErrorMessages();
}
var user = await GetUser(request.Email, request.Password);
if (user != null)
{
//create claims details based on the user information
var claims = new[] {
new Claim(JwtRegisteredClaimNames.Sub, _configuration["token:subject"]),
new Claim(JwtRegisteredClaimNames.Jti, Guid.NewGuid().ToString()),
new Claim(JwtRegisteredClaimNames.Iat, DateTime.UtcNow.ToString()),
new Claim("UserId", user.UserId),
new Claim("UserName", user.UserName),
new Claim("Email", user.Email)
};
//Create Signing Credentials to sign the token
var key = new SymmetricSecurityKey(Encoding.UTF8.GetBytes(_configuration["token:key"]));
var signIn = new SigningCredentials(key, SecurityAlgorithms.HmacSha256);
// Create the token
var token = new JwtSecurityToken(
_configuration["token:issuer"],
_configuration["token:audience"],
claims,
expires: DateTime.UtcNow.AddMinutes(10),
signingCredentials: signIn);
// Serialize the token to a string
var tokenStr = new JwtSecurityTokenHandler().WriteToken(token);
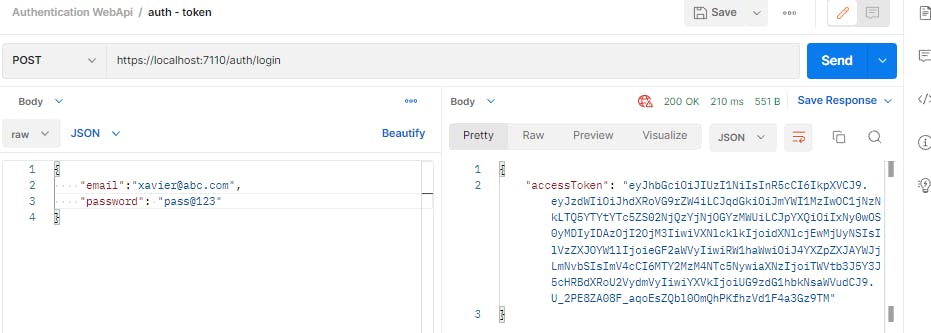
//Add token string to response object and send it back to requestor
var authResponse = new AuthResponse { AccessToken = tokenStr };
return Ok(authResponse);
}
else
{
return BadRequest("Invalid credentials");
}
}
private async Task<User> GetUser(string email, string password)
{
return await Task.FromResult(tempUserDb.FirstOrDefault(u => u.Email == email && u.Password == password));
}
private IActionResult BadRequestErrorMessages()
{
var errMsgs = ModelState.Values.SelectMany(v => v.Errors.Select(e => e.ErrorMessage));
return BadRequest(errMsgs);
}
}
Claims
A claim is a piece of information about a user or the token itself, like their name, email, role, etc. The JwtRegisteredClaimNames class in above code contains constants for the standard claims that are recognized and widely used across various systems that implement JWT.
These constants are often used when creating or validating JWTs to set or extract claims from the token's payload. For example, when you create a JWT, you might use these constants to set the issuer, subject, expiration time, and other relevant claims. When you validate a JWT, you can use these constants to check the validity of claims.
Here are some of the standard claims available in the JwtRegisteredClaimNames class:
Sub: Subject - The subject of the token (usually represents the user).Jti: JWT ID - The unique identifier for the JWT.Iat: Issued At - The timestamp when the JWT was issued.Exp: Expiration Time - The timestamp when the JWT expires.Nbf: Not Before - The timestamp before which the JWT is not valid.Iss: Issuer - The entity that issued the JWT.Aud: Audience - The intended audience for the JWT.NameId: Name ID - The name identifier for the user.AuthTime: Authentication Time - The time when the user was authenticated.GivenName: Given Name - The given name of the user.FamilyName: Family Name - The family name (surname) of the user.Email: Email Address - The email address of the user.Role: Role - The role(s) associated with the user.
SigningCredentials
The SigningCredentials object is used to specify the cryptographic key and algorithm used to sign the JWT (JSON Web Token). The signature is a crucial component of the JWT, as it ensures the integrity and authenticity of the token. Without a valid signature, the contents of the JWT can't be trusted. It takes two main parameters:
Security Key: This is the key used for the cryptographic signing process. The
SymmetricSecurityKeyandAsymmetricSecurityKeyclasses are commonly used to represent the keys. In the code example, thesecretKeyis an instance ofSymmetricSecurityKeythat holds the secret key bytes used for symmetric signing.Signing Algorithm: This specifies the algorithm used to generate the signature. Common algorithms include
SecurityAlgorithms.HmacSha256,SecurityAlgorithms.RsaSha256, etc. The choice of algorithm depends on whether you're using symmetric or asymmetric keys and your security requirements.
5. Add [Authorize] attribute on ArticlesController
using Microsoft.AspNetCore.Authorization;
using Microsoft.AspNetCore.Mvc;

[ApiController]
[Route("[controller]")]
[Authorize]
public class ArticlesController : ControllerBase
{
      //existing code
}
6. Add Authentication middleware
Finally we add the authentication middleware in Program.cs class. This will specify what kind of authentication we want.
The Program.cs file default code looks like this
var builder = WebApplication.CreateBuilder(args);

// Add services to the container.

builder.Services.AddControllers();
// Learn more about configuring Swagger/OpenAPI at https://aka.ms/aspnetcore/swashbuckle
builder.Services.AddEndpointsApiExplorer();
builder.Services.AddSwaggerGen();

var app = builder.Build();

// Configure the HTTP request pipeline.
if (app.Environment.IsDevelopment())
{
    app.UseSwagger();
    app.UseSwaggerUI();
}

app.UseHttpsRedirection();

app.UseAuthorization();

app.MapControllers();

app.Run();
Now we will add the auth middleware at two places
First, at the bottom of the class just above app.UseAuthorization(), we will add
app.UseAuthentication()
Secondly, we will add the auth middleware just below builder.Services.AddControllers()
builder.Services.AddAuthentication(JwtBearerDefaults.AuthenticationScheme).AddJwtBearer(options =>
{
    options.RequireHttpsMetadata = false;
    options.SaveToken = true;
    options.TokenValidationParameters = new TokenValidationParameters()
    {
        ValidateIssuer = true,
        ValidateIssuerSigningKey = true,
        ValidateAudience = true,
        ValidateLifetime = true,
        ValidAudience = builder.Configuration["token:audience"],
        ValidIssuer = builder.Configuration["token:issuer"],
        IssuerSigningKey = new SymmetricSecurityKey(Encoding.UTF8.GetBytes(builder.Configuration["token:key"]))
    };
});
Note that the AddAuthentication method above only configures the authentication services to validate incoming tokens, it doesn't automatically enforce authorization on specific routes or controllers. For that, we have the [Authorize] attribute that we apply to a controller or action endpoint.
The modified Program.cs looks like this
using System.Text;
using Microsoft.AspNetCore.Authentication.JwtBearer;
using Microsoft.IdentityModel.Tokens;

var builder = WebApplication.CreateBuilder(args);

// Add services to the container.

builder.Services.AddControllers();

//Add Authentication middleware
builder.Services.AddAuthentication(JwtBearerDefaults.AuthenticationScheme).AddJwtBearer(options =>
{
    options.RequireHttpsMetadata = false;
    options.SaveToken = true;
    options.TokenValidationParameters = new TokenValidationParameters()
    {
        ValidateIssuer = true,
        ValidateIssuerSigningKey = true,
        ValidateAudience = true,
        ValidateLifetime = true,
        ValidAudience = builder.Configuration["token:audience"],
        ValidIssuer = builder.Configuration["token:issuer"],
        IssuerSigningKey = new SymmetricSecurityKey(Encoding.UTF8.GetBytes(builder.Configuration["token:key"]))
    };
});

// Learn more about configuring Swagger/OpenAPI at https://aka.ms/aspnetcore/swashbuckle
builder.Services.AddEndpointsApiExplorer();
builder.Services.AddSwaggerGen();

var app = builder.Build();

// Configure the HTTP request pipeline.
if (app.Environment.IsDevelopment())
{
    app.UseSwagger();
    app.UseSwaggerUI();
}

app.UseHttpsRedirection();

app.UseAuthentication();
app.UseAuthorization();

app.MapControllers();

app.Run();
You can see this whole project here
Now that our api is secured, we will get a 401 error if we try to run any request.
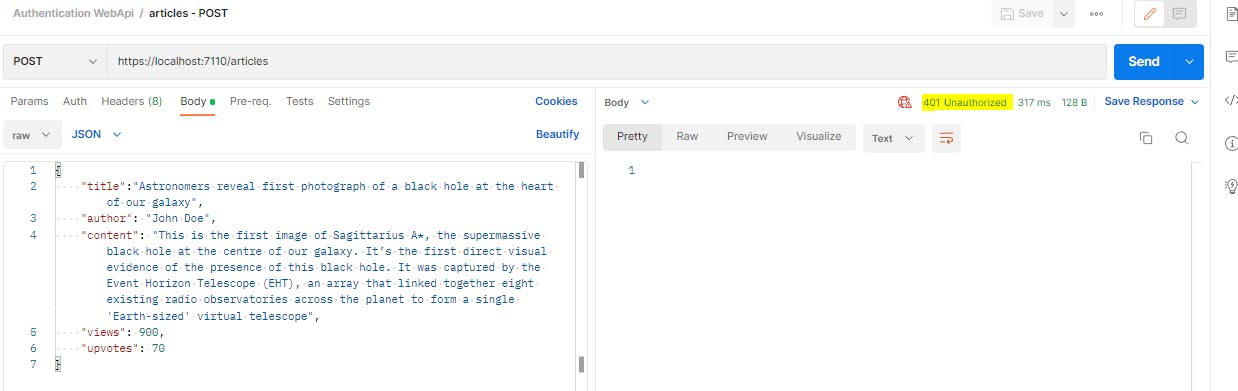
In order to run requests, we would first need to generate an auth token. For that, we will hit the auth endpoint

Now we will provide this auth token from Postman in our normal request.
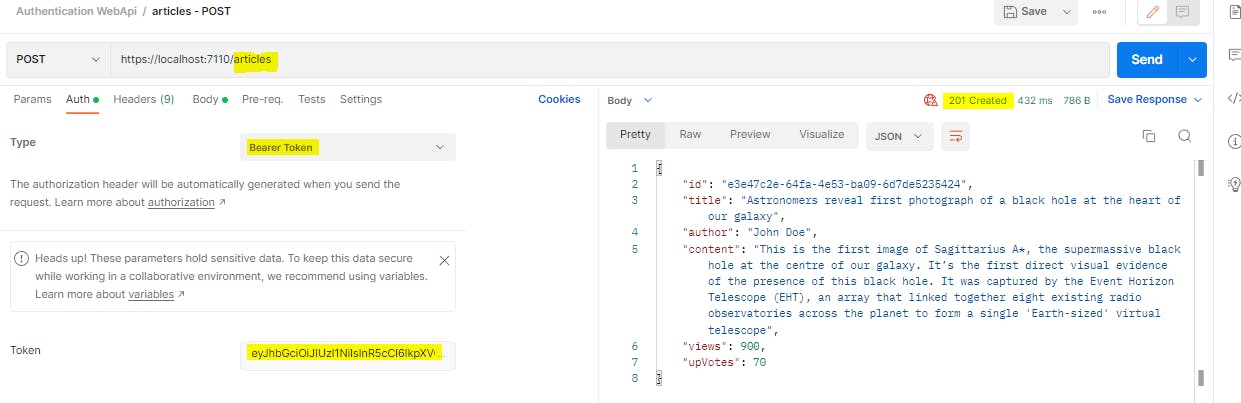
The POST endpoint is now returning 201 response as before.
As a side note, we can see what all information is contained in our token by going to this link - jwt.io
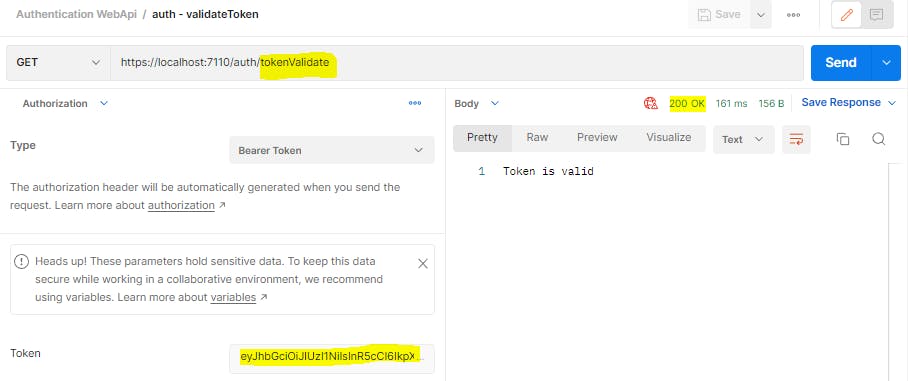
7. Add endpoint to validate a token
Let us now add an endpoint that can validate if a token is valid or not. This endpoint may be used by a requestor to quickly check the validity of a token before sending an actual request.
 [HttpGet("tokenValidate")]
 [Authorize]
 public async Task<IActionResult> TokenValidate()
 {
        //This endpoint is created so any user can validate their token
        return Ok("Token is valid");
 }
We are not doing anything in this endpoint. But because we have added the [Authorize] attribute, this endpoint will authenticate the incoming token and return success only if the token is valid.
8. Add endpoint to register new user
Next we will add a second endpoint to register a new user. We will first create a model class for the incoming registration request
public class RegisterRequest
{
    [Required]
    [EmailAddress]
    public string Email { get; set; }

    [Required]
    [StringLength(50, MinimumLength = 1)]
    public string Username { get; set; }

    [Required]
    [StringLength(50, MinimumLength = 8)]
    public string Password { get; set; }

    [Compare("Password")]
    public string ConfirmPassword { get; set; }
}
Let us now add the endpoint
    [HttpPost("register")]
    public async Task<IActionResult> Register(RegisterRequest registerRequest)
    {
        if (!ModelState.IsValid)
        {
            return BadRequestErrorMessages();
        }

        var isEmailAlreadyRegistered = await GetUserByEmail(registerRequest.Email) != null;

        if(isEmailAlreadyRegistered)
        {
            return Conflict($"Email Id {registerRequest.Email} is already registered.");
        }

        await AddUser( new User{
            Email = registerRequest.Email,
            UserName = registerRequest.Username,
            Password = registerRequest.Password
        });

        return Ok("User created successfully");

    }

    private async Task<User> GetUserByEmail(string email)
    {
        return await Task.FromResult(tempUserDb.FirstOrDefault(u => u.Email == email));
    }

    private async Task<User> AddUser(User newUser)
    {
        newUser.UserId = $"user{DateTime.Now.ToString("hhmmss")}";
        tempUserDb.Add(newUser);
        return newUser;
    }
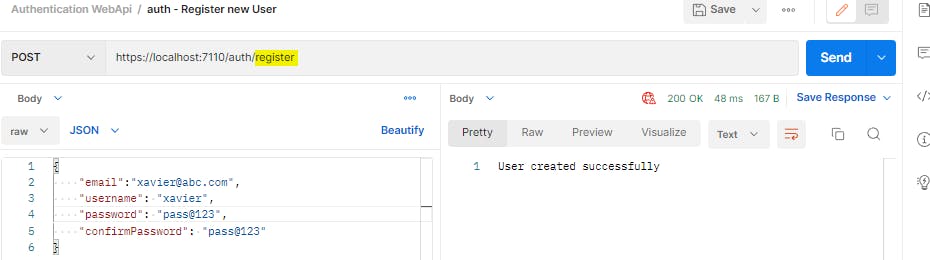
Now if we try to login with this new user id, we will get a token
9. Add endpoint to refresh expired token
Right now we are providing the user with an access token whenever they login with their credentials. However, we should keep a short window of expiry for the token, preferably not more than a few minutes. The reason we keep such a short expiry on access tokens is to avoid their misuse. For example, if a token has a long expiry of, say, 1 month, then an attacker who got hold of our access token somehow, can continue to use this token for up to 1 month. Even if we changed our password, the access token will not be invalidated, as password is not part of an access token. Therefore, keeping token expiry as small as possible is critical to our app's security.
However, this presents another difficulty. If access tokens are so short lived, that means the user needs to enter their credentials every time the token expires, to get a new token. This becomes tedious very quickly and diminishes the user experience.
Here is where a refresh token comes in. A refresh token is provided along with an access token at the time when the user logs in. The user or client app can then store this refresh token for future use. Whenever an access token expires, the user can generate a new access token by providing the refresh token. They need not enter their credentials again.
A refresh token's expiry is usually kept longer than an access token. For example, an access token may be valid only for a few minutes or hours, whereas a refresh token may be valid for many days or months. However, in case the user tries to login after a long time, due to which even the refresh token has also expired, then the only alternative to generate access token is to provide the user credentials once more.
The advantages of using a refresh token may not be immediately apparent when we are connecting to a secured api from Postman, because one way or the other, we have to perform the additional step of providing the refresh token or user credentials to generate a new access token. However, when the same api is being consumed by another application (client), this client app can keep generating new access tokens by using the refresh token, without inconveniencing the end user. The end user will be disturbed only if the refresh token has also expired.
One additional advantage of refresh token is that it can be revoked based on any event such as password change or a security breach. Once a refresh token is revoked, it can no longer be used to generate any more access tokens.
How Refresh tokens work
Initially, a client app hits the
/auth/loginendpoint of our web api and logs in with a userId and password, getting an access token and a refresh token in response. Our api also saves this refresh token in the database.The client app then uses this access token repeatedly for any subsequent calls to a protected resource on our api
Once an access token has expired, our api returns 401 unauthorized response for any incoming requests from the client.
At this point, the client hits the
/auth/refreshendpoint of our api and provides the refresh token. Our api validates the refresh token, and responds with a new set of access token and refresh token. The new refresh token replaces the old one in database as well.At any point, if the client app wants to revoke a refresh token, it can hit the
/auth/revokeendpoint of our api and provide the refresh token in request. Our api will remove this refresh token from the database.
Advantages of refresh token
Refresh token removes the need for the user to enter their credentials frequently to get new access token. As long as refresh token is valid and unexpired, a client app can use it to generate as many access tokens as needed.
Refresh tokens can be revoked based on any event such as password change or if anything goes wrong. A revoked refresh token cannot be used anymore for generating access tokens.
Steps for adding refresh token Below are the steps we will have to take to add refresh token capability to our app
Add config for refresh token
Add refresh token in login response
Add new
refreshendpoint to get new access token based on refresh tokenAdd new
revokeendpoint to revoke a refresh token
1. Add config for refresh token
Currently our appsettings file looks like this
{
  "token": {
    "key": "TWVtb3J5Q3J5cHQ=",
    "issuer": "MemorycryptAuthServer",
    "audience": "PostmanClient",
    "subject": "authToken"
  },
  "Logging": {
    "LogLevel": {
      "Default": "Information",
      "Microsoft.AspNetCore": "Warning"
    }
  },
  "AllowedHosts": "*"
}
We will add the expiry time for access key (up until now, we had hardcoded the access token expiry in our code).
{
  "token": {
    "key": "TWVtb3J5Q3J5cHQ=",
    "accessTokenExpiryMinutes": 1,
    "issuer": "MemorycryptAuthServer",
    "audience": "PostmanClient",
    "subject": "authToken"
  },
  "Logging": {
    "LogLevel": {
      "Default": "Information",
      "Microsoft.AspNetCore": "Warning"
    }
  },
  "AllowedHosts": "*"
}
We will now need to make minor changes in the existing login endpoint, by providing an expiry for the access token as per our new config.
[HttpPost("login")]
public async Task<IActionResult> Login(LoginRequest request)
{
    . . .
    var token = new JwtSecurityToken(
      . . .
      expires: DateTime.UtcNow.AddMinutes(Convert.ToDouble(_configuration["token:accessTokenExpiryMinutes"])),
      . . .
      );

    . . .
}
2. Add refresh token in login response Currently, our auth response looks like this
public class AuthResponse
{
    public string AccessToken { get; set; }
}
Let us add a second property named RefreshToken
public class AuthResponse
{
    public string AccessToken { get; set; }
    public string RefreshToken { get; set; }
}
Let us also add a RefreshToken property in our User class, so that we can save the refresh token for our users
public class User
{
    public string UserId { get; set; }
    public string UserName { get; set; }
    public string DisplayName { get; set; }
    public string Email { get; set; }
    public string Password { get; set; }
    public string MobileNumber { get; set; }
    public DateTime? DateOfBirth { get; set; }
    public string Address { get; set; }
    public string City { get; set; }
    public string State { get; set; }
    public string Country { get; set; }
    public string RefreshToken { get; set; }  //Refresh token for this user
}
Next, in our AuthController, let's generate and add the refresh token in our login endpoint. The refresh token can be a random Base64 string - it need not be a JWT token. Before sending the refresh token, we also save it in our temp user database.
[HttpPost("login")]
public async Task<IActionResult> Login(LoginRequest request)
{
. . .
var refreshTokenStr = GetRefreshToken();
user.RefreshToken = refreshTokenStr;
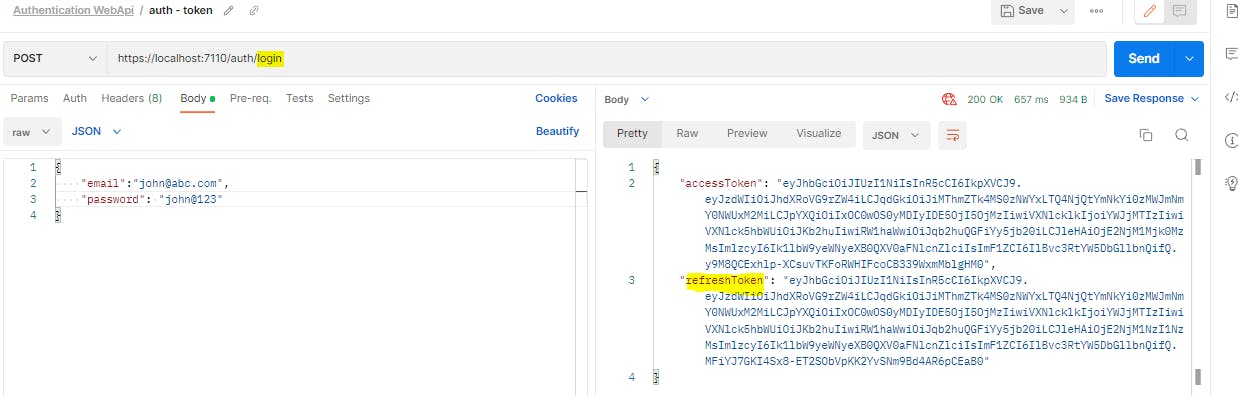
var authResponse = new AuthResponse { AccessToken = tokenStr, RefreshToken = refreshTokenStr };
. . .
}
private string GetRefreshToken()
{
var token = Convert.ToBase64String(RandomNumberGenerator.GetBytes(64));
// ensure token is unique by checking against db
var tokenIsUnique = !tempUserDb.Any(u => u.RefreshToken == token);
if (!tokenIsUnique)
return GetRefreshToken(); //recursive call
return token;
}
Now, whenever user requests oauth token, they will also get refresh token in the same response.
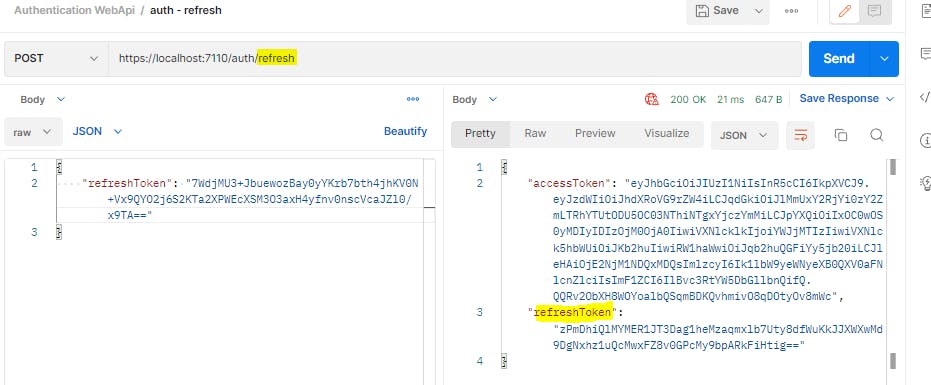
3. Add new refresh endpoint to get access token based on refresh token
The final step is to add a refresh endpoint in the AuthController so that whenever this endpoint is called, we provide a new access token, along with a new refresh token.
public class RefreshRequest
{
    [Required]
    public string RefreshToken { get; set; }
}
Next, we add the new refresh endpoint
[HttpPost("refresh")]
public async Task<IActionResult> Refresh(RefreshRequest request)
{
        if (!ModelState.IsValid)
        {
            return BadRequestErrorMessages();
        }

        //check if any user with this refresh token exists
        var user = await GetUserByRefreshToken(request.RefreshToken);
        if(user==null)
        {
            return BadRequest("Invalid refresh token");
        }

        //provide new access and refresh tokens
        var response = await GetTokens(user);
        return Ok(response);
}

private async Task<AuthResponse> GetTokens(User user)
{
            //create claims details based on the user information
            var claims = new[] {
                        new Claim(JwtRegisteredClaimNames.Sub, _configuration["token:subject"]),
                        new Claim(JwtRegisteredClaimNames.Jti, Guid.NewGuid().ToString()),
                        new Claim(JwtRegisteredClaimNames.Iat, DateTime.UtcNow.ToString()),
                        new Claim("UserId", user.UserId),
                        new Claim("UserName", user.UserName),
                        new Claim("Email", user.Email)
                    };

            var key = new SymmetricSecurityKey(Encoding.UTF8.GetBytes(_configuration["token:key"]));
            var signIn = new SigningCredentials(key, SecurityAlgorithms.HmacSha256);
            var token = new JwtSecurityToken(
                _configuration["token:issuer"],
                _configuration["token:audience"],
                claims,
                expires: DateTime.UtcNow.AddMinutes(Convert.ToDouble(_configuration["token:accessTokenExpiryMinutes"])),
                signingCredentials: signIn);
            var tokenStr = new JwtSecurityTokenHandler().WriteToken(token);

            var refreshTokenStr = GetRefreshToken();
            user.RefreshToken = refreshTokenStr;
            var authResponse = new AuthResponse { AccessToken = tokenStr, RefreshToken = refreshTokenStr };
            return await Task.FromResult(authResponse);
}
Note that the GetTokens() function can be used by our login endpoint as well, since the logic is pretty much the same. So we have refactored our login endpoint as well.
[HttpPost("login")]
public async Task<IActionResult> Login(LoginRequest request)
{
        if (!ModelState.IsValid)
        {
            return BadRequestErrorMessages();
        }

        var user = await GetUser(request.Email, request.Password);

        if (user != null)
        {
            var authResponse = await GetTokens(user);
            return Ok(authResponse);
        }
        else
        {
            return BadRequest("Invalid credentials");
        }

}
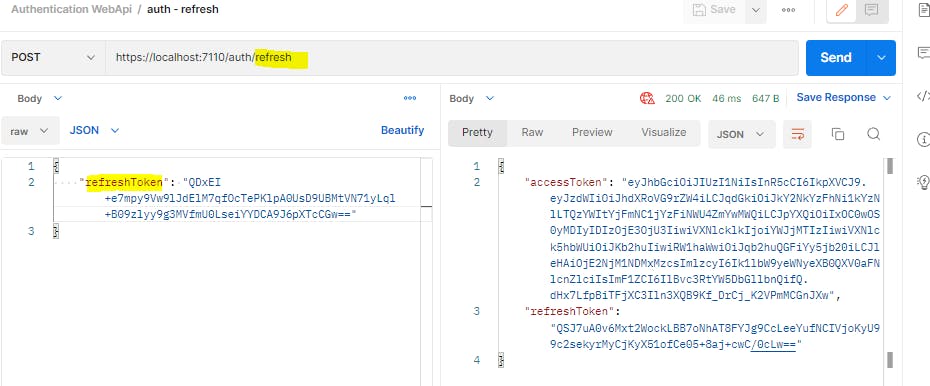
Our refresh endpoint is now ready. Whenever a user's access token expires, they can request a new one like shown below.
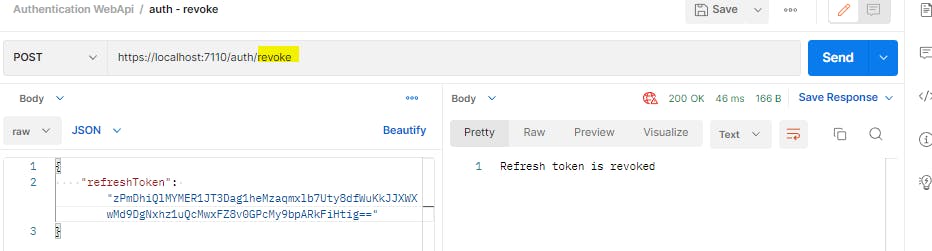
4. Add new revoke endpoint to revoke a refresh token
Let us add a revoke endpoint to invalidate a refresh token. The user or client may use this option if their account is compromised or if they have changed their password.
We will create a new model class for Revoke request.
public class RevokeRequest
{
        [Required]
        public string RefreshToken { get; set; }
}
Next, we add the endpoint for revoking a refresh token
[HttpPost("revoke")]
public async Task<IActionResult> Revoke(RevokeRequest request)
{
        if (!ModelState.IsValid)
        {
            return BadRequestErrorMessages();
        }

        //check if any user with this refresh token exists
        var user = await GetUserByRefreshToken(request.RefreshToken);
        if(user==null)
        {
            return BadRequest("Invalid refresh token");
        }

        //remove refresh token
        user.RefreshToken = null;

        return Ok("Refresh token is revoked");
}
Let us try the revoke endpoint. First we login to get our access token and refresh token
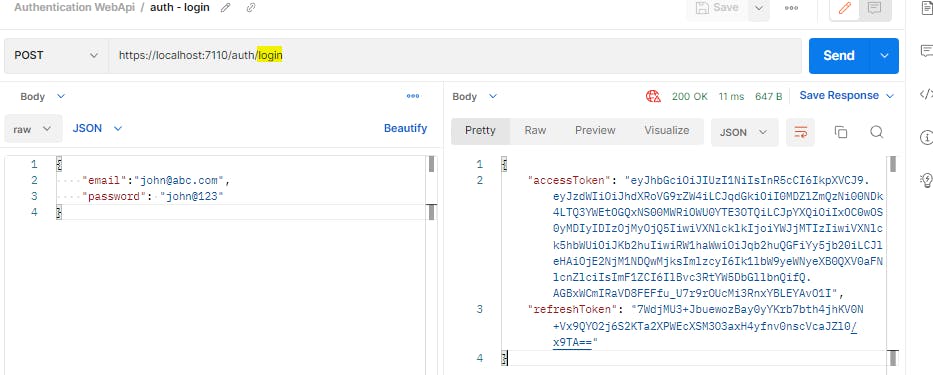
We can use the access token to fetch the articles
Now, let us refresh our token.
It works. Now let us revoke the latest refresh token
If now we try to get new tokens using this revoked refresh token, we will get an error
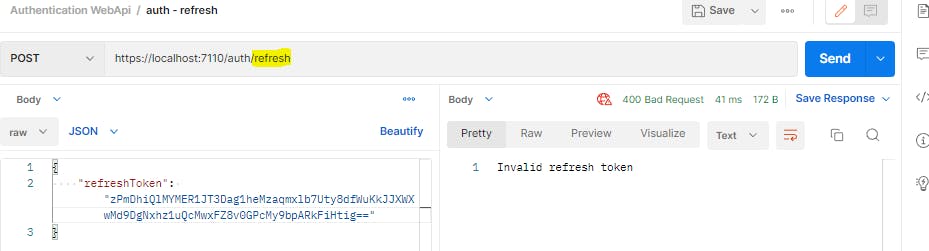
The only way at this point is to start from the top i.e. user needs to login with their credentials to get a new set of access and refresh tokens.
3. Add Identity and Database
Now that our authentication is up and running, let us replace the in-memory objects with a real database. The .NET framework provides a ready to use solution called Identity framework to integrate the authentication logic with database. However, Identity performs a host of other tasks, as we can see from this definition from Microsoft website -
ASP.NET Core Identity is a membership system which allows you to add login functionality to your application. Users can create an account and login with a username and password, or they can use an external login provider such as Facebook, Google, Microsoft Account, Twitter and more.
The Identity framework requires specific tables to be created in SQL Server to store users, roles, claims and their relationships. We can create these tables in code first or database first approach, whichever is more convenient. Once the tables are in place, we use Entity Framework to map these tables to C# classes and use them for authentication.
It is not mandatory to use Identity for authentication, we can pretty much code our own authentication logic. However, if we are creating the authentication logic from scratch and we want all the bells and whistels like support for roles, profiles, 3rd party logins and more, then outsourcing the heavy-lifting to Identity framework allows us to quickly get our authentication logic running.
Here, we will be following the database-first approach to setup Identity objects in SQL Server. This is because in most real-life scenarios, applications should not add or remove tables directly in database, for security and maintainability reasons. Additionally, code-first approach is slightly more complex, as it requires any changes to table structure to be stored as a migration in our project, with lot of boilerplate code added with each migration.
We will generate SQL scripts for creating the Identity tables. These scripts can then be executed in SQL Server and stored for later use in case we want to create the same tables in higher environments like QA, UAT, and Prod.
Below are the steps we will be following for adding Identity to our project.
Add Identity tables in SQL Server
Add Identity Framework in your application
Add db context for articles table
1. Add Identity tables in SQL Server
We will create a dummy webapi application to create the tables in code-first approach. Once the tables are created, we will go back to our main application and use DB-First approach to import these tables in our app.
Step 1. Open VS Code and create a new web api application
Run the below command in VS Code Teminal
dotnet new webapi

A new WebApi project will be created
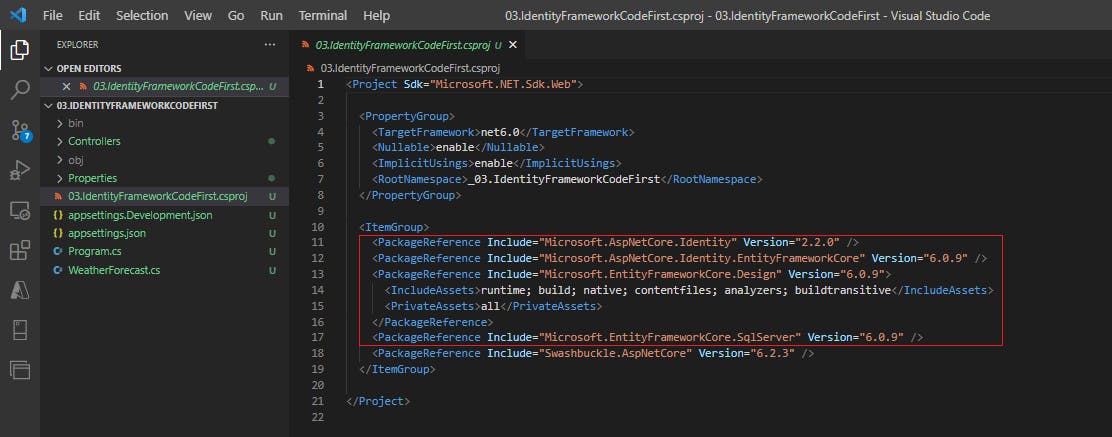
Step 2. Install Nuget packages to support Identity and Entity Framework
Need to install below 4 packages
Microsoft.AspNetCore.Identity
Microsoft.AspNetCore.Identity.EntityFrameworkCore
Microsoft.EntityFrameworkCore.Design
Microsoft.EntityFrameworkCore.SqlServer
Go to Terminal and add the below commands one by one
dotnet add package Microsoft.AspNetCore.Identity
dotnet add package Microsoft.AspNetCore.Identity.EntityFrameworkCore
dotnet add package Microsoft.EntityFrameworkCore.Design
dotnet add package Microsoft.EntityFrameworkCore.SqlServer
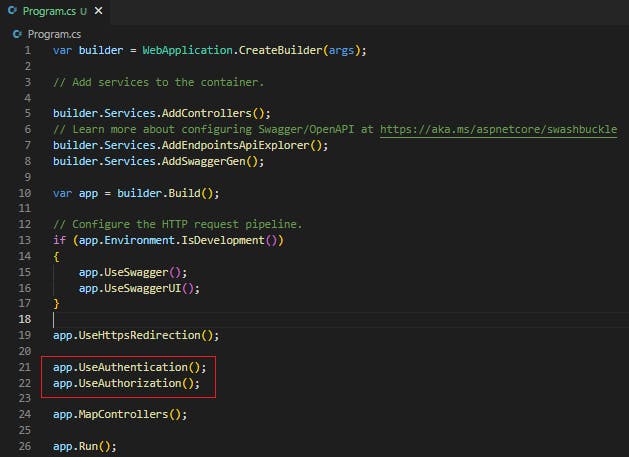
Step 3. Add authentication middleware
Go to Program.cs and add the bare minimum authentication middleware by adding below two lines
app.UseAuthentication();
app.UseAuthorization();
Step 4. Add AppUser class
Add a class in Models folder that inherits from IdentityUser class. Let us call this class AppUser. The IdentityUser class is defined under Microsoft.AspNetCore.Identity namespace.
using Microsoft.AspNetCore.Identity;

public class AppUser : IdentityUser
{

}
The built-in IdentityUser class contains all the usual fields relevant to a user.
public class IdentityUser : IdentityUser<string>
{
       public IdentityUser();
        public IdentityUser(string userName);
}
public class IdentityUser<TKey> where TKey : IEquatable<TKey>
{
        public IdentityUser();
        public IdentityUser(string userName);

        public virtual DateTimeOffset? LockoutEnd { get; set; }
        [PersonalData]
        public virtual bool TwoFactorEnabled { get; set; }
        [PersonalData]
        public virtual bool PhoneNumberConfirmed { get; set; }
        [ProtectedPersonalData]
        public virtual string PhoneNumber { get; set; }
        public virtual string ConcurrencyStamp { get; set; }
        public virtual string SecurityStamp { get; set; }
        public virtual string PasswordHash { get; set; }
        [PersonalData]
        public virtual bool EmailConfirmed { get; set; }
        public virtual string NormalizedEmail { get; set; }
        [ProtectedPersonalData]
        public virtual string Email { get; set; }
        public virtual string NormalizedUserName { get; set; }
        [ProtectedPersonalData]
        public virtual string UserName { get; set; }
        [PersonalData]
        public virtual TKey Id { get; set; }
        public virtual bool LockoutEnabled { get; set; }
        public virtual int AccessFailedCount { get; set; }
        public override string ToString();
}
If there are any properties missing, we can add them in our AppUser class. Let us compare the IdentityUser class with our User class that we created in our main application.
public class User
{
    public string UserId { get; set; }
    public string UserName { get; set; }
    public string DisplayName { get; set; }
    public string Email { get; set; }
    public string Password { get; set; }
    public string MobileNumber { get; set; }
    public DateTime? DateOfBirth { get; set; }
    public string Address { get; set; }
    public string City { get; set; }
    public string State { get; set; }
    public string Country { get; set; }
    public string RefreshToken { get; set; }
}
We can see that few of the fields are missing in IdentityUser class, so let us add these missing properties in our AppUser class.
public class AppUser : IdentityUser
{
    public string DisplayName { get; set; }
    public DateTime? DateOfBirth { get; set; }
    public string Address1 { get; set; }
    public string Address { get; set; }
    public string City { get; set; }
    public string State { get; set; }
    public string Country { get; set; }
    public string RefreshToken { get; set; }
}
Step 5. Add Database Context for Identity tables
Add a class 'AuthDbContext' in Models folder, inheriting from IdentityDbContext<T> class, where T is going to be our AppUser class. The IdentityDbContext class is defined in Microsoft.AspNetCore.Identity.EntityFrameworkCore namespace.
using Microsoft.AspNetCore.Identity.EntityFrameworkCore;
using Microsoft.EntityFrameworkCore;

public class AuthDbContext : IdentityDbContext<AppUser>
{
    public AuthDbContext(DbContextOptions<AuthDbContext> options):base(options)
    {

    }
}
Now let's register this AuthDbContext class in Program.cs
//add auth db context
builder.Services.AddDbContext<AuthDbContext>(options => options.UseSqlServer(builder.Configuration["ConnectionStrings:DefaultConnection"]));
builder.Services.AddIdentity<AppUser, IdentityRole>().AddEntityFrameworkStores<AuthDbContext>().AddDefaultTokenProviders();
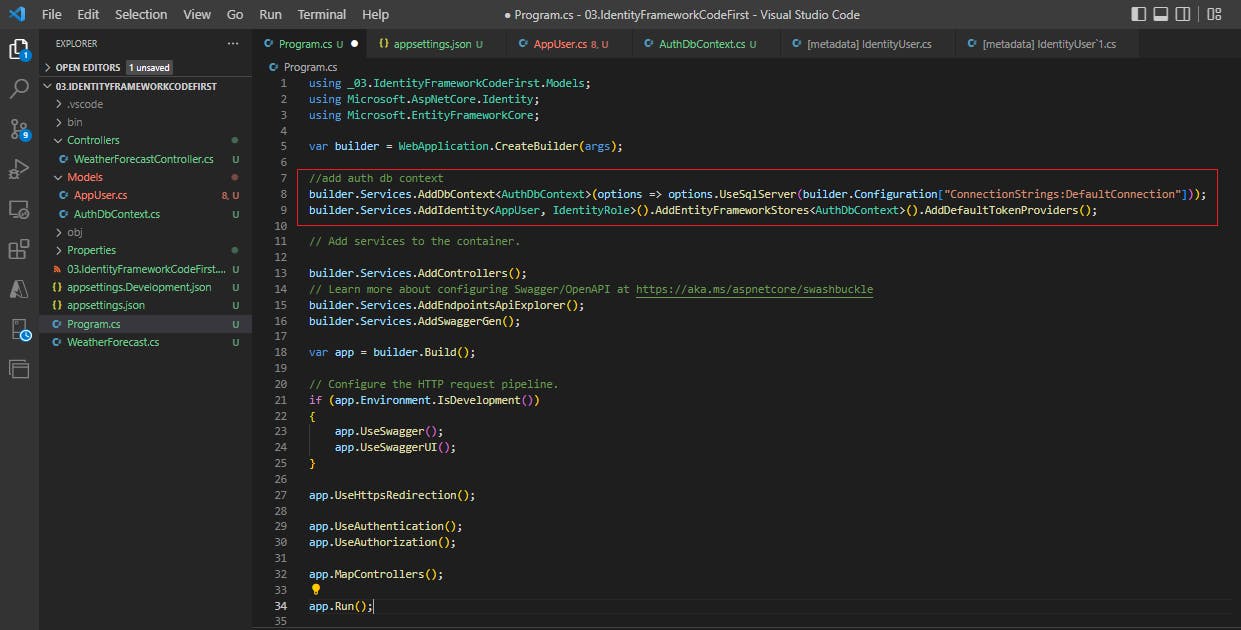
We need to add the connection string in our appsettings.json file, so that the configuration code above can fetch it.
"ConnectionStrings": {
    "DefaultConnection": "Server=localhost\\SQLEXPRESS;Database=MemoryCrypt;Trusted_Connection=True;"
  }
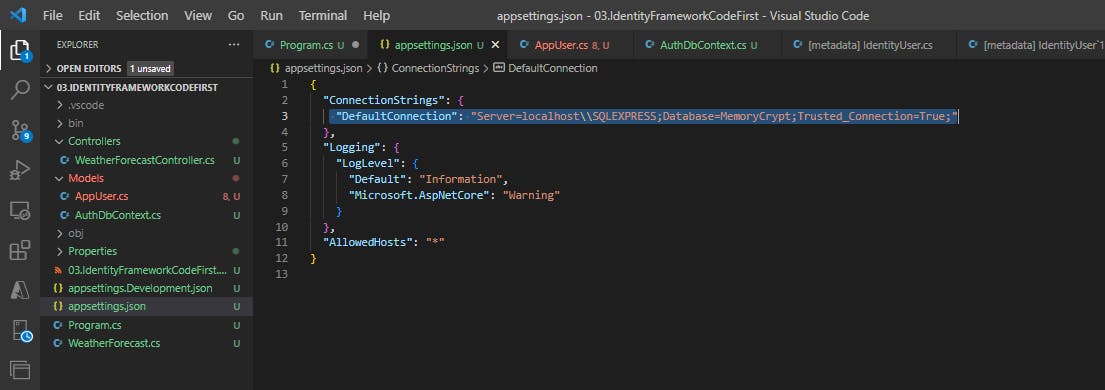
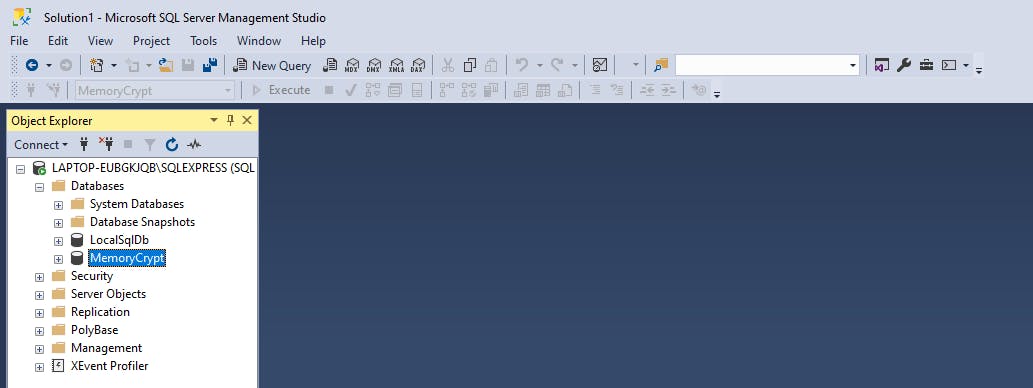
I am connecting to the MemoryCrypt database that I have created in SQL Server.
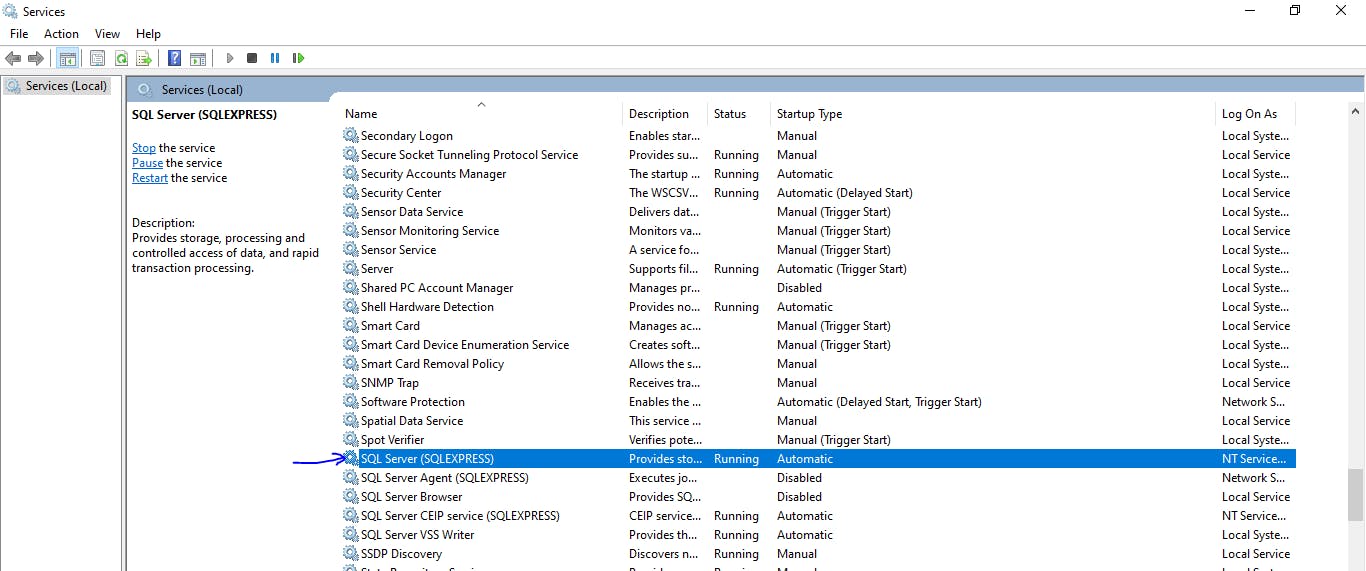
Side note: If you see an error like this A network-related or instance-specific error occurred while establishing a connection to SQL Server. The server was not found or was not accessible. Verify that the instance name is correct and that SQL Server is configured to allow remote connections. (provider: SQL Network Interfaces, error: 26 - Error Locating Server/Instance Specified) (Microsoft SQL Server, Error: -1) For help, click: go.microsoft.com/fwlink?ProdName=Microsoft%..
To fix this, you need to make sure that the SQL Service is showing status as running. In my case, the service name is SQL Server (SQLEXPRESS).
Step 6. Add Code First EF migrations
- Run the below command in Terminal
dotnet tool install --global dotnet-ef
- Make sure that your terminal is currently in the folder csproj file is located, and run this command
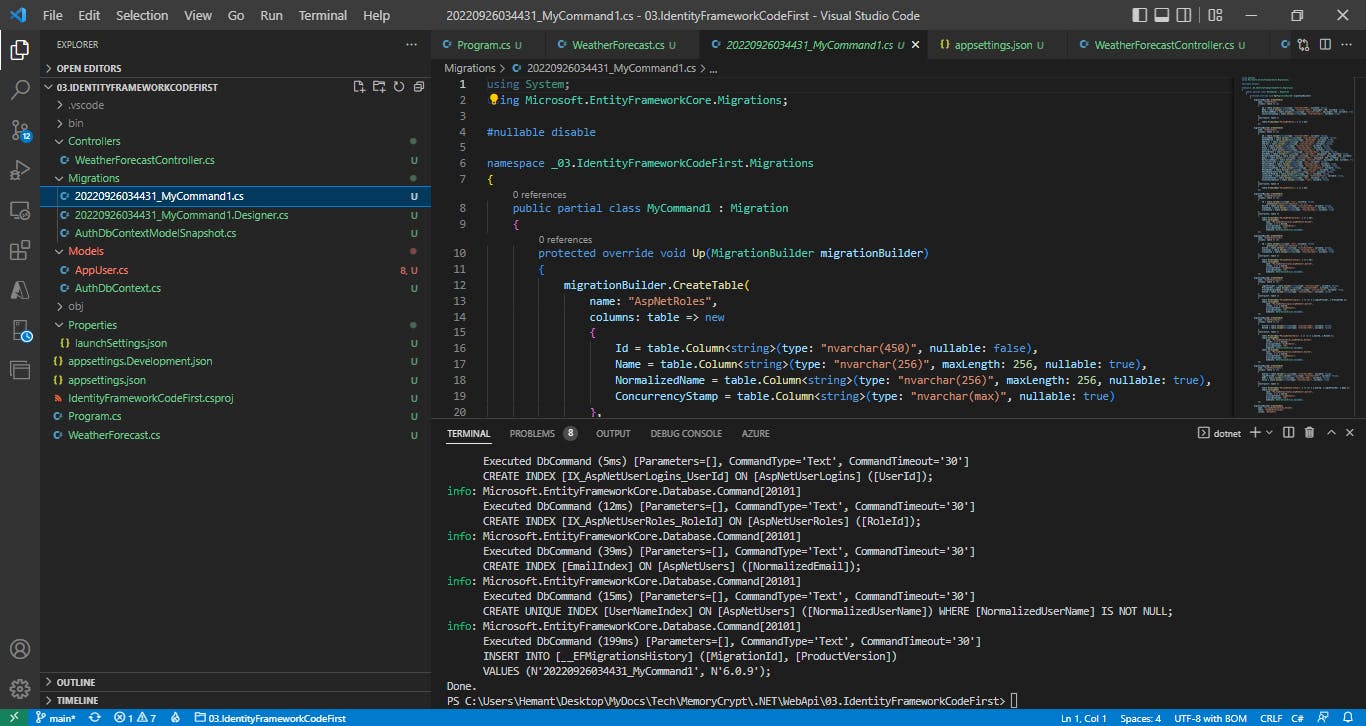
dotnet ef migrations add MyCommand1
This will create the scripts that are needed to create the required tables in database
Next, we execute the below command to add the tables in teh database
dotnet ef database update
Below is the output we see
PS C:\Users\Hemant\Desktop\MyDocs\Tech\MemoryCrypt\.NET\WebApi\03.IdentityFrameworkCodeFirst> dotnet tool install --global dotnet-ef
You can invoke the tool using the following command: dotnet-ef
Tool 'dotnet-ef' (version '6.0.9') was successfully installed.
PS C:\Users\Hemant\Desktop\MyDocs\Tech\MemoryCrypt\.NET\WebApi\03.IdentityFrameworkCodeFirst> dotnet ef migrations add MyCommand1
Build started...
Build succeeded.
info: Microsoft.EntityFrameworkCore.Infrastructure[10403]
      Entity Framework Core 6.0.9 initialized 'AuthDbContext' using provider 'Microsoft.EntityFrameworkCore.SqlServer:6.0.9' with options: None
Done. To undo this action, use 'ef migrations remove'
PS C:\Users\Hemant\Desktop\MyDocs\Tech\MemoryCrypt\.NET\WebApi\03.IdentityFrameworkCodeFirst> dotnet ef database update
Build started...
Build succeeded.
info: Microsoft.EntityFrameworkCore.Infrastructure[10403]
      Entity Framework Core 6.0.9 initialized 'AuthDbContext' using provider 'Microsoft.EntityFrameworkCore.SqlServer:6.0.9' with options: None
info: Microsoft.EntityFrameworkCore.Database.Command[20101]
      Executed DbCommand (31ms) [Parameters=[], CommandType='Text', CommandTimeout='30']
      SELECT 1
info: Microsoft.EntityFrameworkCore.Database.Command[20101]
      Executed DbCommand (26ms) [Parameters=[], CommandType='Text', CommandTimeout='30']
      SELECT OBJECT_ID(N'[__EFMigrationsHistory]');
info: Microsoft.EntityFrameworkCore.Database.Command[20101]
      Executed DbCommand (80ms) [Parameters=[], CommandType='Text', CommandTimeout='30']
      SELECT 1
info: Microsoft.EntityFrameworkCore.Database.Command[20101]
      Executed DbCommand (164ms) [Parameters=[], CommandType='Text', CommandTimeout='30']
      CREATE TABLE [__EFMigrationsHistory] (
          [MigrationId] nvarchar(150) NOT NULL,
          [ProductVersion] nvarchar(32) NOT NULL,
          CONSTRAINT [PK___EFMigrationsHistory] PRIMARY KEY ([MigrationId])
      );
info: Microsoft.EntityFrameworkCore.Database.Command[20101]
      Executed DbCommand (5ms) [Parameters=[], CommandType='Text', CommandTimeout='30']
      SELECT 1
info: Microsoft.EntityFrameworkCore.Database.Command[20101]
      Executed DbCommand (9ms) [Parameters=[], CommandType='Text', CommandTimeout='30']
      SELECT OBJECT_ID(N'[__EFMigrationsHistory]');
info: Microsoft.EntityFrameworkCore.Database.Command[20101]
      Executed DbCommand (58ms) [Parameters=[], CommandType='Text', CommandTimeout='30']
      SELECT [MigrationId], [ProductVersion]
      FROM [__EFMigrationsHistory]
      ORDER BY [MigrationId];
info: Microsoft.EntityFrameworkCore.Migrations[20402]
      Applying migration '20220926034431_MyCommand1'.
Applying migration '20220926034431_MyCommand1'.
info: Microsoft.EntityFrameworkCore.Database.Command[20101]
      Executed DbCommand (84ms) [Parameters=[], CommandType='Text', CommandTimeout='30']
      CREATE TABLE [AspNetRoles] (
          [Id] nvarchar(450) NOT NULL,
          [Name] nvarchar(256) NULL,
          [NormalizedName] nvarchar(256) NULL,
          [ConcurrencyStamp] nvarchar(max) NULL,
          CONSTRAINT [PK_AspNetRoles] PRIMARY KEY ([Id])
      );
info: Microsoft.EntityFrameworkCore.Database.Command[20101]
      Executed DbCommand (28ms) [Parameters=[], CommandType='Text', CommandTimeout='30']
      CREATE TABLE [AspNetUsers] (
          [Id] nvarchar(450) NOT NULL,
          [DisplayName] nvarchar(max) NOT NULL,
          [DateOfBirth] datetime2 NULL,
          [Address1] nvarchar(max) NOT NULL,
          [Address] nvarchar(max) NOT NULL,
          [City] nvarchar(max) NOT NULL,
          [State] nvarchar(max) NOT NULL,
          [Country] nvarchar(max) NOT NULL,
          [RefreshToken] nvarchar(max) NOT NULL,
          [UserName] nvarchar(256) NULL,
          [NormalizedUserName] nvarchar(256) NULL,
          [Email] nvarchar(256) NULL,
          [NormalizedEmail] nvarchar(256) NULL,
          [EmailConfirmed] bit NOT NULL,
          [PasswordHash] nvarchar(max) NULL,
          [SecurityStamp] nvarchar(max) NULL,
          [ConcurrencyStamp] nvarchar(max) NULL,
          [PhoneNumber] nvarchar(max) NULL,
          [PhoneNumberConfirmed] bit NOT NULL,
          [TwoFactorEnabled] bit NOT NULL,
          [LockoutEnd] datetimeoffset NULL,
          [LockoutEnabled] bit NOT NULL,
          [AccessFailedCount] int NOT NULL,
          CONSTRAINT [PK_AspNetUsers] PRIMARY KEY ([Id])
      );
info: Microsoft.EntityFrameworkCore.Database.Command[20101]
      Executed DbCommand (90ms) [Parameters=[], CommandType='Text', CommandTimeout='30']
      CREATE TABLE [AspNetRoleClaims] (
          [Id] int NOT NULL IDENTITY,
          [RoleId] nvarchar(450) NOT NULL,
          [ClaimType] nvarchar(max) NULL,
          [ClaimValue] nvarchar(max) NULL,
          CONSTRAINT [PK_AspNetRoleClaims] PRIMARY KEY ([Id]),
          CONSTRAINT [FK_AspNetRoleClaims_AspNetRoles_RoleId] FOREIGN KEY ([RoleId]) REFERENCES [AspNetRoles] ([Id]) ON DELETE CASCADE
      );
info: Microsoft.EntityFrameworkCore.Database.Command[20101]
      Executed DbCommand (9ms) [Parameters=[], CommandType='Text', CommandTimeout='30']
      CREATE TABLE [AspNetUserClaims] (
          [Id] int NOT NULL IDENTITY,
          [UserId] nvarchar(450) NOT NULL,
          [ClaimType] nvarchar(max) NULL,
          [ClaimValue] nvarchar(max) NULL,
          CONSTRAINT [PK_AspNetUserClaims] PRIMARY KEY ([Id]),
          CONSTRAINT [FK_AspNetUserClaims_AspNetUsers_UserId] FOREIGN KEY ([UserId]) REFERENCES [AspNetUsers] ([Id]) ON DELETE CASCADE
      );
info: Microsoft.EntityFrameworkCore.Database.Command[20101]
      Executed DbCommand (71ms) [Parameters=[], CommandType='Text', CommandTimeout='30']
      CREATE TABLE [AspNetUserLogins] (
          [LoginProvider] nvarchar(450) NOT NULL,
          [ProviderKey] nvarchar(450) NOT NULL,
          [ProviderDisplayName] nvarchar(max) NULL,
          [UserId] nvarchar(450) NOT NULL,
          CONSTRAINT [PK_AspNetUserLogins] PRIMARY KEY ([LoginProvider], [ProviderKey]),
          CONSTRAINT [FK_AspNetUserLogins_AspNetUsers_UserId] FOREIGN KEY ([UserId]) REFERENCES [AspNetUsers] ([Id]) ON DELETE CASCADE
      );
info: Microsoft.EntityFrameworkCore.Database.Command[20101]
      Executed DbCommand (19ms) [Parameters=[], CommandType='Text', CommandTimeout='30']
      CREATE TABLE [AspNetUserRoles] (
          [UserId] nvarchar(450) NOT NULL,
          [RoleId] nvarchar(450) NOT NULL,
          CONSTRAINT [PK_AspNetUserRoles] PRIMARY KEY ([UserId], [RoleId]),
          CONSTRAINT [FK_AspNetUserRoles_AspNetRoles_RoleId] FOREIGN KEY ([RoleId]) REFERENCES [AspNetRoles] ([Id]) ON DELETE CASCADE,
          CONSTRAINT [FK_AspNetUserRoles_AspNetUsers_UserId] FOREIGN KEY ([UserId]) REFERENCES [AspNetUsers] ([Id]) ON DELETE CASCADE
      );
info: Microsoft.EntityFrameworkCore.Database.Command[20101]
      Executed DbCommand (6ms) [Parameters=[], CommandType='Text', CommandTimeout='30']
      CREATE TABLE [AspNetUserTokens] (
          [UserId] nvarchar(450) NOT NULL,
          [LoginProvider] nvarchar(450) NOT NULL,
          [Name] nvarchar(450) NOT NULL,
          [Value] nvarchar(max) NULL,
          CONSTRAINT [PK_AspNetUserTokens] PRIMARY KEY ([UserId], [LoginProvider], [Name]),
          CONSTRAINT [FK_AspNetUserTokens_AspNetUsers_UserId] FOREIGN KEY ([UserId]) REFERENCES [AspNetUsers] ([Id]) ON DELETE CASCADE
      );
info: Microsoft.EntityFrameworkCore.Database.Command[20101]
      Executed DbCommand (224ms) [Parameters=[], CommandType='Text', CommandTimeout='30']
      CREATE INDEX [IX_AspNetRoleClaims_RoleId] ON [AspNetRoleClaims] ([RoleId]);
info: Microsoft.EntityFrameworkCore.Database.Command[20101]
      Executed DbCommand (19ms) [Parameters=[], CommandType='Text', CommandTimeout='30']
      CREATE UNIQUE INDEX [RoleNameIndex] ON [AspNetRoles] ([NormalizedName]) WHERE [NormalizedName] IS NOT NULL;
info: Microsoft.EntityFrameworkCore.Database.Command[20101]
      Executed DbCommand (4ms) [Parameters=[], CommandType='Text', CommandTimeout='30']
      CREATE INDEX [IX_AspNetUserClaims_UserId] ON [AspNetUserClaims] ([UserId]);
info: Microsoft.EntityFrameworkCore.Database.Command[20101]
      Executed DbCommand (5ms) [Parameters=[], CommandType='Text', CommandTimeout='30']
      CREATE INDEX [IX_AspNetUserLogins_UserId] ON [AspNetUserLogins] ([UserId]);
info: Microsoft.EntityFrameworkCore.Database.Command[20101]
      Executed DbCommand (12ms) [Parameters=[], CommandType='Text', CommandTimeout='30']
      CREATE INDEX [IX_AspNetUserRoles_RoleId] ON [AspNetUserRoles] ([RoleId]);
info: Microsoft.EntityFrameworkCore.Database.Command[20101]
      Executed DbCommand (39ms) [Parameters=[], CommandType='Text', CommandTimeout='30']
      CREATE INDEX [EmailIndex] ON [AspNetUsers] ([NormalizedEmail]);
info: Microsoft.EntityFrameworkCore.Database.Command[20101]
      Executed DbCommand (15ms) [Parameters=[], CommandType='Text', CommandTimeout='30']
      CREATE UNIQUE INDEX [UserNameIndex] ON [AspNetUsers] ([NormalizedUserName]) WHERE [NormalizedUserName] IS NOT NULL;
info: Microsoft.EntityFrameworkCore.Database.Command[20101]
      Executed DbCommand (199ms) [Parameters=[], CommandType='Text', CommandTimeout='30']
      INSERT INTO [__EFMigrationsHistory] ([MigrationId], [ProductVersion])
      VALUES (N'20220926034431_MyCommand1', N'6.0.9');
Done.
PS C:\Users\Hemant\Desktop\MyDocs\Tech\MemoryCrypt\.NET\WebApi\03.IdentityFrameworkCodeFirst>
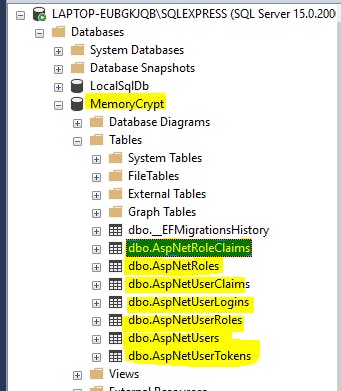
If we now check our database in SSMS, we should see the tables created.
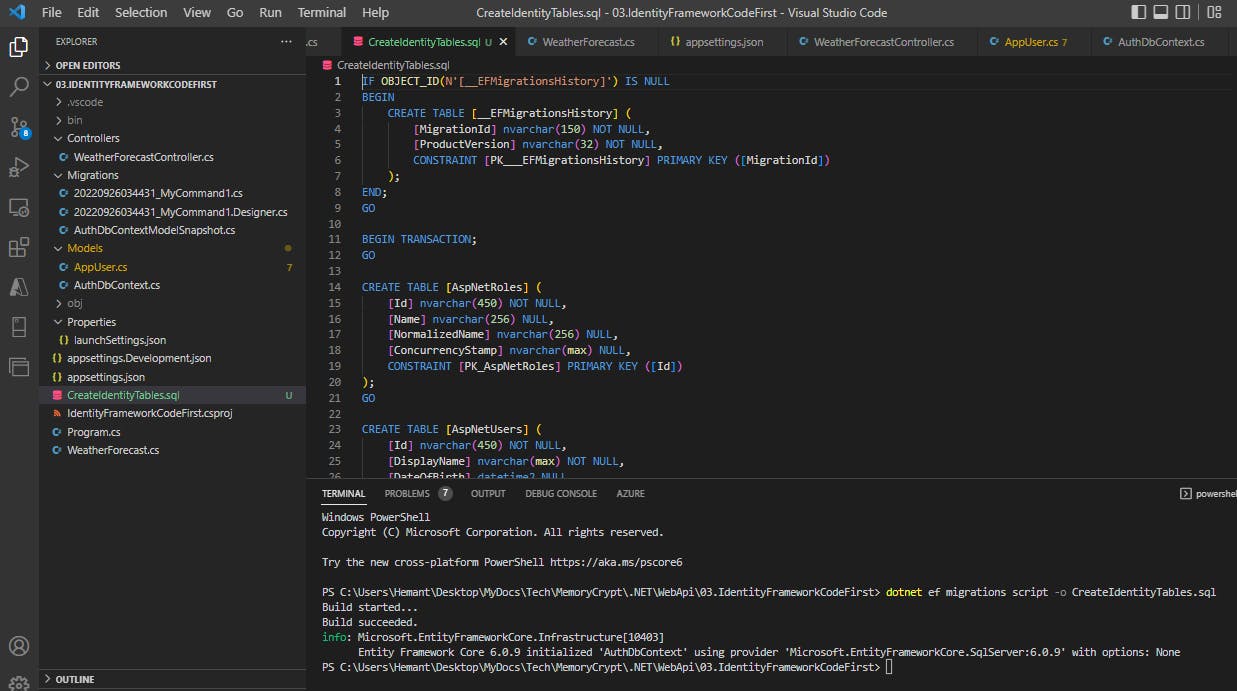
Now, we can generate a SQL script for all of our Identity tables, by executing below command in Terminal
dotnet ef migrations script -o CreateIdentityTables.sql
The file thus generated will contain sql commands to create all the tables.
IF OBJECT_ID(N'[__EFMigrationsHistory]') IS NULL
BEGIN
    CREATE TABLE [__EFMigrationsHistory] (
        [MigrationId] nvarchar(150) NOT NULL,
        [ProductVersion] nvarchar(32) NOT NULL,
        CONSTRAINT [PK___EFMigrationsHistory] PRIMARY KEY ([MigrationId])
    );
END;
GO

BEGIN TRANSACTION;
GO

CREATE TABLE [AspNetRoles] (
    [Id] nvarchar(450) NOT NULL,
    [Name] nvarchar(256) NULL,
    [NormalizedName] nvarchar(256) NULL,
    [ConcurrencyStamp] nvarchar(max) NULL,
    CONSTRAINT [PK_AspNetRoles] PRIMARY KEY ([Id])
);
GO

CREATE TABLE [AspNetUsers] (
    [Id] nvarchar(450) NOT NULL,
    [DisplayName] nvarchar(max) NOT NULL,
    [DateOfBirth] datetime2 NULL,
    [Address1] nvarchar(max) NOT NULL,
    [Address] nvarchar(max) NOT NULL,
    [City] nvarchar(max) NOT NULL,
    [State] nvarchar(max) NOT NULL,
    [Country] nvarchar(max) NOT NULL,
    [RefreshToken] nvarchar(max) NOT NULL,
    [UserName] nvarchar(256) NULL,
    [NormalizedUserName] nvarchar(256) NULL,
    [Email] nvarchar(256) NULL,
    [NormalizedEmail] nvarchar(256) NULL,
    [EmailConfirmed] bit NOT NULL,
    [PasswordHash] nvarchar(max) NULL,
    [SecurityStamp] nvarchar(max) NULL,
    [ConcurrencyStamp] nvarchar(max) NULL,
    [PhoneNumber] nvarchar(max) NULL,
    [PhoneNumberConfirmed] bit NOT NULL,
    [TwoFactorEnabled] bit NOT NULL,
    [LockoutEnd] datetimeoffset NULL,
    [LockoutEnabled] bit NOT NULL,
    [AccessFailedCount] int NOT NULL,
    CONSTRAINT [PK_AspNetUsers] PRIMARY KEY ([Id])
);
GO

CREATE TABLE [AspNetRoleClaims] (
    [Id] int NOT NULL IDENTITY,
    [RoleId] nvarchar(450) NOT NULL,
    [ClaimType] nvarchar(max) NULL,
    [ClaimValue] nvarchar(max) NULL,
    CONSTRAINT [PK_AspNetRoleClaims] PRIMARY KEY ([Id]),
    CONSTRAINT [FK_AspNetRoleClaims_AspNetRoles_RoleId] FOREIGN KEY ([RoleId]) REFERENCES [AspNetRoles] ([Id]) ON DELETE CASCADE
);
GO

CREATE TABLE [AspNetUserClaims] (
    [Id] int NOT NULL IDENTITY,
    [UserId] nvarchar(450) NOT NULL,
    [ClaimType] nvarchar(max) NULL,
    [ClaimValue] nvarchar(max) NULL,
    CONSTRAINT [PK_AspNetUserClaims] PRIMARY KEY ([Id]),
    CONSTRAINT [FK_AspNetUserClaims_AspNetUsers_UserId] FOREIGN KEY ([UserId]) REFERENCES [AspNetUsers] ([Id]) ON DELETE CASCADE
);
GO

CREATE TABLE [AspNetUserLogins] (
    [LoginProvider] nvarchar(450) NOT NULL,
    [ProviderKey] nvarchar(450) NOT NULL,
    [ProviderDisplayName] nvarchar(max) NULL,
    [UserId] nvarchar(450) NOT NULL,
    CONSTRAINT [PK_AspNetUserLogins] PRIMARY KEY ([LoginProvider], [ProviderKey]),
    CONSTRAINT [FK_AspNetUserLogins_AspNetUsers_UserId] FOREIGN KEY ([UserId]) REFERENCES [AspNetUsers] ([Id]) ON DELETE CASCADE
);
GO

CREATE TABLE [AspNetUserRoles] (
    [UserId] nvarchar(450) NOT NULL,
    [RoleId] nvarchar(450) NOT NULL,
    CONSTRAINT [PK_AspNetUserRoles] PRIMARY KEY ([UserId], [RoleId]),
    CONSTRAINT [FK_AspNetUserRoles_AspNetRoles_RoleId] FOREIGN KEY ([RoleId]) REFERENCES [AspNetRoles] ([Id]) ON DELETE CASCADE,
    CONSTRAINT [FK_AspNetUserRoles_AspNetUsers_UserId] FOREIGN KEY ([UserId]) REFERENCES [AspNetUsers] ([Id]) ON DELETE CASCADE
);
GO

CREATE TABLE [AspNetUserTokens] (
    [UserId] nvarchar(450) NOT NULL,
    [LoginProvider] nvarchar(450) NOT NULL,
    [Name] nvarchar(450) NOT NULL,
    [Value] nvarchar(max) NULL,
    CONSTRAINT [PK_AspNetUserTokens] PRIMARY KEY ([UserId], [LoginProvider], [Name]),
    CONSTRAINT [FK_AspNetUserTokens_AspNetUsers_UserId] FOREIGN KEY ([UserId]) REFERENCES [AspNetUsers] ([Id]) ON DELETE CASCADE
);
GO

CREATE INDEX [IX_AspNetRoleClaims_RoleId] ON [AspNetRoleClaims] ([RoleId]);
GO

CREATE UNIQUE INDEX [RoleNameIndex] ON [AspNetRoles] ([NormalizedName]) WHERE [NormalizedName] IS NOT NULL;
GO

CREATE INDEX [IX_AspNetUserClaims_UserId] ON [AspNetUserClaims] ([UserId]);
GO

CREATE INDEX [IX_AspNetUserLogins_UserId] ON [AspNetUserLogins] ([UserId]);
GO

CREATE INDEX [IX_AspNetUserRoles_RoleId] ON [AspNetUserRoles] ([RoleId]);
GO

CREATE INDEX [EmailIndex] ON [AspNetUsers] ([NormalizedEmail]);
GO

CREATE UNIQUE INDEX [UserNameIndex] ON [AspNetUsers] ([NormalizedUserName]) WHERE [NormalizedUserName] IS NOT NULL;
GO

INSERT INTO [__EFMigrationsHistory] ([MigrationId], [ProductVersion])
VALUES (N'20220926034431_MyCommand1', N'6.0.9');
GO

COMMIT;
GO
We will take this sql file and save it in our main application for future use.
You can find the dummy application created above here - github.com/HemantSinghEdu/MemoryCrypt/tree/..
2. Add Identity Framework in your application**
Now we will add the Identity Frameowork in our main application.
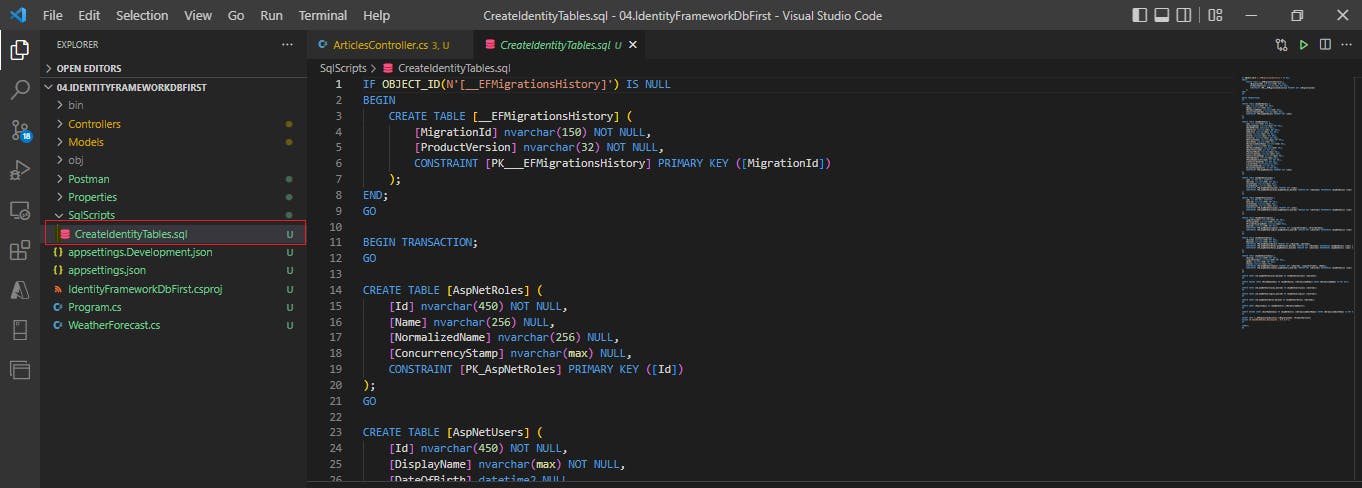
Step 1. Add the CreateIdentityTables.sql file in our main application
Step 2. Add Identity nuget packages to your application
Below are the 4 nuget packages you need to install
Microsoft.AspNetCore.Identity
Microsoft.AspNetCore.Identity.EntityFrameworkCore
Microsoft.EntityFrameworkCore.Design
Microsoft.EntityFrameworkCore.SqlServer
Go to Terminal and add the below commands one by one
dotnet add package Microsoft.AspNetCore.Identity
dotnet add package Microsoft.AspNetCore.Identity.EntityFrameworkCore
dotnet add package Microsoft.EntityFrameworkCore.Design
dotnet add package Microsoft.EntityFrameworkCore.SqlServer
Step 3. Add User class
We already have a User class in place as part of our authorization logic. We just need to ensure that it inherits from IdntityUser.
Currently, the User class looks like this
public class User
{
    public string UserId { get; set; }
    public string UserName { get; set; }
    public string DisplayName { get; set; }
    public string Email { get; set; }
    public string Password { get; set; }
    public string MobileNumber { get; set; }
    public DateTime? DateOfBirth { get; set; }
    public string Address { get; set; }
    public string City { get; set; }
    public string State { get; set; }
    public string Country { get; set; }
    public string RefreshToken { get; set; }
}
However, we are going to make a few changes here. Basically, we will remove redundant fields that are already defined in IdentityUser.
The IdentityUser class already has UserName and Email fields, so we remove those. We already have an Id and PhoneNumber fields in IdentityUser so we don't need UserId and MobileNumber in our User class. The Password field should not be kept as it is not a good practice to store plaintext password in database. Instead, IdentityUser has a PasswordHash field which stores the encrypted value of the password., so we will use that.
Our User class will now look like this
using Microsoft.AspNetCore.Identity;

namespace IdentityFrameworkDbFirst.Models;

public class User : IdentityUser
{
    public string DisplayName { get; set; }
    public DateTime? DateOfBirth { get; set; }
    public string Address1 { get; set; }
    public string Address { get; set; }
    public string City { get; set; }
    public string State { get; set; }
    public string Country { get; set; }
    public string RefreshToken { get; set; }
}
Step 4. Add Database Context
Add a class 'AuthDbContext' in Models folder, inheriting from IdentityDbContext<T> class, where T is going to be our User class. The IdentityDbContext class is defined in Microsoft.AspNetCore.Identity.EntityFrameworkCore namespace.
using Microsoft.AspNetCore.Identity.EntityFrameworkCore;
using Microsoft.EntityFrameworkCore;

namespace IdentityFrameworkDbFirst.Models;

public class AuthDbContext : IdentityDbContext<User>
{
    public AuthDbContext(DbContextOptions<AuthDbContext> options) : base(options)
    {

    }
}
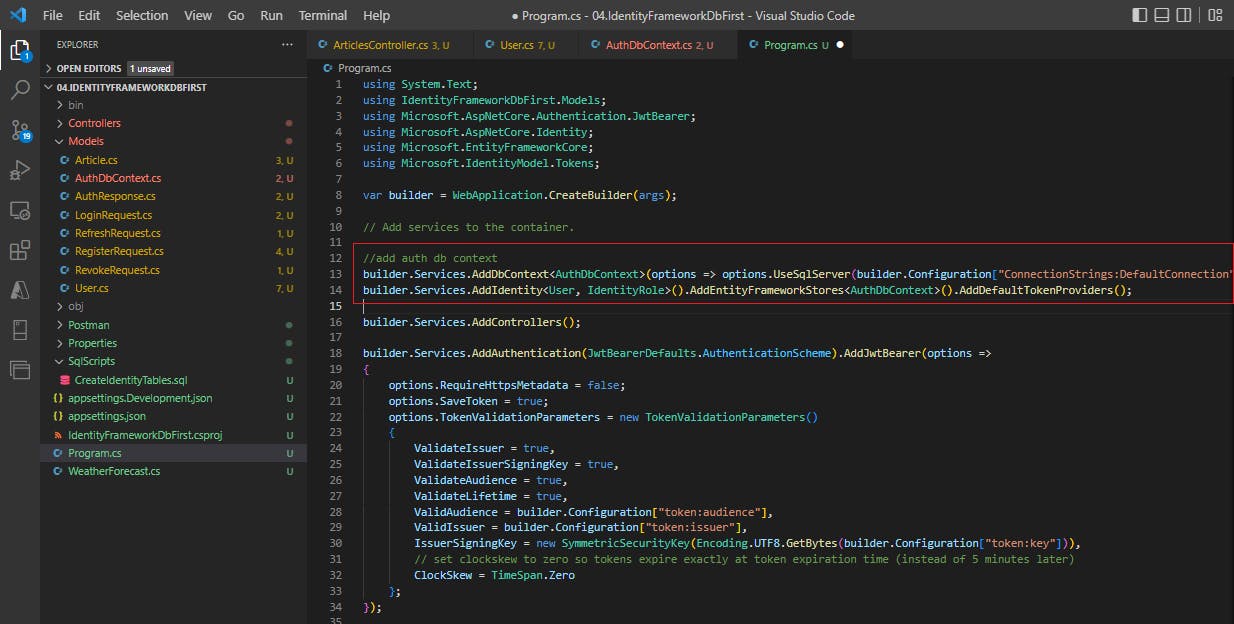
Now let's register this AuthDbContext class in Program.cs
//add auth db context
builder.Services.AddDbContext<AuthDbContext>(options => options.UseSqlServer(builder.Configuration["ConnectionStrings:DefaultConnection"]));
builder.Services.AddIdentity<User, IdentityRole>().AddEntityFrameworkStores<AuthDbContext>().AddDefaultTokenProviders();
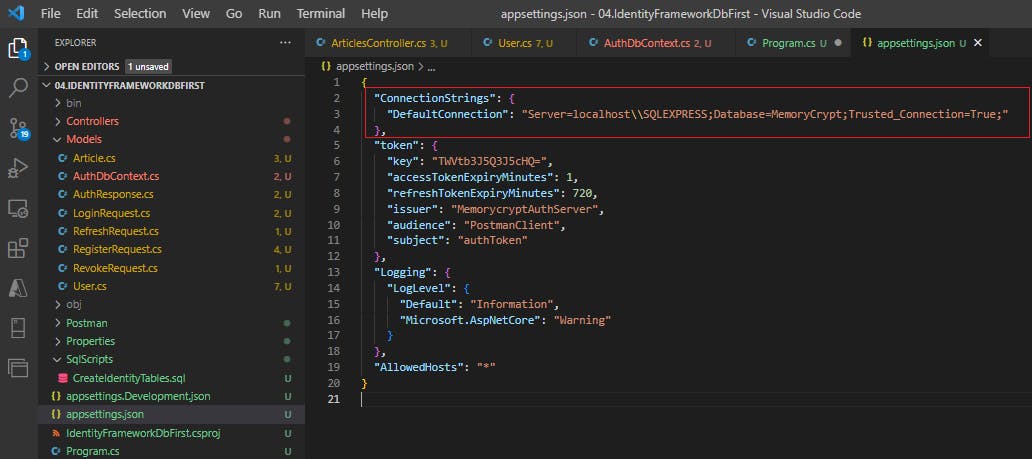
We need to add the connection string in our appsettings.json file, so that the configuration code above can fetch it.
"ConnectionStrings": {
    "DefaultConnection": "Server=localhost\\SQLEXPRESS;Database=MemoryCrypt;Trusted_Connection=True;"
  }
Step 5. Call UserManager methods for User Registration, Login, Refresh and Revoke operations
Let us look at our AuthController class. Currently we have a hardcoded In-memory collection of users.
Now that we have our Db context object, we can start saving user data in SQL Server. However, Identity framework provides us with a UserManager class that internally makes database calls so that we don't have to. So we will use this UserManager class to save or fetch user data from SQL Server.
[ApiController]
[Route("[controller]")]
public class AuthController : ControllerBase
{

    public IConfiguration _configuration;
    private UserManager<User> _userManager;

    public AuthController(IConfiguration config, UserManager<User> userManager)
    {
        _configuration = config;
        _userManager = userManager;
    }

    //rest of the code
}
Login The Login endpoint currently looks like this
[HttpPost("login")]
public async Task<IActionResult> Login(LoginRequest request)
{
        if (!ModelState.IsValid)
        {
            return BadRequestErrorMessages();
        }

        var user = await GetUser(request.Email, request.Password);

        if (user != null)
        {
            var authResponse = await GetTokens(user);
            return Ok(authResponse);
        }
        else
        {
            return BadRequest("Invalid credentials");
        }

    }
We will change it to this
[HttpPost("login")]
public async Task<IActionResult> Login(LoginRequest request)
{
        if (!ModelState.IsValid)
        {
            return BadRequestErrorMessages();
        }

        var user = await _userManager.FindByEmailAsync(request.Email);
        var isAuthorized = user != null && await _userManager.CheckPasswordAsync(user, request.Password);

        if (isAuthorized)
        {
            var authResponse = await GetTokens(user);
            user.RefreshToken = authResponse.RefreshToken;
            await _userManager.UpdateAsync(user);
            return Ok(authResponse);
        }
        else
        {
            return Unauthorized("Invalid credentials");
        }

    }
When returning access token, our api also returns refresh token. The current function to generate refresh token looks like this
    private string GetRefreshToken()
    {
        var token = Convert.ToBase64String(RandomNumberGenerator.GetBytes(64));
        //ensure token is unique by checking against db
        var tokenIsUnique = !tempUserDb.Any(u => u.RefreshToken == token);

        if (!tokenIsUnique)
            return GetRefreshToken();  //recursive call

        return token;
    }
In the above function we can see that we are checking the newly generated refresh token against our in-memory user collection. But now we can check against actual database using the UserManager functions.
    private string GetRefreshToken()
    {
        var token = Convert.ToBase64String(RandomNumberGenerator.GetBytes(64));
        //ensure token is unique by checking against db
        var tokenIsUnique = !_userManager.Users.Any(u => u.RefreshToken == token);

        if (!tokenIsUnique)
            return GetRefreshToken();  //recursive call

        return token;
    }
Register The Register endpoint currently looks like this
[HttpPost("register")]
public async Task<IActionResult> Register(RegisterRequest registerRequest)
{
        if (!ModelState.IsValid)
        {
            return BadRequestErrorMessages();
        }

        var isEmailAlreadyRegistered = await GetUserByEmail(registerRequest.Email) != null;

        if (isEmailAlreadyRegistered)
        {
            return Conflict($"Email Id {registerRequest.Email} is already registered.");
        }

        await AddUser(new User
        {
            Email = registerRequest.Email,
            UserName = registerRequest.Username,
            Password = registerRequest.Password
        });

        return Ok("User created successfully");

}
This will change to this
[HttpPost("register")]
public async Task<IActionResult> Register(RegisterRequest registerRequest)
{
        if (!ModelState.IsValid)
        {
            return BadRequestErrorMessages();
        }

        var isEmailAlreadyRegistered = await _userManager.FindByEmailAsync(registerRequest.Email) != null;

        if (isEmailAlreadyRegistered)
        {
            return Conflict($"Email Id {registerRequest.Email} is already registered.");
        }

        var newUser = new User
        {
            Email = registerRequest.Email,
            UserName = registerRequest.Username
        };

        await _userManager.CreateAsync(newUser, registerRequest.Password);

        return Ok("User created successfully");

}
Update - We also need to add an additional check for duplicate username, as Identity will not register new user with a duplicate username.
[HttpPost("register")]
public async Task<IActionResult> Register(RegisterRequest registerRequest)
{
        if (!ModelState.IsValid)
        {
            return BadRequestErrorMessages();
        }

        var isEmailAlreadyRegistered = await _userManager.FindByEmailAsync(registerRequest.Email) != null;
        var isUserNameAlreadyRegistered = await _userManager.FindByNameAsync(registerRequest.Username) != null;

        if (isEmailAlreadyRegistered)
        {
            return Conflict($"Email Id {registerRequest.Email} is already registered.");
        }

        if (isUserNameAlreadyRegistered)
        {
            return Conflict($"Username {registerRequest.Username} is already registered");
        }

        var newUser = new User
        {
            Email = registerRequest.Email,
            UserName = registerRequest.Username,
            DisplayName = registerRequest.DisplayName,
        };

        var result = await _userManager.CreateAsync(newUser, registerRequest.Password);

        if (result.Succeeded)
        {
            return Ok("User created successfully");
        }
        else
        {
            return StatusCode(500, result.Errors.Select(e => new { Msg = e.Code, Desc = e.Description }).ToList());
        }
}
We have also added additional logic at the end to check if Identity result is successful or not, and if there was any error, we return that error with 500 status code. This had to be done as I realized later on that Identity does not throw an exception if user was not created for any reason. We need to explicitly check the response sent by _userManager.CreateAsync() function.
Token Refresh
Currently, the refresh endpoint looks like this
 [HttpPost("refresh")]
 public async Task<IActionResult> Refresh(RefreshRequest request)
 {
        if (!ModelState.IsValid)
        {
            return BadRequestErrorMessages();
        }

        //check if any user with this refresh token exists
        var user = await GetUserByRefreshToken(request.RefreshToken);
        if(user==null)
        {
            return BadRequest("Invalid refresh token");
        }

        //provide new access and refresh tokens
        var response = await GetTokens(user);
        return Ok(response);
}
Now, our UserManager class does not have a GetUserByRefreshToken() function.
Update*: Here I would like to mention that we already have a way to find a user based on the refresh key, and we used it in* GetRefreshToken() function, when we check if the refresh token is unique or not.
var tokenIsUnique = !_userManager.Users.Any(u => u.RefreshToken == token);
So this should be an easy way to get a user by refresh token, now that I think about it. The code will be like this
var user = _userManager.Users.FirstOrDefault(u => u.RefreshToken == request.RefreshToken);
But just in case you are interested in an alternative, below is my original solution for this problem, where we decode the expired token to find the user's email id and then get the user's details using that email id.
One option is to define GetUserByRefreshToken() as an extension method for UserManager. Another alternative is to ask the user to send the expired token as well in the refresh request. We can deconstruct this expired token to read the claim values stored in it. One of the claim values is email, which we can then use to fetch corresponding user object from UserManager.
So, let us first add the AccessToken field in our RefreshRequest model
public class RefreshRequest
{
    [Required]
    public string AccessToken { get; set; }
    [Required]
    public string RefreshToken { get; set; }
}
Next, add a function in our AuthController to deconstruct the token.
public ClaimsPrincipal GetPrincipalFromExpiredToken(string token)
    {
        var tokenValidationParameters = new TokenValidationParameters
        {
            ValidateAudience = false, //you might want to validate the audience and issuer depending on your use case
            ValidateIssuer = false,
            ValidateIssuerSigningKey = true,
            IssuerSigningKey = new SymmetricSecurityKey(Encoding.UTF8.GetBytes(_configuration["token:key"])),
            ValidateLifetime = false //we don't care about the token's expiration date
        };
        var tokenHandler = new JwtSecurityTokenHandler();
        var principal = tokenHandler.ValidateToken(token, tokenValidationParameters, out SecurityToken securityToken);
        var jwtSecurityToken = securityToken as JwtSecurityToken;
        if (jwtSecurityToken == null || !jwtSecurityToken.Header.Alg.Equals(SecurityAlgorithms.HmacSha256, StringComparison.InvariantCultureIgnoreCase))
            throw new SecurityTokenException("Invalid token");
        return principal;
    }
Finally, modify the refresh endpoint by calling this function
[HttpPost("refresh")]
public async Task<IActionResult> Refresh(RefreshRequest request)
{
        if (!ModelState.IsValid)
        {
            return BadRequestErrorMessages();
        }

        //fetch email from expired token string
        var principal = GetPrincipalFromExpiredToken(request.AccessToken);
        var userEmail = principal.FindFirstValue("Email"); //fetch the email claim's value

        //check if any user with email id has matching refresh token
        var user = !string.IsNullOrEmpty(userEmail) ? await _userManager.FindByEmailAsync(userEmail) : null;
        if(user==null || user.RefreshToken != request.RefreshToken)
        {
            return BadRequest("Invalid refresh token");
        }

        //provide new access and refresh tokens
        var response = await GetTokens(user);
        user.RefreshToken = response.RefreshToken;
        await _userManager.UpdateAsync(user);
        return Ok(response);
}
Principal
In .NET Identity, a "principal" refers to an object that represents the security context of a user or entity. It encapsulates the user's identity and any associated roles or claims, allowing you to make access control decisions in your application.
A principal consists of two main components:
Identity: The identity component represents the user's identity and typically includes information such as the user's username, email, and unique identifier (usually a user ID or name). The identity is typically represented by an instance of the
ClaimsIdentityclass, which contains claims about the user, such as their name, role memberships, and other user-specific attributes.Roles and Claims: A principal can also contain information about the user's roles and claims. Roles are typically represented as strings that categorize users into groups, such as "Admin," "User," or "Manager." Claims are key-value pairs that represent specific attributes or permissions associated with the user.
Token Revoke
Currently, the revoke endpoint looks like this
[HttpPost("revoke")]
public async Task<IActionResult> Revoke(RevokeRequest request)
{
        if (!ModelState.IsValid)
        {
            return BadRequestErrorMessages();
        }

        //check if any user with this refresh token exists
        var user = await GetUserByRefreshToken(request.RefreshToken);
        if(user==null)
        {
            return BadRequest("Invalid refresh token");
        }

        //remove refresh token
        user.RefreshToken = null;

        return Ok("Refresh token is revoked");
}
First, we are going to add [Authorize] attribute to this endpoint, as we want only authorized users to be able to revoke their refresh token. Since we are authorizing the user, the authorize operation automatically populates the HttpContext.User object with the logged-in user's identity data that it found in the auth token. We can get the email id of the current user from this object by reading the Email claim. Then we use this email to fetch the user object from database. Finally, we validate if the refresh token stored for this user in the database matches the refresh token passed in the request. If it is a match, then we revoke this refresh token by removing it from the user object and updating the same in db.
[HttpPost("revoke")]
[Authorize]
public async Task<IActionResult> Revoke(RevokeRequest request)
{
        if (!ModelState.IsValid)
        {
            return BadRequestErrorMessages();
        }

         //fetch email from claims of currently logged in user
        var userEmail = this.HttpContext.User.FindFirstValue("Email");

        //check if any user with email id has matching refresh token
        var user = !string.IsNullOrEmpty(userEmail) ? await _userManager.FindByEmailAsync(userEmail) : null;
        if( user == null || user.RefreshToken != request.RefreshToken)
        {
            return BadRequest("Invalid refresh token");
        }

        //remove refresh token
        user.RefreshToken = null;
        await _userManager.UpdateAsync(user);
        return Ok("Refresh token is revoked");
}
3. Add db context for articles table
Let us add a table in SQL Server directly
CREATE TABLE Articles
(
    Id UNIQUEIDENTIFIER primary key Default(NewId()),
    Title varchar,
    Author varchar,
    Content varchar,
    Views int,
    UpVotes int
)
Now we need to add an ArticlesContext and make changes to the ArticlesController for data fetch operations.
To do this, just run the below command in Terminal. Make sure you are usin the correct connection string for your database. This command will scaffold the db context and create a class for all the tables in our database.
dotnet ef dbcontext scaffold "Server=.\SQLEXPRESS;Database=MemoryCrypt;Trusted_Connection=True;" Microsoft.EntityFrameworkCore.SqlServer -t Articles --output-dir Models --force
The -t Articles flag tells the command to only scaffold the Articles table, otherwise the command will scaffold all the tables in the database, including those related to Identity framework, which is not what we want here. The --force flag is added at the end to ensure that we don't get model already exists error for our Article class. The db context is named after the database, so we get MemoryCryptContext class created for us.
There is one change forced upon he Article class, which is that the data type of Id property is nchanged from string to Guid
public partial class Article
{
        public Guid Id { get; set; }
        public string? Title { get; set; }
        public string? Author { get; set; }
        public string? Content { get; set; }
        public int? Views { get; set; }
        public int? UpVotes { get; set; }
}
The MemoryCryptContext class looks like this
public partial class MemoryCryptContext : DbContext
    {
        public MemoryCryptContext()
        {
        }

        public MemoryCryptContext(DbContextOptions<MemoryCryptContext> options)
            : base(options)
        {
        }

        public virtual DbSet<Article> Articles { get; set; } = null!;

        protected override void OnConfiguring(DbContextOptionsBuilder optionsBuilder)
        {
            if (!optionsBuilder.IsConfigured)
            {
#warning To protect potentially sensitive information in your connection string, you should move it out of source code. You can avoid scaffolding the connection string by using the Name= syntax to read it from configuration - see https://go.microsoft.com/fwlink/?linkid=2131148. For more guidance on storing connection strings, see http://go.microsoft.com/fwlink/?LinkId=723263.
                optionsBuilder.UseSqlServer("Server=.\\SQLEXPRESS;Database=MemoryCrypt;Trusted_Connection=True;");
            }
        }

        protected override void OnModelCreating(ModelBuilder modelBuilder)
        {
            modelBuilder.Entity<Article>(entity =>
            {
                entity.Property(e => e.Id).HasDefaultValueSql("(newid())");

                entity.Property(e => e.Author)
                    .HasMaxLength(1)
                    .IsUnicode(false);

                entity.Property(e => e.Content)
                    .HasMaxLength(1)
                    .IsUnicode(false);

                entity.Property(e => e.Title)
                    .HasMaxLength(1)
                    .IsUnicode(false);
            });

            OnModelCreatingPartial(modelBuilder);
        }

        partial void OnModelCreatingPartial(ModelBuilder modelBuilder);
    }
We can remove the sql connection string from OnConfiguring method, and provide it in Program.cs instead.
public partial class MemoryCryptContext : DbContext
{
        . . .
        protected override void OnConfiguring(DbContextOptionsBuilder optionsBuilder)
        {
        }
        . . .
}
In Program.cs, add this line of code
//add db context for articles
builder.Services.AddDbContext<MemoryCryptContext>(
    options => options.UseSqlServer(builder.Configuration["ConnectionStrings:DefaultConnection"]));
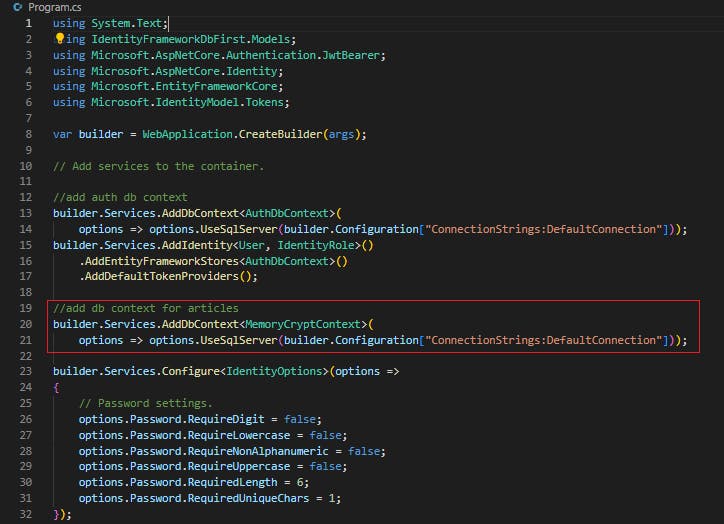
Finally, let's go to our ArticlesController and inject this context and use it in our CRUD operations
using IdentityFrameworkDbFirst.Models;
using Microsoft.AspNetCore.Authorization;
using Microsoft.AspNetCore.Mvc;

namespace IdentityFrameworkDbFirst.Controllers;

[ApiController]
[Route("[controller]")]
[Authorize]
public class ArticlesController : ControllerBase
{
    private readonly ILogger<ArticlesController> _logger;
    private MemoryCryptContext _context;

    public ArticlesController(ILogger<ArticlesController> logger, MemoryCryptContext context)
    {
        _logger = logger;
        _context = context;
    }


    [HttpGet]
    public ActionResult<IEnumerable<Article>> GetArticles()
    {
        return Ok(_context.Articles.ToList());
    }


    [HttpGet("{id}")]
    public ActionResult<Article> GetArticles(string id)
    {
        var article = _context.Articles.FirstOrDefault(a => a.Id.Equals(id));
        if(article==null)
        {
            return NotFound();
        }

        return Ok(article);
    }

    [HttpPost]
    public ActionResult<Article> InsertArticle(Article article)
    {
        article.Id = Guid.NewGuid();
        _context.Articles.Add(article);
        _context.SaveChanges();
        return CreatedAtAction(nameof(GetArticles), new {id = article.Id}, article);
    }


    [HttpPut("{id}")]
    public ActionResult<Article> UpdateArticle(string id, Article article)
    {
        if(id != article.Id.ToString())
        {
            return BadRequest();
        }

        var articleToUpdate = _context.Articles.FirstOrDefault(a => a.Id.Equals(id));

        if(articleToUpdate==null)
        {
            return NotFound();
        }

        articleToUpdate.Author = article.Author;
        articleToUpdate.Content = article.Content;
        articleToUpdate.Title = article.Title;
        articleToUpdate.UpVotes = article.UpVotes;
        articleToUpdate.Views = article.Views;

        _context.Articles.Update(articleToUpdate);
        _context.SaveChanges();

        return NoContent();
    }


    [HttpDelete("{id}")]
    public ActionResult DeleteArticle(string id)
    {
        var articleToDelete = _context.Articles.FirstOrDefault(a => a.Id.Equals(id));

        if(articleToDelete == null)
        {
            return NotFound();
        }

        _context.Articles.Remove(articleToDelete);
        _context.SaveChanges();
        return NoContent();
    }

}
4. Test with Postman
Let us now test our API via Postman
Register a new user
Ran the below request, and Postman response says 201 success
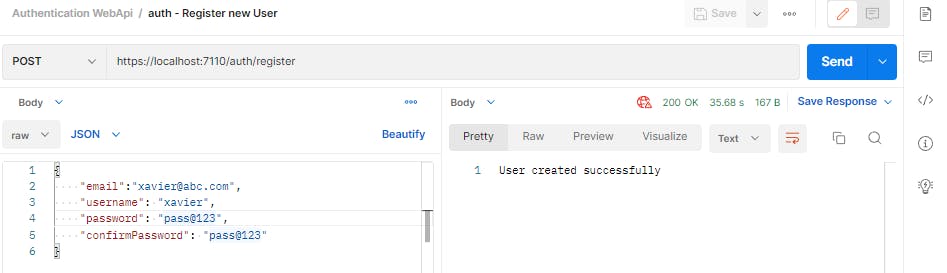
However when I checked console logs in VSCode, it shows failure due to password validation rules enforced by Identity framework - User password validation failed: PasswordRequiresUpper
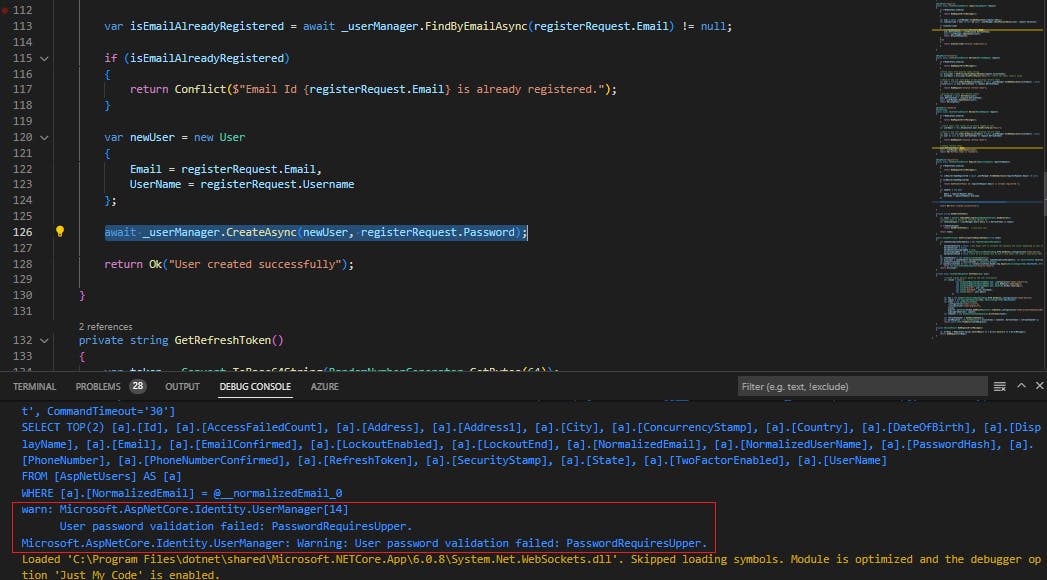
We can override the password rules by specifying the password rules in Program.cs
Right now, the identity setup looks lie this:
builder.Services.AddDbContext<AuthDbContext>(
    options => options.UseSqlServer(builder.Configuration["ConnectionStrings:DefaultConnection"]));
builder.Services.AddIdentity<User, IdentityRole>()
    .AddEntityFrameworkStores<AuthDbContext>()
    .AddDefaultTokenProviders();
Now, let's add the password rules We have disabled uppercase rule, as well as disabled few other rules
//add auth db context
builder.Services.AddDbContext<AuthDbContext>(
    options => options.UseSqlServer(builder.Configuration["ConnectionStrings:DefaultConnection"]));
builder.Services.AddIdentity<User, IdentityRole>()
    .AddEntityFrameworkStores<AuthDbContext>()
    .AddDefaultTokenProviders();

builder.Services.Configure<IdentityOptions>(options =>
{
    // Password settings.
    options.Password.RequireDigit = false;
    options.Password.RequireLowercase = false;
    options.Password.RequireNonAlphanumeric = false;
    options.Password.RequireUppercase = false;
    options.Password.RequiredLength = 6;
    options.Password.RequiredUniqueChars = 1;
});
Now when I ran the register request, I got database errors that fields like address, state, city etc are required as they are not nullable in Sql Server. To fix this, I made these fields nullable and re-executed the code first migrations to ensure that the fields are nullable in database. Just left the DisplayName field as required, so need to provide this field in Register request.

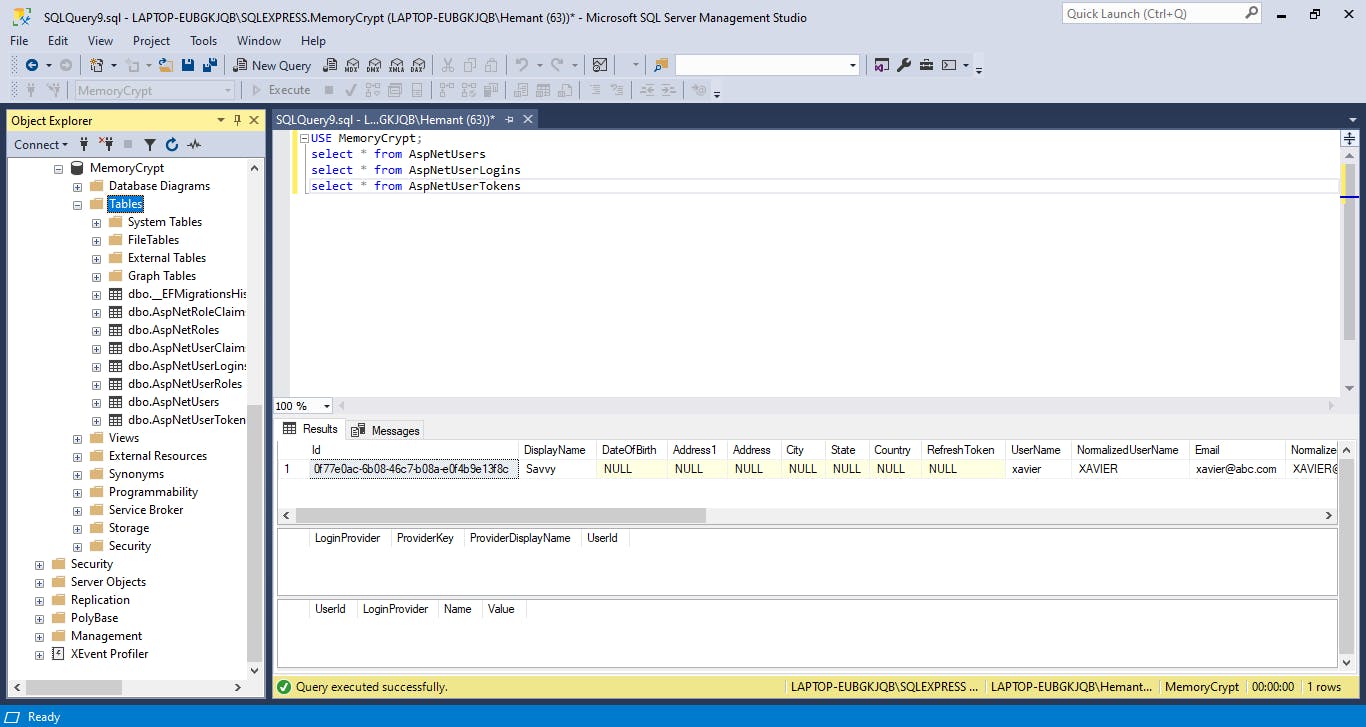
Login
Ran the below request
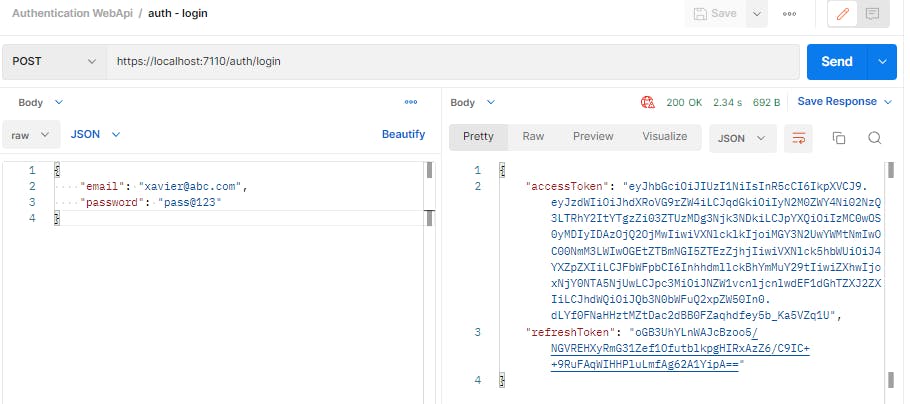
Articles Endpoint Now we will use the token generated in previous step to access the protected Articles endpoint.
However, I found out that I am gettin 404 error like this (not 401)
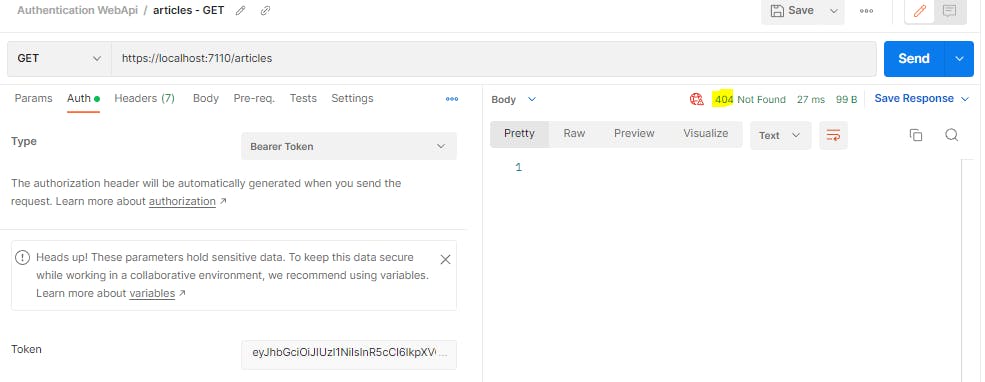
To fix this, I had to modify the Authentication logic a little bit, by adding flags in the AddAuthentication() method
Currently, the AddAuthentication() function looks like this in Program.cs
builder.Services.AddAuthentication(JwtBearerDefaults.AuthenticationScheme).AddJwtBearer(...);
We will add the flags like this:
builder.Services.AddAuthentication(options => {
                    options.DefaultAuthenticateScheme = JwtBearerDefaults.AuthenticationScheme;
                    options.DefaultChallengeScheme = JwtBearerDefaults.AuthenticationScheme;
                    options.DefaultScheme = JwtBearerDefaults.AuthenticationScheme;
                })
                .AddJwtBearer(...);
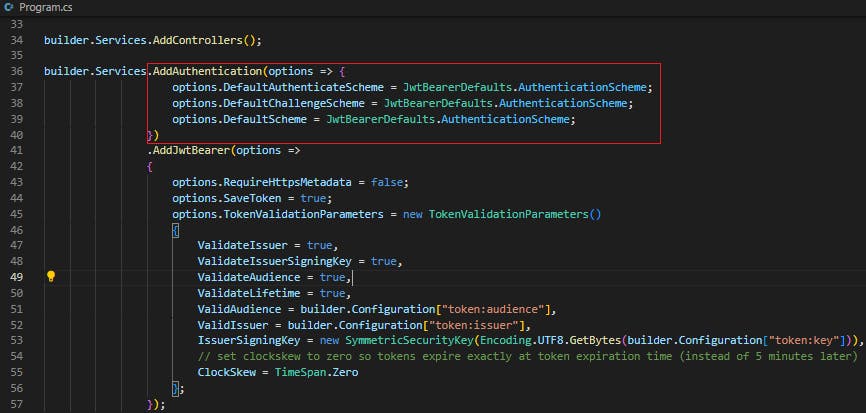
Now, if I access the Articles endpoint, it works
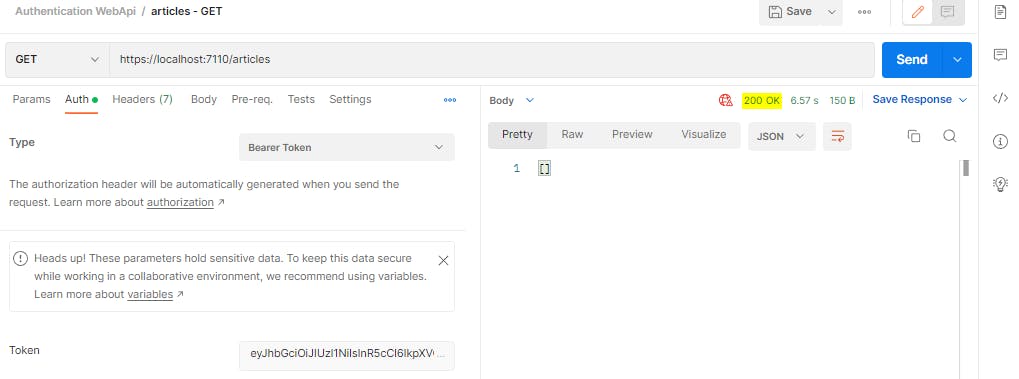
Let us add a new article
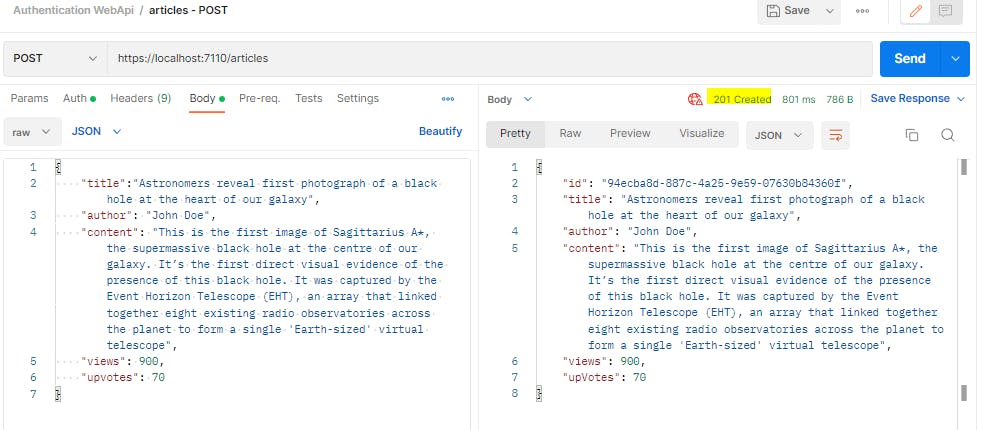
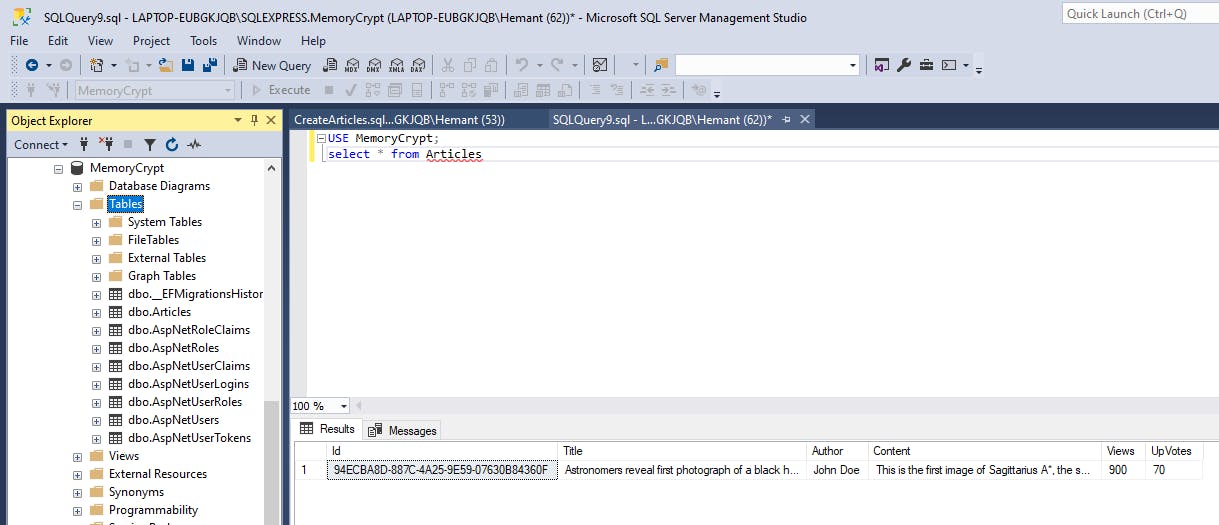
Token Refresh
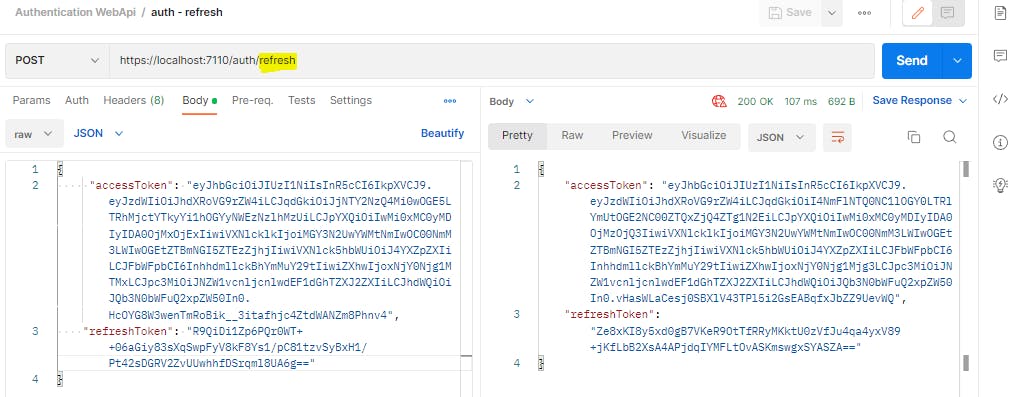
Token Revoke

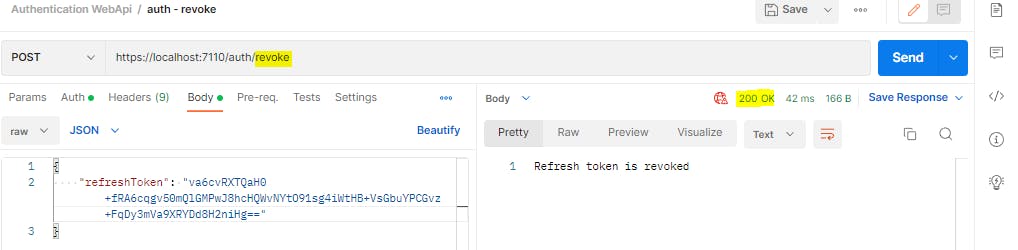
So here we are finally, a working application with authentication. :)
You can see the final application code here - github.com/HemantSinghEdu/MemoryCrypt/tree/..
Next - Create a Web API with Custom Authentication and ASP.NET Core Identity