

Photo by Lucian Alexe on Unsplash
Caching and content delivery - Developing Solutions for Microsoft Azure - Part 4.1


Table of contents
- 4. Monitor, troubleshoot, and optimize Azure solutions
- 4.1 Integrate caching and content delivery within solutions
- Azure Cache for Redis
- Configure Azure Cache for Redis
- Interact with Azure Cache for Redis by using .NET
- Practical 13: Connect an app to Azure Cache for Redis by using .NET Core
- Azure Content Delivery Networks (CDNs)
- Control cache behavior on Azure Content Delivery Networks
- Interact with Azure Content Delivery Networks by using .NET
All the notes on this page have been taken from Microsoft's learning portal - learn.microsoft.com. If any of this material is copyrighted, please let me know in the comments below and I will remove it. The main goal here is to learn and understand the concepts for developing solutions for Microsoft Azure. These notes may be helpful to prepare for the certification AZ-204: Developing Solutions for Microsoft Azure
Continuing from Implement secure cloud solutions - Developing Solutions for Microsoft Azure - Part 3.2
4. Monitor, troubleshoot, and optimize Azure solutions
4.1 Integrate caching and content delivery within solutions
Azure Cache for Redis
Overview
Azure Cache for Redis provides an in-memory data store on the Redis software.
Redis improves the performance scalability of an application that uses backend data stores heavily
It's able to process large volumes of application requests by keeping frequently accessed data in the server memory, which can be written to and read from quickly
Redis brings a critical low-latency and high-throughput data storage solution to modern applications.
Key scenarios
Azure Cache for Redis improves application performance by supporting common application architecture patterns.
| Pattern | Description |
| Data cache | Databases are often too large to load directly into a cache. It's common to use the cache-aside pattern to load data into the cache only as needed. When the system makes changes to the data, the system can also update the cache, which is then distributed to other clients. |
| Content cache | Many web pages are generated from templates that use static content such as headers, footers, banners. These static items shouldn't change often. Using an in-memory cache provides quick access to static content compared to backend datastores. |
| Session store | This pattern is commonly used with shopping carts and other user history data that a web application might associate with user cookies. Storing too much in a cookie can have a negative effect on performance as the cookie size grows and is passed and validated with every request. A typical solution uses the cookie as a key to query the data in a database. Using an in-memory cache, like Azure Cache for Redis, to associate information with a user is much faster than interacting with a full relational database. |
| Job and message queuing | Applications often add tasks to a queue when the operations associated with the request take time to execute. Longer running operations are queued to be processed in sequence, often by another server. This method of deferring work is called task queuing. |
| Distributed transactions | Applications sometimes require a series of commands against a backend data-store to execute as a single atomic operation. All commands must succeed, or all must be rolled back to the initial state. Azure Cache for Redis supports executing a batch of commands as a single transaction. |
Service tiers
Azure Cache for Redis is available in these tiers:
| Tier | Description |
| Basic | An OSS Redis cache running on a single VM. This tier has no service-level agreement (SLA) and is ideal for development/test and non-critical workloads. |
| Standard | An OSS Redis cache running on two VMs in a replicated configuration. |
| Premium | High-performance OSS Redis caches. This tier offers higher throughput, lower latency, better availability, and more features. Premium caches are deployed on more powerful VMs compared to the VMs for Basic or Standard caches. |
| Enterprise | High-performance caches powered by Redis Labs' Redis Enterprise software. This tier supports Redis modules including RediSearch, RedisBloom, and RedisTimeSeries. Also, it offers even higher availability than the Premium tier. |
| Enterprise Flash | Cost-effective large caches powered by Redis Labs' Redis Enterprise software. This tier extends Redis data storage to non-volatile memory, which is cheaper than DRAM, on a VM. It reduces the overall per-GB memory cost. |
Configure Azure Cache for Redis
You can create a Redis cache using the Azure portal, the Azure CLI, or Azure PowerShell.
Create and configure an Azure Cache for Redis instance
There are several parameters you will need to decide in order to configure the cache properly for your purposes.
Name
The Redis cache will need a globally unique name. The name has to be unique within Azure because it is used to generate a public-facing URL to connect and communicate with the service.
The name must be between 1 and 63 characters, composed of numbers, letters, and the '-' character. The cache name can't start or end with the '-' character, and consecutive '-' characters aren't valid.
Location
You will need to decide where the Redis cache will be physically located by selecting an Azure region. You should always place your cache instance and your application in the same region. Put the Redis cache as close to the data consumer as you can.
Pricing tier
There are three pricing tiers available for an Azure Cache for Redis.
Basic: Basic cache ideal for development/testing. Is limited to a single server, 53 GB of memory, and 20,000 connections. There is no SLA for this service tier.
Standard: Production cache which supports replication and includes an SLA. It supports two servers, and has the same memory/connection limits as the Basic tier.
Premium: Enterprise tier which builds on the Standard tier and includes persistence, clustering, and scale-out cache support. This is the highest performing tier with up to 530 GB of memory and 40,000 simultaneous connections.
You can control the amount of cache memory available on each tier - this is selected by choosing a cache level from C0-C6 for Basic/Standard and P0-P4 for Premium.
Tip: Microsoft recommends you always use Standard or Premium Tier for production systems. The Basic Tier is a single node system with no data replication and no SLA.
The Premium tier allows you to persist data in two ways to provide disaster recovery:
RDB persistence takes a periodic snapshot and can rebuild the cache using the snapshot in case of failure.
AOF persistence saves every write operation to a log that is saved at least once per second. This creates bigger files than RDB but has less data loss.
There are several other settings which are only available to the Premium tier.
Virtual Network support
If you create a premium tier Redis cache, you can deploy it to a virtual network in the cloud. Your cache will be available to only other virtual machines and applications in the same virtual network. This provides a higher level of security when your service and cache are both hosted in Azure, or are connected through an Azure virtual network VPN.
Clustering support
With a premium tier Redis cache, you can implement clustering to automatically split your dataset among multiple nodes. To implement clustering, you specify the number of shards to a maximum of 10. The cost incurred is the cost of the original node, multiplied by the number of shards.
Accessing the Redis instance
Redis has a command-line tool for interacting with an Azure Cache for Redis as a client. The tool is available for Windows platforms by downloading the Redis command-line tools for Windows. If you want to run the command-line tool on another platform, download Azure Cache for Redis from https://redis.io/download.
Redis supports a set of known commands. A command is typically issued as COMMAND parameter1 parameter2 parameter3.
Here are some common commands you can use:
| Command | Description |
ping | Ping the server. Returns "PONG". |
set [key] [value] | Sets a key/value in the cache. Returns "OK" on success. |
get [key] | Gets a value from the cache. |
exists [key] | Returns '1' if the key exists in the cache, '0' if it doesn't. |
type [key] | Returns the type associated to the value for the given key. |
incr [key] | Increment the given value associated with key by '1'. The value must be an integer or double value. This returns the new value. |
incrby [key] [amount] | Increment the given value associated with key by the specified amount. The value must be an integer or double value. This returns the new value. |
del [key] | Deletes the value associated with the key. |
flushdb | Delete all keys and values in the database. |
Below is an example of a command:
> set somekey somevalue
OK
> get somekey
"somevalue"
> exists somekey
(string) 1
> del somekey
(string) 1
> exists somekey
(string) 0
Adding an expiration time to values
Caching is important because it allows us to store commonly used values in memory. However, we also need a way to expire values when they are stale. In Redis this is done by applying a time to live (TTL) to a key.
When the TTL elapses, the key is automatically deleted, exactly as if the DEL command were issued. Here are some notes on TTL expirations.
Expirations can be set using seconds or milliseconds precision.
The expire time resolution is always 1 millisecond.
Information about expires are replicated and persisted on disk, the time virtually passes when your Redis server remains stopped (this means that Redis saves the date at which a key will expire).
Here is an example of an expiration:
> set counter 100
OK
> expire counter 5
(integer) 1
> get counter
100
... wait ...
> get counter
(nil)
Accessing a Redis cache from a client
To connect to an Azure Cache for Redis instance, you'll need several pieces of information. Clients need the host name, port, and an access key for the cache. You can retrieve this information in the Azure portal through the Settings > Access Keys page.
The host name is the public Internet address of your cache, which was created using the name of the cache. For example
sportsresults.redis.cache.windows.net.The access key acts as a password for your cache. There are two keys created: primary and secondary. You can use either key, two are provided in case you need to change the primary key. You can switch all of your clients to the secondary key, and regenerate the primary key. This would block any applications using the original primary key. Microsoft recommends periodically regenerating the keys - much like you would your personal passwords.
Warning: Your access keys should be considered confidential information, treat them like you would a password. Anyone who has an access key can perform any operation on your cache!
Interact with Azure Cache for Redis by using .NET
Executing commands on the Redis cache
A popular high-performance Redis client for the .NET language is StackExchange.Redis. The package is available through NuGet and can be added to your .NET code using the command line or IDE. Below are examples of how to use the client.
Connecting to your Redis cache with StackExchange.Redis
Recall that we use the host address, port number, and an access key to connect to a Redis server. Azure also offers a connection string for some Redis clients which bundles this data together into a single string. It will look something like the following (with the cache-name and password-here fields filled in with real values):
[cache-name].redis.cache.windows.net:6380,password=[password-here],ssl=True,abortConnect=False
You can pass this string to StackExchange.Redis to create a connection to the server.
Notice that there are two additional parameters at the end:
ssl - ensures that communication is encrypted.
abortConnection - allows a connection to be created even if the server is unavailable at that moment.
There are several other optional parameters you can append to the string to configure the client library.
Creating a connection
The main connection object in StackExchange.Redis is the StackExchange.Redis.ConnectionMultiplexer class. This object abstracts the process of connecting to a Redis server (or group of servers). It's optimized to manage connections efficiently and intended to be kept around while you need access to the cache.
You create a ConnectionMultiplexer instance using the static ConnectionMultiplexer.Connect or ConnectionMultiplexer.ConnectAsync method, passing in either a connection string or a ConfigurationOptions object.
Here's a simple example:
using StackExchange.Redis;
...
var connectionString = "[cache-name].redis.cache.windows.net:6380,password=[password-here],ssl=True,abortConnect=False";
var redisConnection = ConnectionMultiplexer.Connect(connectionString);
Once you have a ConnectionMultiplexer, there are 3 primary things you might want to do:
Access a Redis Database. This is what we will focus on here.
Make use of the publisher/subscriber features of Redis. This is outside the scope of this module.
Access an individual server for maintenance or monitoring purposes.
Accessing a Redis database
The Redis database is represented by the IDatabase type. You can retrieve one using the GetDatabase() method:
IDatabase db = redisConnection.GetDatabase();
Tip: The object returned from GetDatabase is a lightweight object, and does not need to be stored. Only the ConnectionMultiplexer needs to be kept alive.
Once you have a IDatabase object, you can execute methods to interact with the cache. All methods have synchronous and asynchronous versions which return Task objects to make them compatible with the async and await keywords.
Here is an example of storing a key/value in the cache:
bool wasSet = db.StringSet("favorite:flavor", "i-love-rocky-road");
The StringSet method returns a bool indicating whether the value was set (true) or not (false). We can then retrieve the value with the StringGet method:
string value = db.StringGet("favorite:flavor");
Console.WriteLine(value); // displays: ""i-love-rocky-road""
Getting and Setting binary values
Recall that Redis keys and values are binary safe. These same methods can be used to store binary data. There are implicit conversion operators to work with byte[] types so you can work with the data naturally:
byte[] key = ...;
byte[] value = ...;

db.StringSet(key, value);
byte[] key = ...;
byte[] value = db.StringGet(key);
StackExchange.Redis represents keys using the RedisKey type. This class has implicit conversions to and from both string and byte[], allowing both text and binary keys to be used without any complication. Values are represented by the RedisValue type. As with RedisKey, there are implicit conversions in place to allow you to pass string or byte[].
Other common operations
The IDatabase interface includes several other methods to work with the Redis cache. There are methods to work with hashes, lists, sets, and ordered sets.
Here are some of the more common ones that work with single keys, you can read the source code for the interface to see the full list.
| Method | Description |
CreateBatch | Creates a group of operations that will be sent to the server as a single unit, but not necessarily processed as a unit. |
CreateTransaction | Creates a group of operations that will be sent to the server as a single unit and processed on the server as a single unit. |
KeyDelete | Delete the key/value. |
KeyExists | Returns whether the given key exists in cache. |
KeyExpire | Sets a time-to-live (TTL) expiration on a key. |
KeyRename | Renames a key. |
KeyTimeToLive | Returns the TTL for a key. |
KeyType | Returns the string representation of the type of the value stored at key. The different types that can be returned are: string, list, set, zset and hash. |
Executing other commands
The IDatabase object has an Execute and ExecuteAsync method which can be used to pass textual commands to the Redis server. For example:
var result = db.Execute("ping");
Console.WriteLine(result.ToString()); // displays: "PONG"
The Execute and ExecuteAsync methods return a RedisResult object which is a data holder that includes two properties:
Typewhich returns astringindicating the type of the result - "STRING", "INTEGER", etc.IsNulla true/false value to detect when the result isnull.
You can then use ToString() on the RedisResult to get the actual return value.
You can use Execute to perform any supported commands - for example, we can get all the clients connected to the cache ("CLIENT LIST"):
var result = await db.ExecuteAsync("client", "list");
Console.WriteLine($"Type = {result.Type}\r\nResult = {result}");
This would output all the connected clients:
Type = BulkString
Result = id=9469 addr=16.183.122.154:54961 fd=18 name=DESKTOP-AAAAAA age=0 idle=0 flags=N db=0 sub=1 psub=0 multi=-1 qbuf=0 qbuf-free=0 obl=0 oll=0 omem=0 ow=0 owmem=0 events=r cmd=subscribe numops=5
id=9470 addr=16.183.122.155:54967 fd=13 name=DESKTOP-BBBBBB age=0 idle=0 flags=N db=0 sub=0 psub=0 multi=-1 qbuf=0 qbuf-free=32768 obl=0 oll=0 omem=0 ow=0 owmem=0 events=r cmd=client numops=17
Storing more complex values
Redis is oriented around binary safe strings, but you can cache off object graphs by serializing them to a textual format - typically XML or JSON. For example, perhaps for our statistics, we have a GameStats object which looks like:
public class GameStat
{
    public string Id { get; set; }
    public string Sport { get; set; }
    public DateTimeOffset DatePlayed { get; set; }
    public string Game { get; set; }
    public IReadOnlyList<string> Teams { get; set; }
    public IReadOnlyList<(string team, int score)> Results { get; set; }

    public GameStat(string sport, DateTimeOffset datePlayed, string game, string[] teams, IEnumerable<(string team, int score)> results)
    {
        Id = Guid.NewGuid().ToString();
        Sport = sport;
        DatePlayed = datePlayed;
        Game = game;
        Teams = teams.ToList();
        Results = results.ToList();
    }

    public override string ToString()
    {
        return $"{Sport} {Game} played on {DatePlayed.Date.ToShortDateString()} - " +
               $"{String.Join(',', Teams)}\r\n\t" +
               $"{String.Join('\t', Results.Select(r => $"{r.team } - {r.score}\r\n"))}";
    }
}
We could use the Newtonsoft.Json library to turn an instance of this object into a string:
var stat = new GameStat("Soccer", new DateTime(2019, 7, 16), "Local Game",
                new[] { "Team 1", "Team 2" },
                new[] { ("Team 1", 2), ("Team 2", 1) });

string serializedValue = Newtonsoft.Json.JsonConvert.SerializeObject(stat);
bool added = db.StringSet("event:1950-world-cup", serializedValue);
We could retrieve it and turn it back into an object using the reverse process:
var result = db.StringGet("event:2019-local-game");
var stat = Newtonsoft.Json.JsonConvert.DeserializeObject<GameStat>(result.ToString());
Console.WriteLine(stat.Sport); // displays "Soccer"
Cleaning up the connection
Once you are done with the Redis connection, you can Dispose the ConnectionMultiplexer. This will close all connections and shutdown the communication to the server.
redisConnection.Dispose();
redisConnection = null;
Practical 13: Connect an app to Azure Cache for Redis by using .NET Core
In this exercise you will learn how to:
Create a new Redis Cache instance by using Azure CLI commands.
Create a .NET Core console app to add and retrieve values from the cache by using the StackExchange.Redis package.
Prerequisites
An Azure account with an active subscription.
Visual Studio Code on one of the supported platforms.
The C# extension for Visual Studio Code.
.NET Core 3.1 is the target framework for the steps below.
Step 1: Create Azure resources
Sign in to the portal: https://portal.azure.com and open the Cloud Shell, and select Bash as the shell.
Create a resource group for Azure resources. Replace
<myLocation>with a region near you.az group create --name demo-redis-rg --location <myLocation>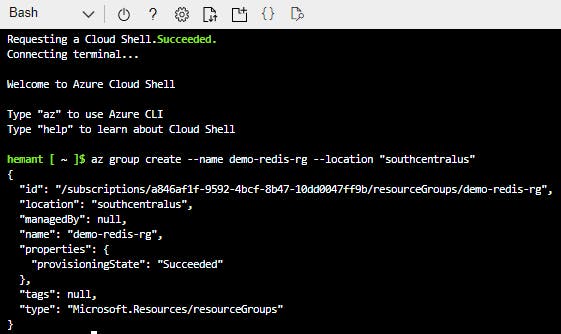
Create an Azure Cache for Redis instance by using the
az redis createcommand. The instance name needs to be unique and the script below will attempt to generate one for you, replace<myLocation>with the region you used in the previous step. This command will take a few minutes to complete.redisName=redis$RANDOM az redis create --location <myLocation> \ --resource-group demo-redis-rg \ --name $redisName \ --sku Basic --vm-size c0Note: this may take a few minutes

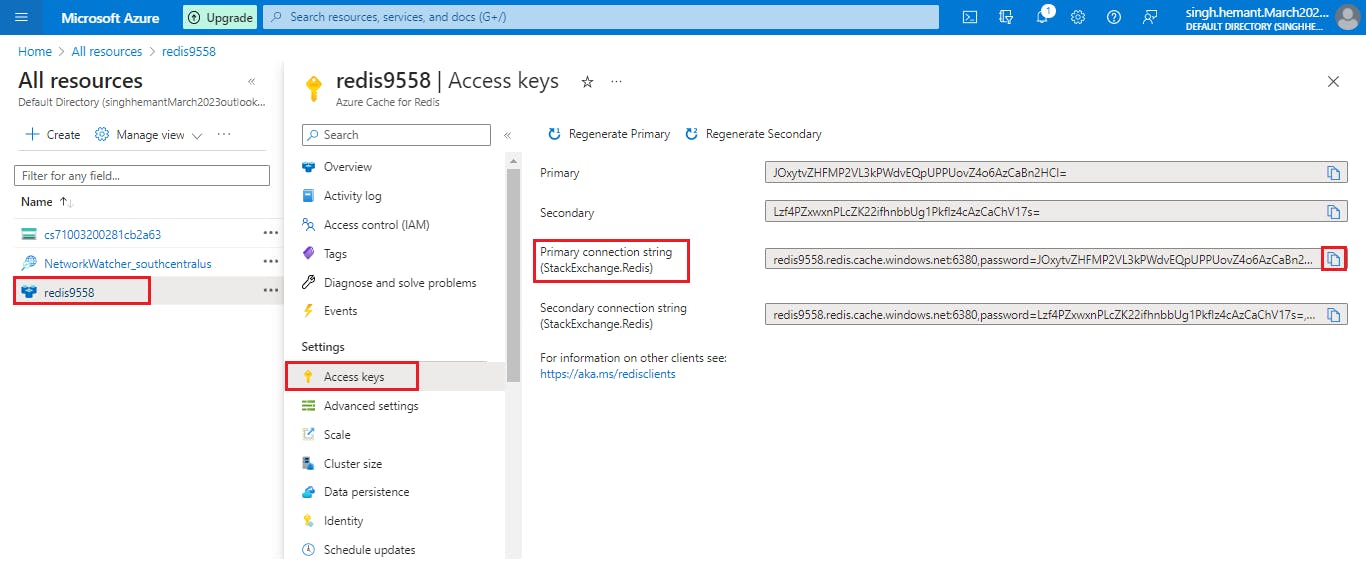
In the Azure portal navigate to the new Redis Cache you created.
Select Access keys in the Settings section of the Navigation Pane and leave the portal open. We'll copy the Primary connection string (StackExchange.Redis) value to use in the app later.
Step 2: Create the console application
Create a console app by running the command below in the Visual Studio Code terminal.
dotnet new console -o RediscacheOpen the app in Visual Studio Code by selecting File > Open Folder and choosing the folder for the app.
Add the
StackExchange.Redispackage to the project.dotnet add package StackExchange.RedisIn the Program.cs file add the
usingstatement below at the top.using StackExchange.Redis; using System.Threading.Tasks;Add the following variable to the
Programclass, replace<REDIS_CONNECTION_STRING>with the Primary connection string (StackExchange.Redis) from the portal.// connection string to your Redis Cache static string connectionString = "REDIS_CONNECTION_STRING";Replace the
Mainmethod with the following code.static async Task Main(string[] args) { // The connection to the Azure Cache for Redis is managed by the ConnectionMultiplexer class. using (var cache = ConnectionMultiplexer.Connect(connectionString)) { IDatabase db = cache.GetDatabase(); // Snippet below executes a PING to test the server connection var result = await db.ExecuteAsync("ping"); Console.WriteLine($"PING = {result.Type} : {result}"); // Call StringSetAsync on the IDatabase object to set the key "test:key" to the value "100" bool setValue = await db.StringSetAsync("test:key", "100"); Console.WriteLine($"SET: {setValue}"); // StringGetAsync takes the key to retrieve and return the value string getValue = await db.StringGetAsync("test:key"); Console.WriteLine($"GET: {getValue}"); } }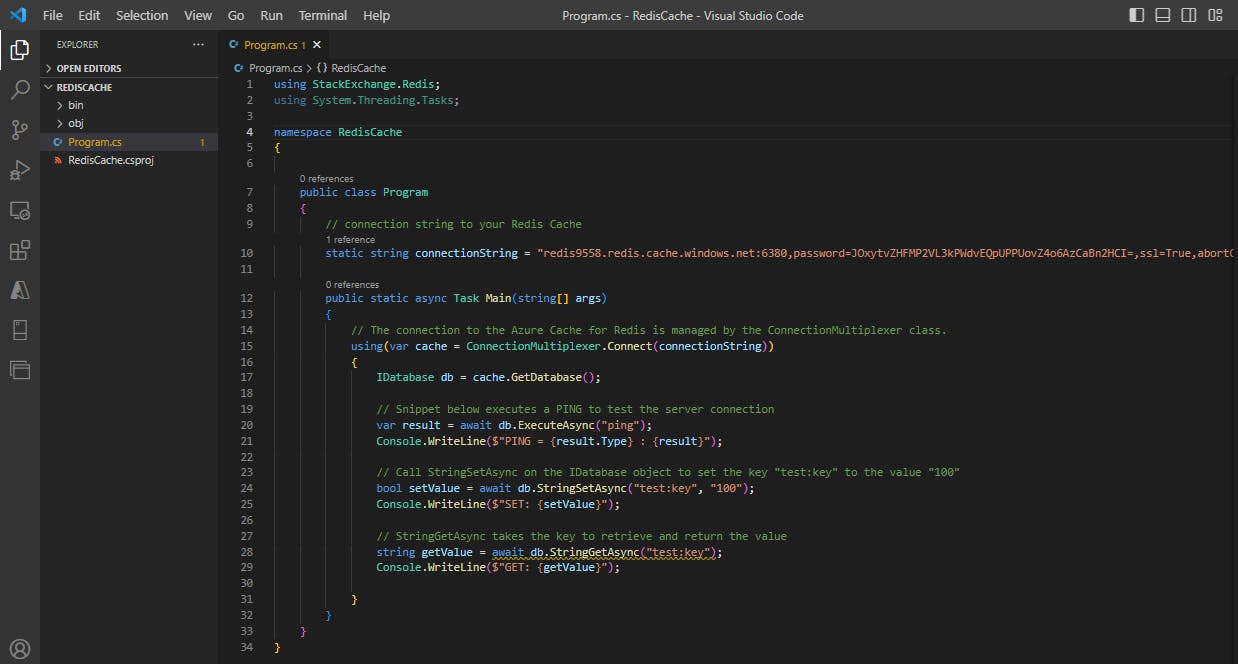
In the Visual Studio Code terminal run the commands below to build the app to check for errors, and then run the app using the commands below
 dotnet build
 dotnet run
The output should be similar to the following:
 PING = SimpleString : PONG
 SET: True
 GET: 100
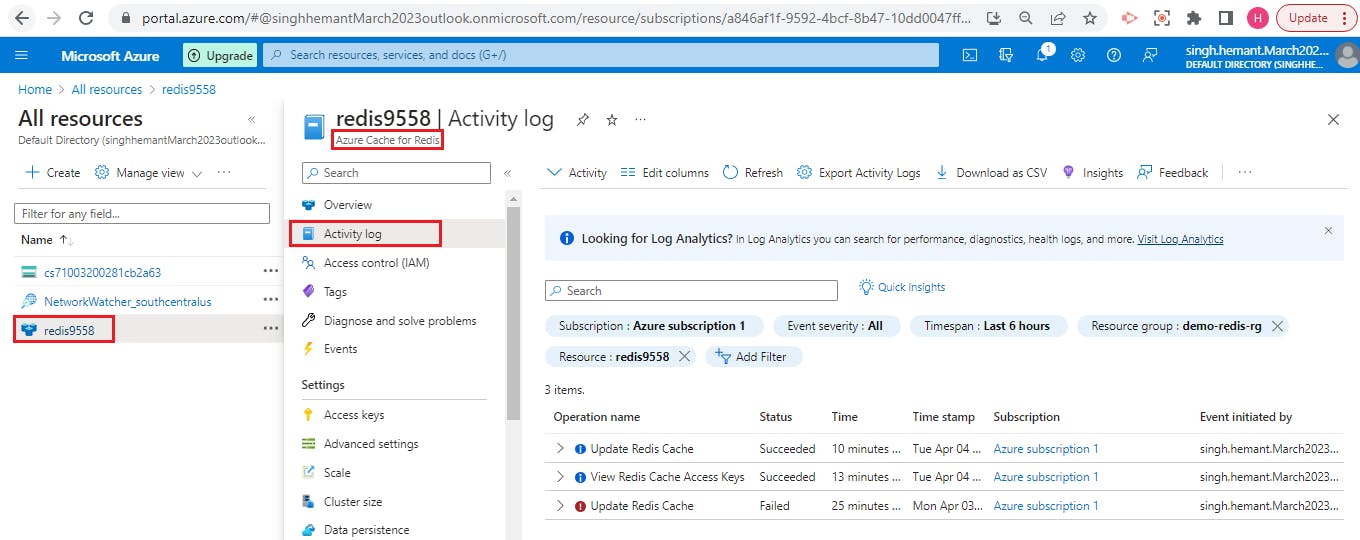
Return to the portal and select Activity log in the Azure Cache for Redis blade. You can view the operations in the log.
Step 3: Clean up resources
When the resources are no longer needed, you can use the az group delete command to remove the resource group.
az group delete -n az204-redis-rg --no-wait
Azure Content Delivery Networks (CDNs)
Azure Content Delivery Networks
A content delivery network (CDN) is a distributed network of servers that can efficiently deliver web content to users. CDNs store cached content on edge servers in point-of-presence (POP) locations that are close to end users, to minimize latency.
Azure Content Delivery Network (CDN) offers developers a global solution for rapidly delivering high-bandwidth content to users by caching their content at strategically placed physical nodes across the world. Azure CDN can also accelerate dynamic content, which cannot be cached, by leveraging various network optimizations using CDN POPs. For example, route optimization to bypass Border Gateway Protocol (BGP).
Benefits
Better performance and improved user experience for end users, especially when using applications in which multiple round-trips are required to load content.
Large scaling to better handle instantaneous high loads, such as the start of a product launch event.
Distribution of user requests and serving of content directly from edge servers so that less traffic is sent to the original server.
How Azure Content Delivery Network works
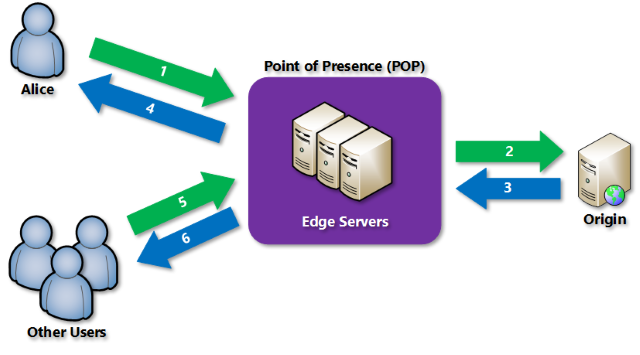
Alice requests a file by using a URL with a special domain name, such as
<endpoint name>.azureedge.net. The DNS routes the request to the best performing POP location, which is usually the POP that is geographically closest to the user.If no edge servers in the POP (point of presence) have the file in their cache, the POP requests the file from the origin server. The origin server can be an Azure Web App, Azure Cloud Service, Azure Storage account, or any publicly accessible web server.
The origin server returns the file to an edge server in the POP.
An edge server in the POP caches the file and returns the file to the original requestor (Alice). The file remains cached on the edge server in the POP until the time-to-live (TTL) specified by its HTTP headers expires. If the origin server didn't specify a TTL, the default TTL is seven days.
Additional users can then request the same file by using the same URL that Alice used.
If the TTL for the file hasn't expired, the POP edge server returns the file directly from the cache
Requirements
To use Azure CDN, you need to create at least one CDN profile, which is a collection of CDN endpoints
Every CDN endpoint represents a specific configuration of content deliver behavior and access
To organize your CDN endpoints by internet domain, web application, or some other criteria, you can use multiple profiles.
Limitations
Each Azure subscription has default limits for the following resources:
The number of CDN profiles that can be created
The number of endpoints that can be created in a CDN profile
The number of custom domains that can be mapped to an endpoint
Azure CDN Products:
Azure CDN includes four products:
Azure CDN Standard from Microsoft
Azure CDN Standard from Akamai
Azure CDN Stanard from Verizon
Azure CDN Premium from Verizon
Control cache behavior on Azure Content Delivery Networks
It is important for any caching mechanism to control when content is refreshed. To save time and bandwidth consumption, a cached resource is not compared to the version on the origin server every time it is accessed. Instead, as long as a cached resource is considered to be fresh, it is assumed to be the most current version and is sent directly to the client.
A cached resource is considered to be fresh when its age is less than the age or period defined by a cache setting. For example, when a browser reloads a webpage, it verifies that each cached resource on your hard drive is fresh and loads it. If the resource is not fresh (stale), an up-to-date copy is loaded from the server.
Controlling caching behavior
Azure CDNs provide two mechanisms for caching files. However, these configuration settings depend on the tier you've selected. Caching rules in Azure CDN Standard for Microsoft are set at the endpoint level and provide three configuration options. Other tiers provide additional configuration options, which include:
Caching rules. Caching rules can be either global (apply to all content from a specified endpoint) or custom. Custom rules apply to specific paths and file extensions.
Query string caching. Query string caching enables you to configure how Azure CDN responds to a query string. Query string caching has no effect on files that can't be cached.
With the Azure CDN Standard for Microsoft Tier, caching rules are as simple as the following three options:
Ignore query strings. This option is the default mode. A CDN POP simply passes the request and any query strings directly to the origin server on the first request and caches the asset. New requests for the same asset will ignore any query strings until the TTL expires.
Bypass caching for query strings. Each query request from the client is passed directly to the origin server with no caching.
Cache every unique URL. Every time a requesting client generates a unique URL, that URL is passed back to the origin server and the response cached with its own TTL. This final method is inefficient where each request is a unique URL, as the cache-hit ratio becomes low.
To change these settings, in the Endpoint pane, select Caching rules and then select the caching option that you want to apply to the endpoint and select Save.
Caching and time to live
If you publish a website through Azure CDN, the files on that site are cached until their TTL expires. The Cache-Control header contained in the HTTP response from origin server determines the TTL duration.
If you don't set a TTL on a file, Azure CDN sets a default value. However, this default may be overridden if you have set up caching rules in Azure. Default TTL values are as follows:
Generalized web delivery optimizations: seven days
Large file optimizations: one day
Media streaming optimizations: one year
Content updating
In normal operation, an Azure CDN edge node will serve an asset until its TTL expires. The edge node reconnects to the origin server when the TTL expires and a client makes a request to the same asset. The node will fetch another copy of the asset, resetting the TTL in the process.
To ensure that users always receive the latest version of an asset, consider including a version string in the asset URL. This approach causes the CDN to retrieve the new asset immediately.
Alternatively, you can purge cached content from the edge nodes, which refreshes the content on the next client request. You might purge cached content when publishing a new version of a web app or to replace any out-of-date assets.
You can purge content in several ways.
On an endpoint by endpoint basis, or all endpoints simultaneously should you want to update everything on your CDN at once.
Specify a file, by including the path to that file or all assets on the selected endpoint by checking the Purge All checkbox in the Azure portal.
Based on wildcards (*) or using the root (/).
The Azure CLI provides a special purge verb that will unpublish cached assets from an endpoint. This is very useful if you have an application scenario where a large amount of data is invalidated and should be updated in the cache. To unpublish assets, you must specify either a file path, a wildcard directory, or both:
az cdn endpoint purge \
    --content-paths '/css/*' '/js/app.js' \
    --name ContosoEndpoint \
    --profile-name DemoProfile \
    --resource-group ExampleGroup
You can also preload assets into an endpoint. This is useful for scenarios where your application creates a large number of assets, and you want to improve the user experience by prepopulating the cache before any actual requests occur:
az cdn endpoint load \
    --content-paths '/img/*' '/js/module.js' \
    --name ContosoEndpoint \
    --profile-name DemoProfile \
    --resource-group ExampleGroup
Geo-filtering
Geo-filtering enables you to allow or block content in specific countries/regions, based on the country/region code. In the Azure CDN Standard for Microsoft Tier, you can only allow or block the entire site. With the Verizon and Akamai tiers, you can also set up restrictions on directory paths.
Interact with Azure Content Delivery Networks by using .NET
You can use the Azure CDN Library for .NET to automate creation and management of CDN profiles and endpoints. Install the Microsoft.Azure.Management.Cdn.Fluent directly from the Visual Studio Package Manager console or with the .NET Core CLI.
Create a CDN client
The example below shows creating a client by using the CdnManagementClient class.
static void Main(string[] args)
{
    // Create CDN client
    CdnManagementClient cdn = new CdnManagementClient(new TokenCredentials(authResult.AccessToken))
        { SubscriptionId = subscriptionId };
}
List CDN profiles and endpoints
The first thing the method below does is list all the profiles and endpoints in our resource group, and if it finds a match for the profile and endpoint names specified in our constants, makes a note of that for later so we don't try to create duplicates.
private static void ListProfilesAndEndpoints(CdnManagementClient cdn)
{
    // List all the CDN profiles in this resource group
    var profileList = cdn.Profiles.ListByResourceGroup(resourceGroupName);
    foreach (Profile p in profileList)
    {
        Console.WriteLine("CDN profile {0}", p.Name);
        if (p.Name.Equals(profileName, StringComparison.OrdinalIgnoreCase))
        {
            // Hey, that's the name of the CDN profile we want to create!
            profileAlreadyExists = true;
        }

        //List all the CDN endpoints on this CDN profile
        Console.WriteLine("Endpoints:");
        var endpointList = cdn.Endpoints.ListByProfile(p.Name, resourceGroupName);
        foreach (Endpoint e in endpointList)
        {
            Console.WriteLine("-{0} ({1})", e.Name, e.HostName);
            if (e.Name.Equals(endpointName, StringComparison.OrdinalIgnoreCase))
            {
                // The unique endpoint name already exists.
                endpointAlreadyExists = true;
            }
        }
        Console.WriteLine();
    }
}
Create CDN profiles and endpoints
The example below shows creating an Azure CDN profile.
private static void CreateCdnProfile(CdnManagementClient cdn)
{
    if (profileAlreadyExists)
    {
        //Check to see if the profile already exists
    }
    else
    {
        //Create the new profile
        ProfileCreateParameters profileParms =
            new ProfileCreateParameters() { Location = resourceLocation, Sku = new Sku(SkuName.StandardVerizon) };
        cdn.Profiles.Create(profileName, profileParms, resourceGroupName);
    }
}
Once the profile is created, we'll create an endpoint.
private static void CreateCdnEndpoint(CdnManagementClient cdn)
{
    if (endpointAlreadyExists)
    {
        //Check to see if the endpoint already exists
    }
    else
    {
        //Create the new endpoint
        EndpointCreateParameters endpointParms =
            new EndpointCreateParameters()
            {
                Origins = new List<DeepCreatedOrigin>() { new DeepCreatedOrigin("Contoso", "www.contoso.com") },
                IsHttpAllowed = true,
                IsHttpsAllowed = true,
                Location = resourceLocation
            };
        cdn.Endpoints.Create(endpointName, endpointParms, profileName, resourceGroupName);
    }
}
Purge an endpoint
A common task that we might want to perform is purging the content in our endpoint.
private static void PromptPurgeCdnEndpoint(CdnManagementClient cdn)
{
    if (PromptUser(String.Format("Purge CDN endpoint {0}?", endpointName)))
    {
        Console.WriteLine("Purging endpoint. Please wait...");
        cdn.Endpoints.PurgeContent(resourceGroupName, profileName, endpointName, new List<string>() { "/*" });
        Console.WriteLine("Done.");
        Console.WriteLine();
    }
}
Up Next - Monitoring and logging - Developing Solutions for Microsoft Azure - Part 4.2