

Photo by James Sutton on Unsplash
Implement secure cloud solutions - Developing Solutions for Microsoft Azure - Part 3.2


Table of contents
- 3. Implement Azure Security
- 3.2 Implement secure cloud solutions
- Azure Key Vault
- Azure Key Vault best practices
- Authenticate to Azure Key Vault
- Practical 12: Set and retrieve a secret from Azure Key Vault by using Azure CLI
- Implement Managed Identities
- Managed identities authentication flow
- Configure managed identities
- Acquire an access token
- Azure App Configuration
- Create paired keys and values
- Manage application features
- Secure app configuration data
All the notes on this page have been taken from Microsoft's learning portal - learn.microsoft.com. If any of this material is copyrighted, please let me know in the comments below and I will remove it. The main goal here is to learn and understand the concepts for developing solutions for Microsoft Azure. These notes may be helpful to prepare for the certification AZ-204: Developing Solutions for Microsoft Azure
Continuing from User Authentication and Authorization - Developing Solutions for Microsoft Azure - Part 3.1
3. Implement Azure Security
3.2 Implement secure cloud solutions
Azure Key Vault
Azure Key Vault is a cloud service for securely storing and accessing secrets such as API keys, passwords, certificates, or cryptographic keys.
The Azure Key Vault service supports two types of containers: vaults and managed hardware security module(HSM) pools. Vaults support storing software and HSM-backed keys, secrets, and certificates. Managed HSM pools only support HSM-backed keys.
Azure Key Vault helps solve the following problems:
Secrets Management: Azure Key Vault can be used to Securely store and tightly control access to tokens, passwords, certificates, API keys, and other secrets
Key Management: Azure Key Vault can also be used as a Key Management solution. Azure Key Vault makes it easy to create and control the encryption keys used to encrypt your data.
Certificate Management: Azure Key Vault is also a service that lets you easily provision, manage, and deploy public and private Secure Sockets Layer/Transport Layer Security (SSL/TLS) certificates for use with Azure and your internal connected resources.
Azure Key Vault has two service tiers: Standard, which encrypts with a software key, and a Premium tier, which includes hardware security module(HSM)-protected keys. To see a comparison between the Standard and Premium tiers, see the Azure Key Vault pricing page.
Key benefits of using Azure Key Vault
Centralized application secrets: Centralizing storage of application secrets in Azure Key Vault allows you to control their distribution. For example, instead of storing the connection string in the app's code you can store it securely in Key Vault. Your applications can securely access the information they need by using URIs. These URIs allow the applications to retrieve specific versions of a secret.
Securely store secrets and keys: Access to a key vault requires proper authentication and authorization before a caller (user or application) can get access. Authentication is done via Azure Active Directory. Authorization may be done via Azure role-based access control (Azure RBAC) or Key Vault access policy. Azure RBAC is used when dealing with the management of the vaults and key vault access policy is used when attempting to access data stored in a vault. Azure Key Vaults may be either software-protected or, with the Azure Key Vault Premium tier, hardware-protected by hardware security modules (HSMs).
Monitor access and use: You can monitor activity by enabling logging for your vaults. You have control over your logs and you may secure them by restricting access and you may also delete logs that you no longer need. Azure Key Vault can be configured to:
Archive to a storage account.
Stream to an event hub.
Send the logs to Azure Monitor logs.
Simplified administration of application secrets: Security information must be secured, it must follow a life cycle, and it must be highly available. Azure Key Vault simplifies the process of meeting these requirements by:
Removing the need for in-house knowledge of Hardware Security Modules
Scaling up on short notice to meet your organization’s usage spikes.
Replicating the contents of your Key Vault within a region and to a secondary region. Data replication ensures high availability and takes away the need of any action from the administrator to trigger the failover.
Providing standard Azure administration options via the portal, Azure CLI and PowerShell.
Automating certain tasks on certificates that you purchase from Public CAs, such as enrollment and renewal.
Azure Key Vault best practices
Authentication
To do any operations with Key Vault, you first need to authenticate to it. There are three ways to authenticate to Key Vault:
Managed identities for Azure resources: When you deploy an app on a virtual machine in Azure, you can assign an identity to your virtual machine that has access to Key Vault. You can also assign identities to other Azure resources. The benefit of this approach is that the app or service isn't managing the rotation of the first secret. Azure automatically rotates the service principal client secret associated with the identity. We recommend this approach as a best practice.
Service principal and certificate: You can use a service principal and an associated certificate that has access to Key Vault. We don't recommend this approach because the application owner or developer must rotate the certificate.
Service principal and secret: Although you can use a service principal and a secret to authenticate to Key Vault, we don't recommend it. It's hard to automatically rotate the bootstrap secret that's used to authenticate to Key Vault.
Encryption of data in transit
Azure Key Vault enforces Transport Layer Security (TLS) protocol to protect data when it’s traveling between Azure Key Vault and clients. Clients negotiate a TLS connection with Azure Key Vault. TLS provides strong authentication, message privacy, and integrity (enabling detection of message tampering, interception, and forgery), interoperability, algorithm flexibility, and ease of deployment and use.
Perfect Forward Secrecy (PFS) protects connections between customers’ client systems and Microsoft cloud services by unique keys. Connections also use RSA-based 2,048-bit encryption key lengths. This combination makes it difficult for someone to intercept and access data that is in transit.
Azure Key Vault best practices
Use separate key vaults: Recommended to use a vault per application per environment (Development, Pre-Production and Production). This helps you not share secrets across environments and also reduces the threat in case of a breach.
Control access to your vault: Key Vault data is sensitive and business critical, you need to secure access to your key vaults by allowing only authorized applications and users.
Backup: Create regular back ups of your vault on update/delete/create of objects within a Vault.
Logging: Be sure to turn on logging and alerts.
Recovery options: Turn on soft-delete and purge protection if you want to guard against force deletion of the secret.
Authenticate to Azure Key Vault
Authentication with Key Vault works in conjunction with Azure Active Directory, which is responsible for authenticating the identity of any given security principal.
For applications, there are two ways to obtain a service principal:
Enable a system-assigned managed identity for the application. With managed identity, Azure internally manages the application's service principal and automatically authenticates the application with other Azure services. Managed identity is available for applications deployed to a variety of services.
If you cannot use managed identity, you instead register the application with your Azure AD tenant. Registration also creates a second application object that identifies the app across all tenants.
Note: It is recommended to use a system-assigned managed identity.
Authentication to Key Vault in application code
If you want authentication to Key Vault in application code (instead of using a managed identity), you can use Key Vault SDK. It uses Azure Identity client library, which allows seamless authentication to Key Vault across environments with same code. The table below provides information on the Azure Identity client libraries:
| .NET | Python | Java | JavaScript |
| Azure Identity SDK .NET | Azure Identity SDK Python | Azure Identity SDK Java | Azure Identity SDK JavaScript |
Authentication to Key Vault with REST
Access tokens must be sent to the service using the HTTP Authorization header. Again, this is an alternative to using managed identity:
PUT /keys/MYKEY?api-version=<api_version>  HTTP/1.1
Authorization: Bearer <access_token>
When an access token is not supplied, or when a token is not accepted by the service, an HTTP 401 error will be returned to the client and will include the WWW-Authenticate header, for example:
401 Not Authorized
WWW-Authenticate: Bearer authorization="…", resource="…"
The parameters on the WWW-Authenticate header are:
authorization: The address of the OAuth2 authorization service that may be used to obtain an access token for the request.
resource: The name of the resource (
https://vault.azure.net) to use in the authorization request.
Practical 12: Set and retrieve a secret from Azure Key Vault by using Azure CLI
Prerequisites
- An Azure account with an active subscription.
Step 1: Log in to Azure and start the Cloud Shell
Log in to the Azure portal and open the Cloud Shell.

After the shell opens be sure to select the Bash environment.

Step 2: Create a Key Vault
Let's set some variables for the CLI commands to use to reduce the amount of retyping. Replace the
<myLocation>variable string below with a region that makes sense for you. The Key Vault name needs to be a globally unique name, and the script below generates a random string.myKeyVault=demovault-$RANDOM myLocation=<myLocation>Create a resource group.
az group create --name demo-vault-rg --location $myLocation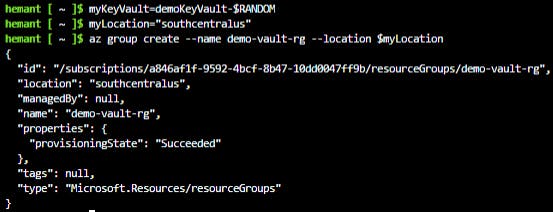
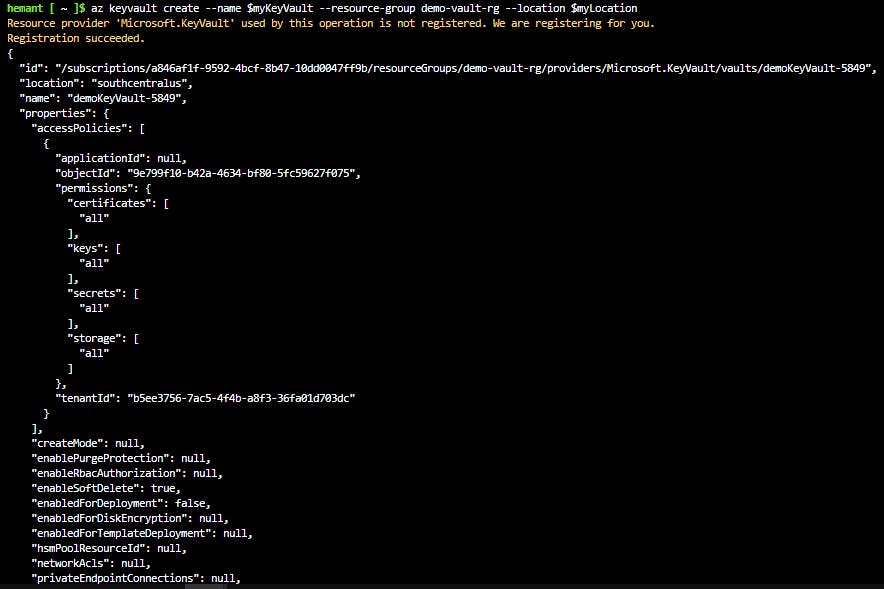
Create a Key Vault by using the
az keyvault createcommand.az keyvault create --name $myKeyVault --resource-group demo-vault-rg --location $myLocationNote: This can take a few minutes to run.
Step 3: Add and retrieve a secret
To add a secret to the vault, you just need to take a couple of additional steps.
Create a secret. Let's add a password that could be used by an app. The password will be called ExamplePassword and will store the value of hVFkk965BuUo in it.
az keyvault secret set --vault-name $myKeyVault --name "ExamplePassword" --value "hVFkk965BuUo"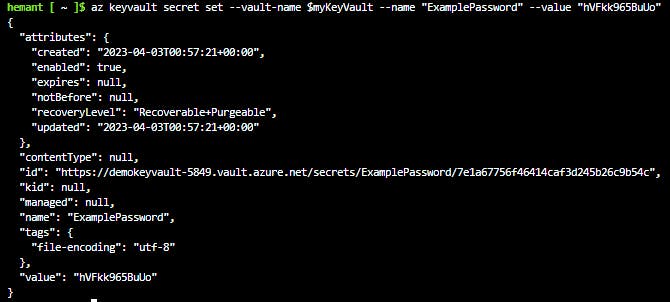
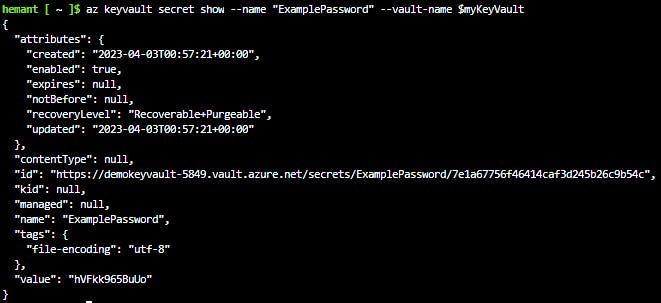
Use the
az keyvault secret showcommand to retrieve the secret.az keyvault secret show --name "ExamplePassword" --vault-name $myKeyVaultThis command will return some JSON. The last line will contain the password in plain text.
"value": "hVFkk965BuUo"
You have created a Key Vault, stored a secret, and retrieved it.
Step 4: Clean up resources
When you no longer need the resources in this exercise use the following command to delete the resource group and associated Key Vault.
az group delete --name az204-vault-rg --no-wait
Implement Managed Identities
Managed identities provide an identity for applications to use when connecting to resources that support Azure Active Directory (Azure AD) authentication. Applications may use the managed identity to obtain Azure AD tokens.
Managed identities eliminate the need for developers to manage credentials.
Types of managed identities
There are two types of managed identities:
A system-assigned managed identity is enabled directly on an Azure service instance. When the identity is enabled, Azure creates an identity for the instance in the Azure AD tenant that's trusted by the subscription of the instance. After the identity is created, the credentials are provisioned onto the instance. The lifecycle of a system-assigned identity is directly tied to the Azure service instance that it's enabled on. If the instance is deleted, Azure automatically cleans up the credentials and the identity in Azure AD.
A user-assigned managed identity is created as a standalone Azure resource. Through a create process, Azure creates an identity in the Azure AD tenant that's trusted by the subscription in use. After the identity is created, the identity can be assigned to one or more Azure service instances. The lifecycle of a user-assigned identity is managed separately from the lifecycle of the Azure service instances to which it's assigned.
Internally, managed identities are service principals of a special type, which are locked to only be used with Azure resources. When the managed identity is deleted, the corresponding service principal is automatically removed.
Characteristics of managed identities
The table below highlights some of the key differences between the two types of managed identities.
| Characteristic | System-assigned managed identity | User-assigned managed identity |
| Creation | Created as part of an Azure resource (for example, an Azure virtual machine or Azure App Service) | Created as a stand-alone Azure resource |
| Lifecycle | Shared lifecycle with the Azure resource that the managed identity is created with. When the parent resource is deleted, the managed identity is deleted as well. | Independent life-cycle. Must be explicitly deleted. |
| Sharing across Azure resources | Cannot be shared, it can only be associated with a single Azure resource. | Can be shared, the same user-assigned managed identity can be associated with more than one Azure resource. |
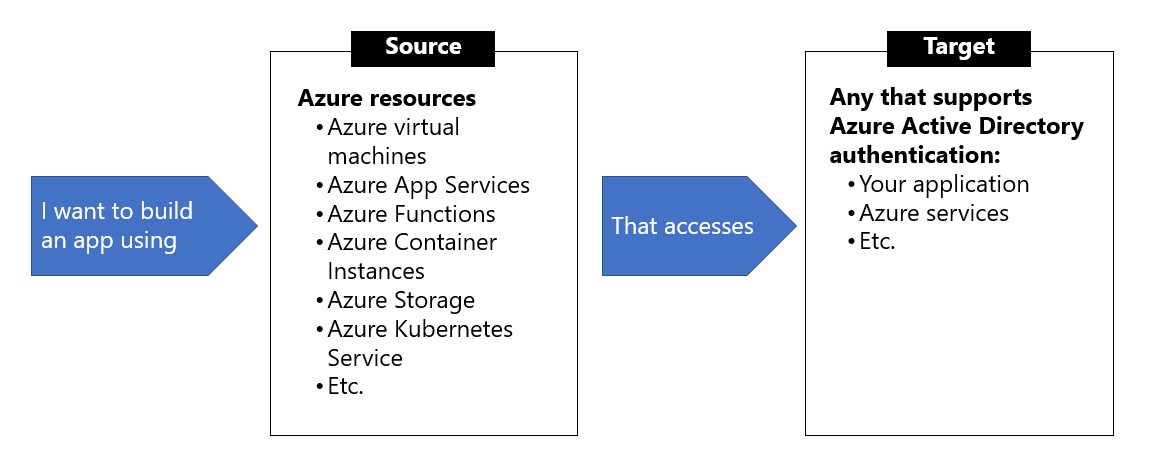
When to use managed identities
The image below gives an overview of the scenarios that support using managed identities. For example, you can use managed identities if you want to build an app using Azure App Services that accesses Azure Storage without having to manage any credentials.
What Azure services support managed identities?
Managed identities for Azure resources can be used to authenticate to services that support Azure Active Directory authentication. For a list of Azure services that support the managed identities for Azure resources feature, visit Services that support managed identities for Azure resources.
Managed identities authentication flow
Below are the flows detailing how the two types of managed identities work with an Azure virtual machine.
How a system-assigned managed identity works with an Azure virtual machine
Azure Resource Manager receives a request to enable the system-assigned managed identity on a virtual machine.
Azure Resource Manager creates a service principal in Azure Active Directory for the identity of the virtual machine. The service principal is created in the Azure Active Directory tenant that's trusted by the subscription.
Azure Resource Manager configures the identity on the virtual machine by updating the Azure Instance Metadata Service identity endpoint with the service principal client ID and certificate.
After the virtual machine has an identity, use the service principal information to grant the virtual machine access to Azure resources. To call Azure Resource Manager, use role-based access control in Azure Active Directory to assign the appropriate role to the virtual machine service principal. To call Key Vault, grant your code access to the specific secret or key in Key Vault.
Your code that's running on the virtual machine can request a token from the Azure Instance Metadata service endpoint, accessible only from within the virtual machine:
http://169.254.169.254/metadata/identity/oauth2/tokenA call is made to Azure Active Directory to request an access token (as specified in step 5) by using the client ID and certificate configured in step 3. Azure Active Directory returns a JSON Web Token (JWT) access token.
Your code sends the access token on a call to a service that supports Azure Active Directory authentication.
How a user-assigned managed identity works with an Azure virtual machine
Azure Resource Manager receives a request to create a user-assigned managed identity.
Azure Resource Manager creates a service principal in Azure Active Directory for the user-assigned managed identity. The service principal is created in the Azure Active Directory tenant that's trusted by the subscription.
Azure Resource Manager receives a request to configure the user-assigned managed identity on a virtual machine and updates the Azure Instance Metadata Service identity endpoint with the user-assigned managed identity service principal client ID and certificate.
After the user-assigned managed identity is created, use the service principal information to grant the identity access to Azure resources. To call Azure Resource Manager, use role-based access control in Azure Active Directory to assign the appropriate role to the service principal of the user-assigned identity. To call Key Vault, grant your code access to the specific secret or key in Key Vault.
Note: You can also do this step before step 3.
Your code that's running on the virtual machine can request a token from the Azure Instance Metadata Service identity endpoint, accessible only from within the virtual machine:
http://169.254.169.254/metadata/identity/oauth2/tokenA call is made to Azure Active Directory to request an access token (as specified in step 5) by using the client ID and certificate configured in step 3. Azure Active Directory returns a JSON Web Token (JWT) access token.
Your code sends the access token on a call to a service that supports Azure Active Directory authentication.
Configure managed identities
You can configure an Azure virtual machine with a managed identity during, or after, the creation of the virtual machine. Below are some CLI examples showing the commands for both system- and user-assigned identities.
System-assigned managed identity
To create, or enable, an Azure virtual machine with the system-assigned managed identity your account needs the Virtual Machine Contributor role assignment. No additional Azure AD directory role assignments are required.
Enable system-assigned managed identity during creation of an Azure virtual machine
The following example creates a virtual machine named myVM with a system-assigned managed identity, as requested by the --assign-identity parameter, with the specified --role and --scope. The --admin-username and --admin-password parameters specify the administrative user name and password account for virtual machine sign-in. Update these values as appropriate for your environment:
az vm create --resource-group myResourceGroup \
    --name myVM --image win2016datacenter \
    --generate-ssh-keys \
    --assign-identity \
    --role contributor \
    --scope mySubscription \
    --admin-username azureuser \
    --admin-password myPassword12
Enable system-assigned managed identity on an existing Azure virtual machine
Use the az vm identity assign command to assign the system-assigned identity to an existing virtual machine:
az vm identity assign -g myResourceGroup -n myVm
User-assigned managed identity
To assign a user-assigned identity to a virtual machine during its creation, your account needs the Virtual Machine Contributor and Managed Identity Operator role assignments. No additional Azure AD directory role assignments are required.
Enabling user-assigned managed identities is a two-step process:
Create the user-assigned identity
Assign the identity to a virtual machine
Create a user-assigned identity
Create a user-assigned managed identity using az identity create. The -g parameter specifies the resource group where the user-assigned managed identity is created, and the -n parameter specifies its name.
az identity create -g myResourceGroup -n myUserAssignedIdentity
Assign a user-assigned managed identity during the creation of an Azure virtual machine
The following example creates a virtual machine associated with the new user-assigned identity, as specified by the --assign-identity parameter, with the given --role and --scope.
BashCopy
az vm create \
--resource-group <RESOURCE GROUP> \
--name <VM NAME> \
--image UbuntuLTS \
--admin-username <USER NAME> \
--admin-password <PASSWORD> \
--assign-identity <USER ASSIGNED IDENTITY NAME> \
--role <ROLE> \
--scope <SUBSCRIPTION>
Assign a user-assigned managed identity to an existing Azure virtual machine
Assign the user-assigned identity to your virtual machine using az vm identity assign.
az vm identity assign \
    -g <RESOURCE GROUP> \
    -n <VM NAME> \
    --identities <USER ASSIGNED IDENTITY>
Azure SDKs with managed identities for Azure resources support
Azure supports multiple programming platforms through a series of Azure SDKs. Several of them have been updated to support managed identities for Azure resources, and provide corresponding samples to demonstrate usage.
Acquire an access token
A client application can request managed identities for Azure resources app-only access token for accessing a given resource. The token is based on the managed identities for Azure resources service principal. As such, there is no need for the client to register itself to obtain an access token under its own service principal. The token is suitable for use as a bearer token in service-to-service calls requiring client credentials.
This unit provides various code and script examples for token acquisition, as well as guidance on important topics such as handling token expiration and HTTP errors.
Important: All sample code/script in this unit assumes the client is running on a virtual machine with managed identities for Azure resources.
Acquire a token
The fundamental interface for acquiring an access token is based on REST, making it accessible to any client application running on the VM that can make HTTP REST calls. This is similar to the Azure AD programming model, except the client uses an endpoint on the virtual machine versus an Azure AD endpoint.
Sample request using the Azure Instance Metadata Service (IMDS) endpoint:
GET 'http://169.254.169.254/metadata/identity/oauth2/token?api-version=2018-02-01&resource=https://management.azure.com/' HTTP/1.1 Metadata: true
| Element | Description |
GET | The HTTP verb, indicating you want to retrieve data from the endpoint. In this case, an OAuth access token. |
http://169.254.169.254/metadata/identity/oauth2/token | The managed identities for Azure resources endpoint for the Instance Metadata Service. |
api-version | A query string parameter, indicating the API version for the IMDS endpoint. Please use API version 2018-02-01 or greater. |
resource | A query string parameter, indicating the App ID URI of the target resource. It also appears in the aud (audience) claim of the issued token. This example requests a token to access Azure Resource Manager, which has an App ID URI of https://management.azure.com/. |
Metadata | An HTTP request header field, required by managed identities for Azure resources as a mitigation against Server Side Request Forgery (SSRF) attack. This value must be set to "true", in all lower case. |
Sample response:
HTTP/1.1 200 OK
Content-Type: application/json
{
  "access_token": "eyJ0eXAi...",
  "refresh_token": "",
  "expires_in": "3599",
  "expires_on": "1506484173",
  "not_before": "1506480273",
  "resource": "https://management.azure.com/",
  "token_type": "Bearer"
}
Get a token by using C#
The code sample below builds the request to acquire a token, calls the endpoint, and then extracts the token from the response.
using System;
using System.Collections.Generic;
using System.IO;
using System.Net;
using System.Web.Script.Serialization;

// Build request to acquire managed identities for Azure resources token
HttpWebRequest request = (HttpWebRequest)WebRequest.Create("http://169.254.169.254/metadata/identity/oauth2/token?api-version=2018-02-01&resource=https://management.azure.com/");
request.Headers["Metadata"] = "true";
request.Method = "GET";

try
{
    // Call /token endpoint
    HttpWebResponse response = (HttpWebResponse)request.GetResponse();

    // Pipe response Stream to a StreamReader, and extract access token
    StreamReader streamResponse = new StreamReader(response.GetResponseStream());
    string stringResponse = streamResponse.ReadToEnd();
    JavaScriptSerializer j = new JavaScriptSerializer();
    Dictionary<string, string> list = (Dictionary<string, string>) j.Deserialize(stringResponse, typeof(Dictionary<string, string>));
    string accessToken = list["access_token"];
}
catch (Exception e)
{
    string errorText = String.Format("{0} \n\n{1}", e.Message, e.InnerException != null ? e.InnerException.Message : "Acquire token failed");
}
Token caching
While the managed identities for Azure resources subsystem does cache tokens, we also recommend implementing token caching in your code. As a result, you should prepare for scenarios where the resource indicates that the token is expired.
On-the-wire calls to Azure Active Directory result only when:
Cache miss occurs due to no token in the managed identities for Azure resources subsystem cache.
The cached token is expired.
Retry guidance
It is recommended to retry if you receive a 404, 429, or 5xx error code. Throttling limits apply to the number of calls made to the IMDS endpoint. When the throttling threshold is exceeded, IMDS endpoint limits any further requests while the throttle is in effect. During this period, the IMDS endpoint will return the HTTP status code 429 ("Too many requests"), and the requests fail.
Azure App Configuration
Azure App Configuration provides a service to centrally manage application settings and feature flags. Use App Configuration to store all the settings for your application and secure their access in one place.
App Configuration offers the following benefits:
A fully managed service that can be set up in minutes
Flexible key representations and mappings
Tagging with labels
Point-in-time replay of settings
Dedicated UI for feature flag management
Comparison of two sets of configurations on custom-defined dimensions
Enhanced security through Azure-managed identities
Complete data encryptions, at rest or in transit
Native integration with popular frameworks
App Configuration complements Azure Key Vault, which is used to store application secrets. App Configuration makes it easier to implement the following scenarios:
Centralize management and distribution of hierarchical configuration data for different environments and geographies
Dynamically change application settings without the need to redeploy or restart an application
Control feature availability in real-time
Use App Configuration
The easiest way to add an App Configuration store to your application is through a client library that Microsoft provides. Based on the programming language and framework, the following best methods are available to you.
| Programming language and framework | How to connect |
| .NET Core and ASP.NET Core | App Configuration provider for .NET Core |
| .NET Framework and ASP.NET | App Configuration builder for .NET |
| Java Spring | App Configuration client for Spring Cloud |
| Others | App Configuration REST API |
Create paired keys and values
Azure App Configuration stores configuration data as key-value pairs.
Keys
Keys serve as the name for key-value pairs and are used to store and retrieve corresponding values. It's a common practice to organize keys into a hierarchical namespace by using a character delimiter, such as / or :. Use a convention that's best suited for your application. App Configuration treats keys as a whole. It doesn't parse keys to figure out how their names are structured or enforce any rule on them.
Keys stored in App Configuration are case-sensitive, unicode-based strings. The keys app1 and App1 are distinct in an App Configuration store. Keep this in mind when you use configuration settings within an application because some frameworks handle configuration keys case-insensitively.
You can use any unicode character in key names entered into App Configuration except for *, ,, and \. These characters are reserved. If you need to include a reserved character, you must escape it by using \{Reserved Character}. There's a combined size limit of 10,000 characters on a key-value pair. This limit includes all characters in the key, its value, and all associated optional attributes. Within this limit, you can have many hierarchical levels for keys.
Design key namespaces
There are two general approaches to naming keys used for configuration data: flat or hierarchical. These methods are similar from an application usage standpoint, but hierarchical naming offers a number of advantages:
Easier to read. Instead of one long sequence of characters, delimiters in a hierarchical key name function as spaces in a sentence.
Easier to manage. A key name hierarchy represents logical groups of configuration data.
Easier to use. It's simpler to write a query that pattern-matches keys in a hierarchical structure and retrieves only a portion of configuration data.
Below are some examples of how you can structure your key names into a hierarchy:
Based on component services
  AppName:Service1:ApiEndpoint
  AppName:Service2:ApiEndpoint
Based on deployment regions
  AppName:Region1:DbEndpoint
  AppName:Region2:DbEndpoint
Label keys
Key values in App Configuration can optionally have a label attribute. Labels are used to differentiate key values with the same key. A key app1 with labels A and B forms two separate keys in an App Configuration store. By default, the label for a key value is empty, or null.
Label provides a convenient way to create variants of a key. A common use of labels is to specify multiple environments for the same key:
Key = AppName:DbEndpoint & Label = Test
Key = AppName:DbEndpoint & Label = Staging
Key = AppName:DbEndpoint & Label = Production
Version key values
App Configuration doesn't version key values automatically as they're modified. Use labels as a way to create multiple versions of a key value. For example, you can input an application version number or a Git commit ID in labels to identify key values associated with a particular software build.
Query key values
Each key value is uniquely identified by its key plus a label that can be null. You query an App Configuration store for key values by specifying a pattern. The App Configuration store returns all key values that match the pattern and their corresponding values and attributes.
Values
Values assigned to keys are also unicode strings. You can use all unicode characters for values. There's an optional user-defined content type associated with each value. Use this attribute to store information, for example an encoding scheme, about a value that helps your application to process it properly.
Configuration data stored in an App Configuration store, which includes all keys and values, is encrypted at rest and in transit. App Configuration isn't a replacement solution for Azure Key Vault. Don't store application secrets in it.
Manage application features
Feature management is a modern software-development practice that decouples feature release from code deployment and enables quick changes to feature availability on demand. It uses a technique called feature flags (also known as feature toggles, feature switches, and so on) to dynamically administer a feature's lifecycle.
Basic concepts
Here are several new terms related to feature management:
Feature flag: A feature flag is a variable with a binary state of on or off. The feature flag also has an associated code block. The state of the feature flag triggers whether the code block runs or not.
Feature manager: A feature manager is an application package that handles the lifecycle of all the feature flags in an application. The feature manager typically provides additional functionality, such as caching feature flags and updating their states.
Filter: A filter is a rule for evaluating the state of a feature flag. A user group, a device or browser type, a geographic location, and a time window are all examples of what a filter can represent.
An effective implementation of feature management consists of at least two components working in concert:
An application that makes use of feature flags.
A separate repository that stores the feature flags and their current states.
Feature flag usage in code
The basic pattern for implementing feature flags in an application is simple. You can think of a feature flag as a Boolean state variable used with an if conditional statement in your code:
if (featureFlag) {
    // Run the following code
}
In this case, if featureFlag is set to True, the enclosed code block is executed; otherwise, it's skipped. You can set the value of featureFlag statically, as in the following code example:
bool featureFlag = true;
You can also evaluate the flag's state based on certain rules:
bool featureFlag = isBetaUser();
A slightly more complicated feature flag pattern includes an else statement as well:
if (featureFlag) {
    // This following code will run if the featureFlag value is true
} else {
    // This following code will run if the featureFlag value is false
}
Feature flag declaration
Each feature flag has two parts: a name and a list of one or more filters that are used to evaluate if a feature's state is on (that is, when its value is True). A filter defines a use case for when a feature should be turned on.
When a feature flag has multiple filters, the filter list is traversed in order until one of the filters determines the feature should be enabled. At that point, the feature flag is on, and any remaining filter results are skipped. If no filter indicates the feature should be enabled, the feature flag is off.
The feature manager supports appsettings.json as a configuration source for feature flags. The following example shows how to set up feature flags in a JSON file:
"FeatureManagement": {
    "FeatureA": true, // Feature flag set to on
    "FeatureB": false, // Feature flag set to off
    "FeatureC": {
        "EnabledFor": [
            {
                "Name": "Percentage",
                "Parameters": {
                    "Value": 50
                }
            }
        ]
    }
}
Feature flag repository
To use feature flags effectively, you need to externalize all the feature flags used in an application. This approach allows you to change feature flag states without modifying and redeploying the application itself.
Azure App Configuration is designed to be a centralized repository for feature flags. You can use it to define different kinds of feature flags and manipulate their states quickly and confidently. You can then use the App Configuration libraries for various programming language frameworks to easily access these feature flags from your application.
Secure app configuration data
In this unit you will learn how to secure your apps configuration data by using:
Customer-managed keys
Private endpoints
Managed identities
Encrypt configuration data by using customer-managed keys
Azure App Configuration encrypts sensitive information at rest using a 256-bit AES encryption key provided by Microsoft. Every App Configuration instance has its own encryption key managed by the service and used to encrypt sensitive information. Sensitive information includes the values found in key-value pairs. When customer-managed key capability is enabled, App Configuration uses a managed identity assigned to the App Configuration instance to authenticate with Azure Active Directory. The managed identity then calls Azure Key Vault and wraps the App Configuration instance's encryption key. The wrapped encryption key is then stored and the unwrapped encryption key is cached within App Configuration for one hour. App Configuration refreshes the unwrapped version of the App Configuration instance's encryption key hourly. This ensures availability under normal operating conditions.
Enable customer-managed key capability
The following components are required to successfully enable the customer-managed key capability for Azure App Configuration:
Standard tier Azure App Configuration instance
Azure Key Vault with soft-delete and purge-protection features enabled
An RSA or RSA-HSM key within the Key Vault: The key must not be expired, it must be enabled, and it must have both wrap and unwrap capabilities enabled
Once these resources are configured, two steps remain to allow Azure App Configuration to use the Key Vault key:
Assign a managed identity to the Azure App Configuration instance
Grant the identity
GET,WRAP, andUNWRAPpermissions in the target Key Vault's access policy.
Use private endpoints for Azure App Configuration
You can use private endpoints for Azure App Configuration to allow clients on a virtual network (VNet) to securely access data over a private link. The private endpoint uses an IP address from the VNet address space for your App Configuration store. Network traffic between the clients on the VNet and the App Configuration store traverses over the VNet using a private link on the Microsoft backbone network, eliminating exposure to the public internet.
Using private endpoints for your App Configuration store enables you to:
Secure your application configuration details by configuring the firewall to block all connections to App Configuration on the public endpoint.
Increase security for the virtual network (VNet) ensuring data doesn't escape from the VNet.
Securely connect to the App Configuration store from on-premises networks that connect to the VNet using VPN or ExpressRoutes with private-peering.
Private endpoints for App Configuration
When creating a private endpoint, you must specify the App Configuration store to which it connects. If you have multiple App Configuration stores, you need a separate private endpoint for each store. Azure relies upon DNS resolution to route connections from the VNet to the configuration store over a private link. You can quickly find connections strings in the Azure portal by selecting your App Configuration store, then selecting Settings > Access Keys.
DNS changes for private endpoints
When you create a private endpoint, the DNS CNAME resource record for the configuration store is updated to an alias in a subdomain with the prefix privatelink. Azure also creates a private DNS zone corresponding to the privatelink subdomain, with the DNS A resource records for the private endpoints.
When you resolve the endpoint URL from within the VNet hosting the private endpoint, it resolves to the private endpoint of the store. When resolved from outside the VNet, the endpoint URL resolves to the public endpoint. When you create a private endpoint, the public endpoint is disabled.
Managed identities
A managed identity from Azure Active Directory (Azure AD) allows Azure App Configuration to easily access other AAD-protected resources, such as Azure Key Vault. The identity is managed by the Azure platform. It does not require you to provision or rotate any secrets.
Your application can be granted two types of identities:
A system-assigned identity is tied to your configuration store. It's deleted if your configuration store is deleted. A configuration store can only have one system-assigned identity.
A user-assigned identity is a standalone Azure resource that can be assigned to your configuration store. A configuration store can have multiple user-assigned identities.
Add a system-assigned identity
To set up a managed identity using the Azure CLI, use the az appconfig identity assign command against an existing configuration store. The following Azure CLI example creates a system-assigned identity for an Azure App Configuration store named myTestAppConfigStore.
az appconfig identity assign \
    --name myTestAppConfigStore \
    --resource-group myResourceGroup
Add a user-assigned identity
Creating an App Configuration store with a user-assigned identity requires that you create the identity and then assign its resource identifier to your store. The following Azure CLI examples create a user-assigned identity called myUserAssignedIdentity and assign it to an Azure App Configuration store named myTestAppConfigStore.
Create an identity using the az identity create command:
az identity create --resource-group myResourceGroup --name myUserAssignedIdentity
Assign the new user-assigned identity to the myTestAppConfigStore configuration store:
az appconfig identity assign --name myTestAppConfigStore \
    --resource-group myResourceGroup \
    --identities /subscriptions/[subscription id]/resourcegroups/myResourceGroup/providers/Microsoft.ManagedIdentity/userAssignedIdentities/myUserAssignedIdentity
Up Next - Caching and content delivery - Developing Solutions for Microsoft Azure - Part 4.1