

Photo by Immo Wegmann on Unsplash
User Authentication and Authorization - Developing Solutions for Microsoft Azure - Part 3.1


Table of contents
- 3. Implement Azure Security
- 3.1 Implement user authentication and authorization
- Microsoft Identity Platform
- Service Principals
- Permissions and consent
- Conditional access
- Microsoft Authentication Library
- Initialize client applications
- Practical 11: Implement interactive authentication by using MSAL.NET
- Shared Access Signature
- When to use shared access signatures
- Stored access policies
- Microsoft Graph
- Query Microsoft Graph by using REST
- Query Microsoft Graph by using SDKs
- Best practices for Microsoft Graph
All the notes on this page have been taken from Microsoft's learning portal - learn.microsoft.com. If any of this material is copyrighted, please let me know in the comments below and I will remove it. The main goal here is to learn and understand the concepts for developing solutions for Microsoft Azure. These notes may be helpful to prepare for the certification AZ-204: Developing Solutions for Microsoft Azure
Continuing from Azure Blob storage - Developing Solutions for Microsoft Azure - Part 2.2
3. Implement Azure Security
3.1 Implement user authentication and authorization
Microsoft Identity Platform
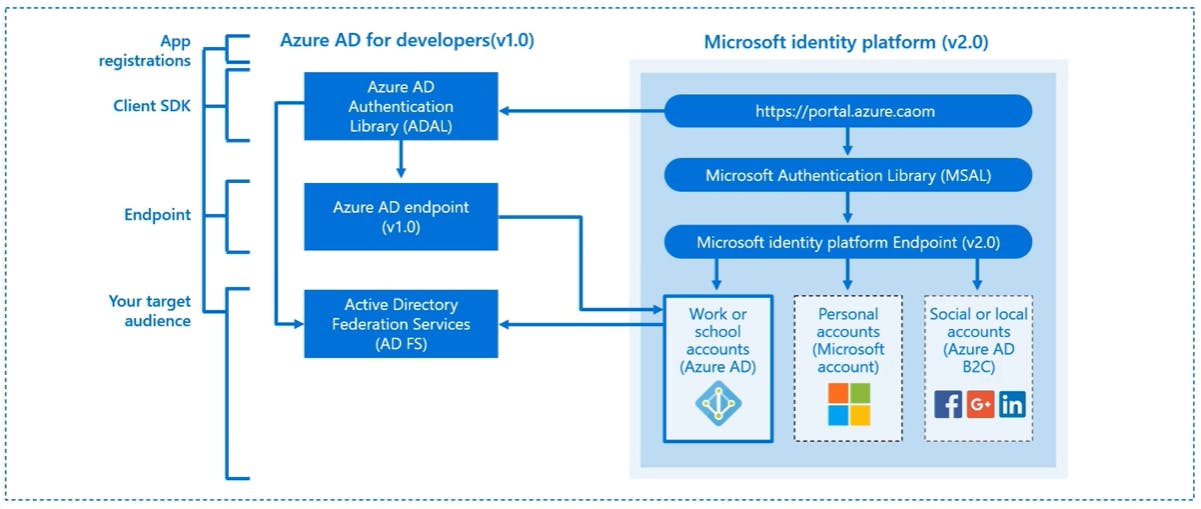
The Microsoft identity platform helps you build applications your users and customers can sign in to using their Microsoft identities or social accounts, and provide authorized access to your own APIs or Microsoft APIs
There are several components that make up the Microsoft identity platform:
OAuth 2.0 and OpenID Connect standard-compliant authentication service enabling developers to authenticate several identity types, including:
Work or school accounts, provisioned through Azure Active Directory
Personal Microsoft account, like Skype, Xbox, and Outlook.com
Social or local accounts, by using Azure Active Directory B2C
Open-source libraries: Microsoft Authentication Libraries (MSAL) and support for other standards-compliant libraries
Application management portal: A registration and configuration experience in the Azure portal, along with the other Azure management capabilities.
Application configuration API and PowerShell: Programmatic configuration of your applications through the Microsoft Graph API and PowerShell so you can automate your DevOps tasks.
Service Principals
When you register an app in the Azure portal, you choose whether it is Single Tenant (only accessible in your tenant) or Multi Tenant (accessible in other tenants)
If you register an application in the portal, below objects are automatically created in your home tenant:
Application object
Service principal object: Application, Managed identity, Legacy
Application object
An Azure Active Directory application is defined by its one and only application object, which resides in the Azure Active Directory tenant where the application was registered (known as the application's "home" tenant). An application object is used as a template or blueprint to create one or more service principal objects. A service principal is created in every tenant where the application is used. Similar to a class in object-oriented programming, the application object has some static properties that are applied to all the created service principals (or application instances).
The application object describes three aspects of an application: how the service can issue tokens in order to access the application, resources that the application might need to access, and the actions that the application can take.
The Microsoft Graph Application entity defines the schema for an application object's properties.
Service principal object
To access resources that are secured by an Azure Active Directory tenant, the entity that requires access must be represented by a security principal. This is true for both users (user principal) and applications (service principal).
The security principal defines the access policy and permissions for the user/application in the Azure Active Directory tenant. This enables core features such as authentication of the user/application during sign-in, and authorization during resource access.
There are three types of service principal:
Application - This type of service principal is the local representation, or application instance, of a global application object in a single tenant or directory. A service principal is created in each tenant where the application is used and references the globally unique app object. The service principal object defines what the app can actually do in the specific tenant, who can access the app, and what resources the app can access.
Managed identity - This type of service principal is used to represent a managed identity. Managed identities provide an identity for applications to use when connecting to resources that support Azure Active Directory authentication. When a managed identity is enabled, a service principal representing that managed identity is created in your tenant. Service principals representing managed identities can be granted access and permissions, but cannot be updated or modified directly.
Legacy - This type of service principal represents a legacy app, which is an app created before app registrations were introduced or an app created through legacy experiences. A legacy service principal can have credentials, service principal names, reply URLs, and other properties that an authorized user can edit, but does not have an associated app registration. The service principal can only be used in the tenant where it was created.
Relationship between application objects and service principals
The application object is the global representation of your application for use across all tenants, and the service principal is the local representation for use in a specific tenant. The application object serves as the template from which common and default properties are derived for use in creating corresponding service principal objects.
An application object has:
A 1:1 relationship with the software application, and
A 1:many relationship with its corresponding service principal object(s).
A service principal must be created in each tenant where the application is used, enabling it to establish an identity for sign-in and/or access to resources being secured by the tenant. A single-tenant application has only one service principal (in its home tenant), created and consented for use during application registration. A multi-tenant application also has a service principal created in each tenant where a user from that tenant has consented to its use.
Permissions and consent
Applications that integrate with the Microsoft identity platform follow an authorization model that gives users and administrators control over how data can be accessed.
The Microsoft identity platform implements the OAuth 2.0 authorization protocol. OAuth 2.0 is a method through which a third-party app can access web-hosted resources on behalf of a user.
When a resource's functionality is chunked into small permission sets, third-party apps can be built to request only the permissions that they need to perform their function. Users and administrators can know what data the app can access.
In OAuth 2.0, these types of permission sets are called scopes. They're also often referred to as permissions. In the Microsoft identity platform, a permission is represented as a string value. An app requests the permissions it needs by specifying the permission in the scope query parameter. Identity platform supports several well-defined OpenID Connect scopes as well as resource-based permissions. For example, the permission string https://graph.microsoft.com/Calendars.Read is used to request permission to read users calendars in Microsoft Graph.
Note: In requests to the authorization, token or consent endpoints for the Microsoft Identity platform, if the resource identifier is omitted in the scope parameter, the resource is assumed to be Microsoft Graph. For example, scope=User.Read is equivalent to https://graph.microsoft.com/User.Read.
Permission types
The Microsoft identity platform supports two types of permissions:
Delegated permissions are used by apps that have a signed-in user present. For these apps, either the user or an administrator consents to the permissions that the app requests. The app is delegated with the permission to act as a signed-in user when it makes calls to the target resource.
Application permissions are used by apps that run without a signed-in user present. For example, apps that run as background services or daemons. Only an administrator can consent to app-only access permissions.
Consent types
There are four consent types:
Static user consent
In the static user consent scenario, you must specify all the permissions it needs in the app's configuration in the Azure portal. If the user (or administrator, as appropriate) has not granted consent for this app, then Microsoft identity platform will prompt the user to provide consent at this time. Static permissions also enables administrators to consent on behalf of all users in the organization.
While static permissions of the app defined in the Azure portal keep the code nice and simple, it presents some possible issues for developers:
The app needs to request all the permissions it would ever need upon the user's first sign-in. This can lead to a long list of permissions that discourages end users from approving the app's access on initial sign-in.
The app needs to know all of the resources it would ever access ahead of time. It is difficult to create apps that could access an arbitrary number of resources.
Incremental and Dynamic user consent
With the Microsoft identity platform endpoint, you can ignore the static permissions defined in the app registration information in the Azure portal and request permissions incrementally instead. You can ask for a minimum set of permissions upfront and request more over time as the customer uses additional app features.
To do so, you can specify the scopes your app needs at any time by including the new scopes in the scope parameter when requesting an access token - without the need to pre-define them in the application registration information. If the user hasn't yet consented to new scopes added to the request, they'll be prompted to consent only to the new permissions. Incremental, or dynamic consent, only applies to delegated permissions and not to app-only access permissions.
Important: Dynamic consent can be convenient, but presents a big challenge for permissions that require admin consent, since the admin consent experience doesn't know about those permissions at consent time. If you require admin privileged permissions or if your app uses dynamic consent, you must register all of the permissions in the Azure portal (not just the subset of permissions that require admin consent). This enables tenant admins to consent on behalf of all their users.
Admin consent
Admin consent is required when your app needs access to certain high-privilege permissions. Admin consent ensures that administrators have some additional controls before authorizing apps or users to access highly privileged data from the organization.
Admin consent done on behalf of an organization still requires the static permissions registered for the app. Set those permissions for apps in the app registration portal if you need an admin to give consent on behalf of the entire organization. This reduces the cycles required by the organization admin to set up the application.
Requesting individual user consent
In an OpenID Connect or OAuth 2.0 authorization request, an app can request the permissions it needs by using the scope query parameter. For example, when a user signs in to an app, the app sends a request like the following example. Line breaks are added for legibility.
GET https://login.microsoftonline.com/common/oauth2/v2.0/authorize?
client_id=6731de76-14a6-49ae-97bc-6eba6914391e
&response_type=code
&redirect_uri=http%3A%2F%2Flocalhost%2Fmyapp%2F
&response_mode=query
&scope=
https%3A%2F%2Fgraph.microsoft.com%2Fcalendars.read%20
https%3A%2F%2Fgraph.microsoft.com%2Fmail.send
&state=12345
The scope parameter is a space-separated list of delegated permissions that the app is requesting. Each permission is indicated by appending the permission value to the resource's identifier (the application ID URI). In the request example, the app needs permission to read the user's calendar and send mail as the user.
After the user enters their credentials, the Microsoft identity platform checks for a matching record of user consent. If the user hasn't consented to any of the requested permissions in the past, and if the administrator hasn't consented to these permissions on behalf of the entire organization, the Microsoft identity platform asks the user to grant the requested permissions.
Conditional access
Conditional Access enables developers and enterprise customers to protect services in a multitude of ways including:
Allowing only Intune enrolled devices to access specific services
Restricting user locations and IP ranges
How does Conditional Access impact an app?
In most common cases, Conditional Access does not change an app's behavior or require any changes from the developer. Only in certain cases when an app indirectly or silently requests a token for a service does an app require code changes to handle Conditional Access challenges.
Specifically, the following scenarios require code to handle Conditional Access challenges:
Apps performing the on-behalf-of flow
Apps accessing multiple services/resources
Single-page apps using MSAL.js
Web apps calling a resource
Conditional Access policies can be applied to the app and also a web API your app accesses. Depending on the scenario, an enterprise customer can apply and remove Conditional Access policies at any time. For your app to continue functioning when a new policy is applied, implement challenge handling.
Conditional Access examples
Some scenarios require code changes to handle Conditional Access whereas others work as is. Here are a few scenarios using Conditional Access to do multifactor authentication that gives some insight into the difference.
You are building a single-tenant iOS app and apply a Conditional Access policy. The app signs in a user and doesn't request access to an API. When the user signs in, the policy is automatically invoked and the user needs to perform multifactor authentication.
You are building an app that uses a middle tier service to access a downstream API. An enterprise customer at the company using this app applies a policy to the downstream API. When an end user signs in, the app requests access to the middle tier and sends the token. The middle tier performs on-behalf-of flow to request access to the downstream API. At this point, a claims "challenge" is presented to the middle tier. The middle tier sends the challenge back to the app, which needs to comply with the Conditional Access policy.
Microsoft Authentication Library
Microsoft Authentication Library (MSAL) can be used to provide secure access to Microsoft Graph, other Microsoft APIs, third-party web APIs, or your own web API.
MSAL gives you many ways to get tokens, with a consistent API for a number of platforms. Using MSAL provides the following benefits:
No need to directly use the OAuth libraries or code against the protocol in your application.
Acquires tokens on behalf of a user or on behalf of an application (when applicable to the platform).
Maintains a token cache and refreshes tokens for you when they are close to expire. You don't need to handle token expiration on your own.
Helps you specify which audience you want your application to sign in.
Helps you set up your application from configuration files.
Helps you troubleshoot your app by exposing actionable exceptions, logging, and telemetry.
| Library | Supported platforms and frameworks |
| MSAL for Android | Android |
| MSAL Angular | Single-page apps with Angular and Angular.js frameworks |
| MSAL for iOS and macOS | iOS and macOS |
| MSAL Go (Preview) | Windows, macOS, Linux |
| MSAL Java | Windows, macOS, Linux |
| MSAL.js | JavaScript/TypeScript frameworks such as Vue.js, Ember.js, or Durandal.js |
| MSAL.NET | .NET Framework, .NET Core, Xamarin Android, Xamarin iOS, Universal Windows Platform |
| MSAL Node | Web apps with Express, desktop apps with Electron, Cross-platform console apps |
| MSAL Python | Windows, macOS, Linux |
| MSAL React | Single-page apps with React and React-based libraries (Next.js, Gatsby.js) |
Authentication flows
Below are some of the different authentication flows provided by Microsoft Authentication Library (MSAL). These flows can be used in a variety of different application scenarios.
| Flow | Description |
| Authorization code | Native and web apps securely obtain tokens in the name of the user |
| Client credentials | Service applications run without user interaction |
| On-behalf-of | The application calls a service/web API, which in turns calls Microsoft Graph |
| Implicit | Used in browser-based applications |
| Device code | Enables sign-in to a device by using another device that has a browser |
| Integrated Windows | Windows computers silently acquire an access token when they are domain joined |
| Interactive | Mobile and desktops applications call Microsoft Graph in the name of a user |
| Username/password | The application signs in a user by using their username and password |
Public client, and confidential client applications
Security tokens can be acquired by multiple types of applications, separated into the following two categories. Each is used with different libraries and objects.
Public client applications: Are apps that run on devices or desktop computers or in a web browser. They're not trusted to safely keep application secrets, so they only access web APIs on behalf of the user. (They support only public client flows.) Public clients can't hold configuration-time secrets, so they don't have client secrets.
Confidential client applications: Are apps that run on servers (web apps, web API apps, or even service/daemon apps). They're considered difficult to access, and for that reason capable of keeping an application secret. Confidential clients can hold configuration-time secrets. Each instance of the client has a distinct configuration (including client ID and client secret).
Initialize client applications
The recommended way to instantiate an application is by using the application builders: PublicClientApplicationBuilder and ConfidentialClientApplicationBuilder. They offer a powerful mechanism to configure the application either from the code, or from a configuration file, or even by mixing both approaches.
Before initializing an application, you first need to register it so that your app can be integrated with the Microsoft identity platform. After registration, you may need the following information (which can be found in the Azure portal):
The client ID (a string representing a GUID)
The identity provider URL (named the instance) and the sign-in audience for your application. These two parameters are collectively known as the authority.
The tenant ID if you are writing a line of business application solely for your organization (also named single-tenant application).
The application secret (client secret string) or certificate (of type X509Certificate2) if it's a confidential client app.
For web apps, and sometimes for public client apps (in particular when your app needs to use a broker), you'll have also set the redirectUri where the identity provider will contact back your application with the security tokens.
Initializing public and confidential client applications from code
The following code instantiates a public client application, signing-in users in the Microsoft Azure public cloud, with their work and school accounts, or their personal Microsoft accounts.
IPublicClientApplication app = PublicClientApplicationBuilder.Create(clientId).Build();
In the same way, the following code instantiates a confidential application (a Web app located at https://myapp.azurewebsites.net) handling tokens from users in the Microsoft Azure public cloud, with their work and school accounts, or their personal Microsoft accounts. The application is identified with the identity provider by sharing a client secret:
string redirectUri = "https://myapp.azurewebsites.net";
IConfidentialClientApplication app = ConfidentialClientApplicationBuilder.Create(clientId)
    .WithClientSecret(clientSecret)
    .WithRedirectUri(redirectUri )
    .Build();
Builder modifiers
In the code snippets using application builders, a number of .With methods can be applied as modifiers (for example, .WithAuthority and .WithRedirectUri).
.WithAuthoritymodifier: The.WithAuthoritymodifier sets the application default authority to an Azure Active Directory authority, with the possibility of choosing the Azure Cloud, the audience, the tenant (tenant ID or domain name), or providing directly the authority URI.var clientApp = PublicClientApplicationBuilder.Create(client_id) .WithAuthority(AzureCloudInstance.AzurePublic, tenant_id) .Build();.WithRedirectUrimodifier: The.WithRedirectUrimodifier overrides the default redirect URI. In the case of public client applications, this will be useful for scenarios which require a broker.var clientApp = PublicClientApplicationBuilder.Create(client_id) .WithAuthority(AzureCloudInstance.AzurePublic, tenant_id) .WithRedirectUri("http://localhost") .Build();
Modifiers common to public and confidential client applications
The table below lists some of the modifiers you can set on a public, or confidential client.
| Modifier | Description |
.WithAuthority() | Sets the application default authority to an Azure Active Directory authority, with the possibility of choosing the Azure Cloud, the audience, the tenant (tenant ID or domain name), or providing directly the authority URI. |
.WithTenantId(string tenantId) | Overrides the tenant ID, or the tenant description. |
.WithClientId(string) | Overrides the client ID. |
.WithRedirectUri(string redirectUri) | Overrides the default redirect URI. In the case of public client applications, this will be useful for scenarios requiring a broker. |
.WithComponent(string) | Sets the name of the library using MSAL.NET (for telemetry reasons). |
.WithDebugLoggingCallback() | If called, the application will call Debug.Write simply enabling debugging traces. |
.WithLogging() | If called, the application will call a callback with debugging traces. |
.WithTelemetry(TelemetryCallback telemetryCallback) | Sets the delegate used to send telemetry. |
Modifiers specific to confidential client applications
The modifiers you can set on a confidential client application builder are:
| Modifier | Description |
.WithCertificate(X509Certificate2 certificate) | Sets the certificate identifying the application with Azure Active Directory. |
.WithClientSecret(string clientSecret) | Sets the client secret (app password) identifying the application with Azure Active Directory. |
Practical 11: Implement interactive authentication by using MSAL.NET
Prerequisites
An Azure account with an active subscription.
Visual Studio Code
Step 1: Register a new application
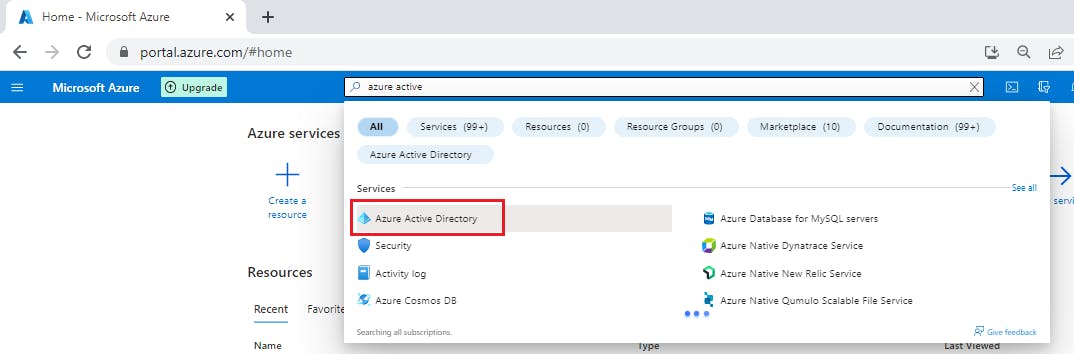
Sign in to the portal: https://portal.azure.com
Search for and select Azure Active Directory.
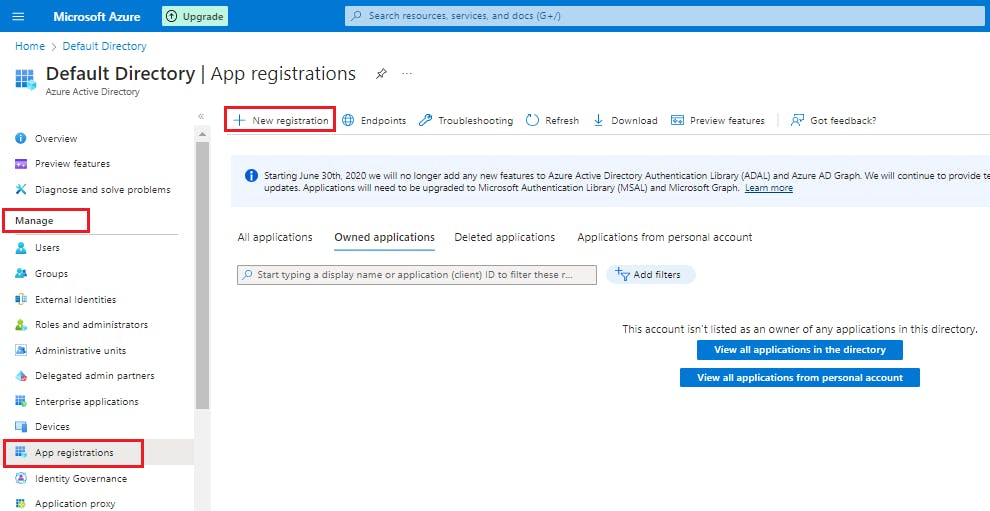
Under Manage, select App registrations > New registration.
When the Register an application page appears, enter your application's registration information (don't worry, we will create this app shortly):
| Field | Value | | --- | --- | | Name |
MyDemoApp| | Supported account types | Select Accounts in this organizational directory only | | Redirect URI (optional) | Select Public client/native (mobile & desktop) and enterhttp://localhostin the box to the right. |Select Register.
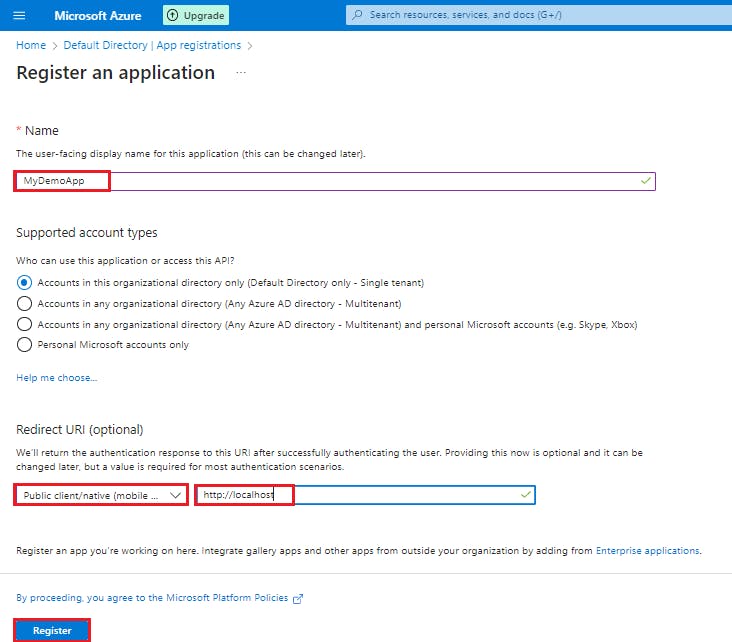
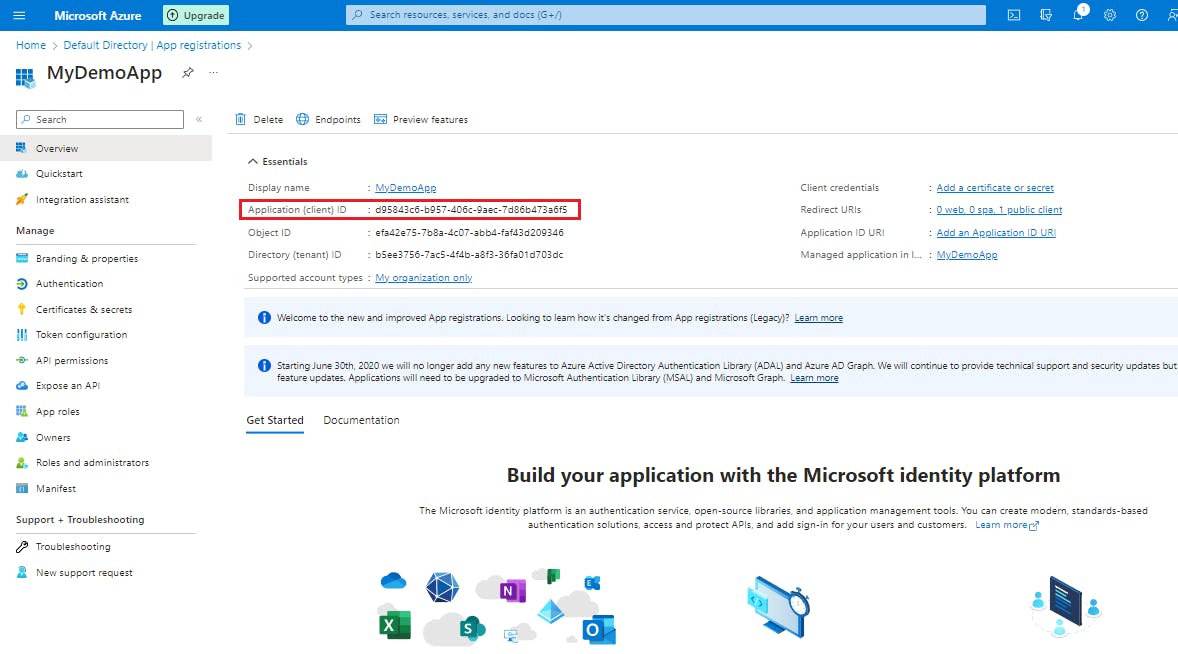
Azure Active Directory assigns a unique application (client) ID to your app, and you're taken to your application's Overview page.
Step 2: Set up the console application
Launch Visual Studio Code and open a terminal by selecting Terminal and then New Terminal.
Create a folder for the project and change in to the folder.
 md AuthDemo
 cd AuthDemo
Create the .NET console app.
dotnet new console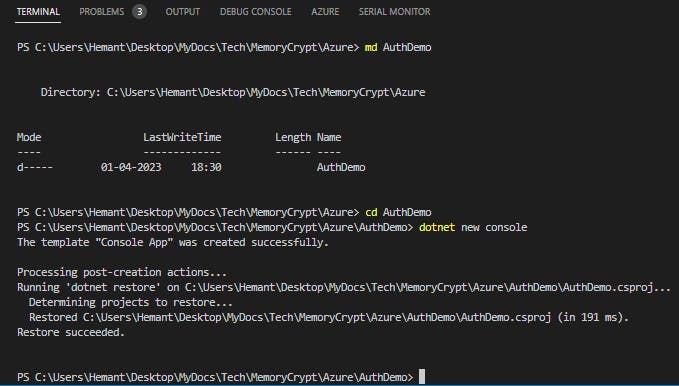
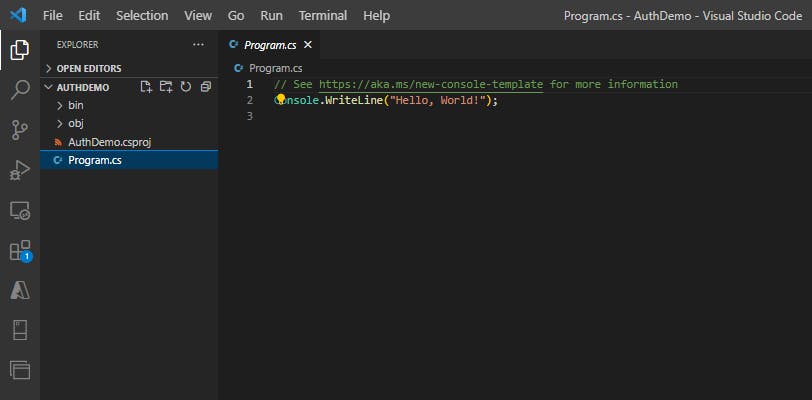
Open the AuthDemo folder in Visual Studio Code.
code . -r
Step 3: Add packages and using statements
In this section you will add the necessary packages and code to the project.
Add the
Microsoft.Identity.Clientpackage to the project in a terminal in Visual Studio Code.dotnet add package Microsoft.Identity.ClientOpen the Program.cs file and add
usingstatements to includeMicrosoft.Identity.Clientand to enable async operations.using System.Threading.Tasks; using Microsoft.Identity.Client;Change the Main method to enable async.
public static async Task Main(string[] args)
Step 4: Add code for the interactive authentication
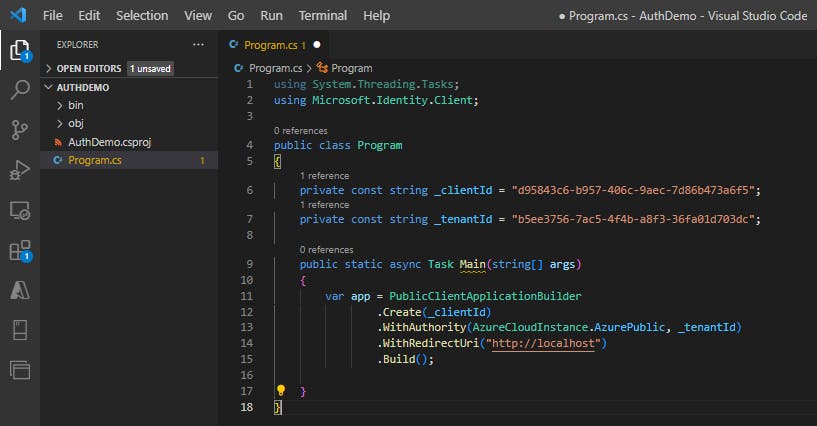
We'll need two variables to hold the Application (client) and Directory (tenant) IDs. You can copy those values from the portal. Add the code below and replace the string values with the appropriate values from the portal.
private const string _clientId = "APPLICATION_CLIENT_ID"; private const string _tenantId = "DIRECTORY_TENANT_ID";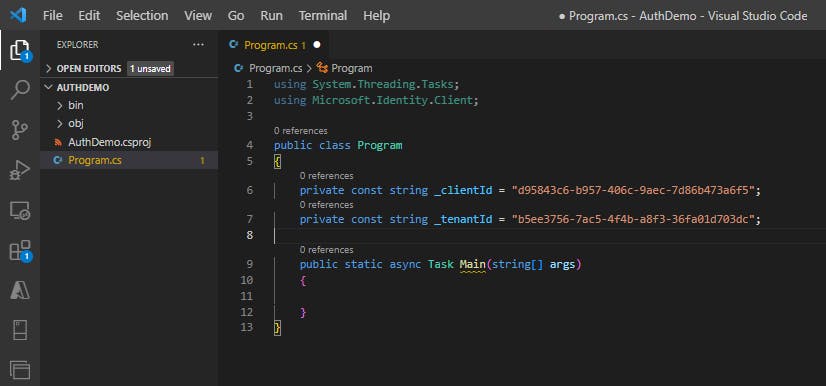
Use the
PublicClientApplicationBuilderclass to build out the authorization context.var app = PublicClientApplicationBuilder .Create(_clientId) .WithAuthority(AzureCloudInstance.AzurePublic, _tenantId) .WithRedirectUri("http://localhost") .Build();| Code | Description | | --- | --- | |
.Create| Creates aPublicClientApplicationBuilderfrom a clientID. | |.WithAuthority| Adds a known Authority corresponding to an ADFS server. In the code we're specifying the Public cloud, and using the tenant for the app we registered. |
Step 5: Acquire a token
When you registered the MyDemoApp app in Azure portal, it automatically generated an API permission user.read for Microsoft Graph. We'll use that permission to acquire a token.
Set the permission scope for the token request. Add the following code below the
PublicClientApplicationBuilder.string[] scopes = { "user.read" };Add code to request the token and write the result out to the console.
AuthenticationResult result = await app.AcquireTokenInteractive(scopes).ExecuteAsync(); Console.WriteLine($"Token:\t{result.AccessToken}");
Step 6: Review completed application
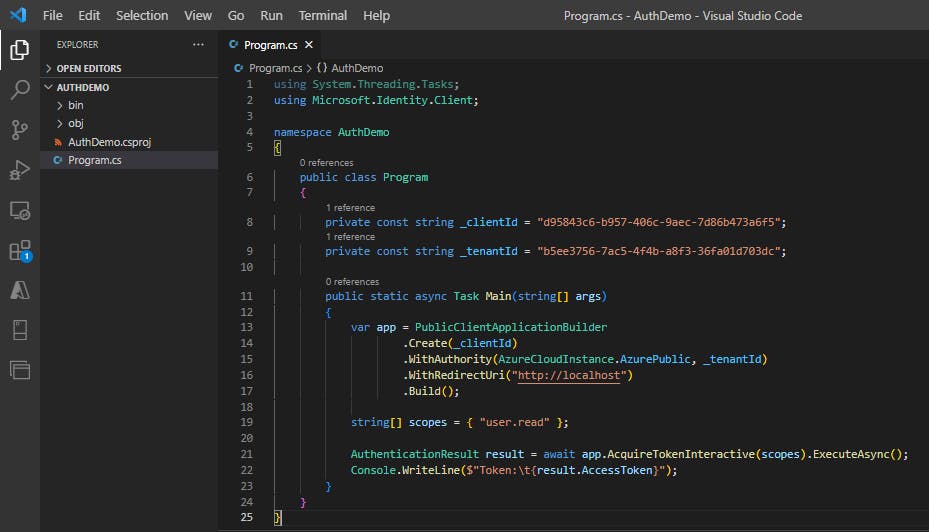
The contents of the Program.cs file should resemble the example below.
using System;
 using System.Threading.Tasks;
 using Microsoft.Identity.Client;
namespace AuthDemo
{
class Program
{
 private const string _clientId = "APPLICATION_CLIENT_ID";
 private const string _tenantId = "DIRECTORY_TENANT_ID";
public static async Task Main(string[] args)
{
 var app = PublicClientApplicationBuilder
     .Create(_clientId)
     .WithAuthority(AzureCloudInstance.AzurePublic, _tenantId)
     .WithRedirectUri("http://localhost")
     .Build();
string[] scopes = { "user.read" };
 AuthenticationResult result = await app.AcquireTokenInteractive(scopes).ExecuteAsync();

 Console.WriteLine($"Token:\t{result.AccessToken}");
}
}
}
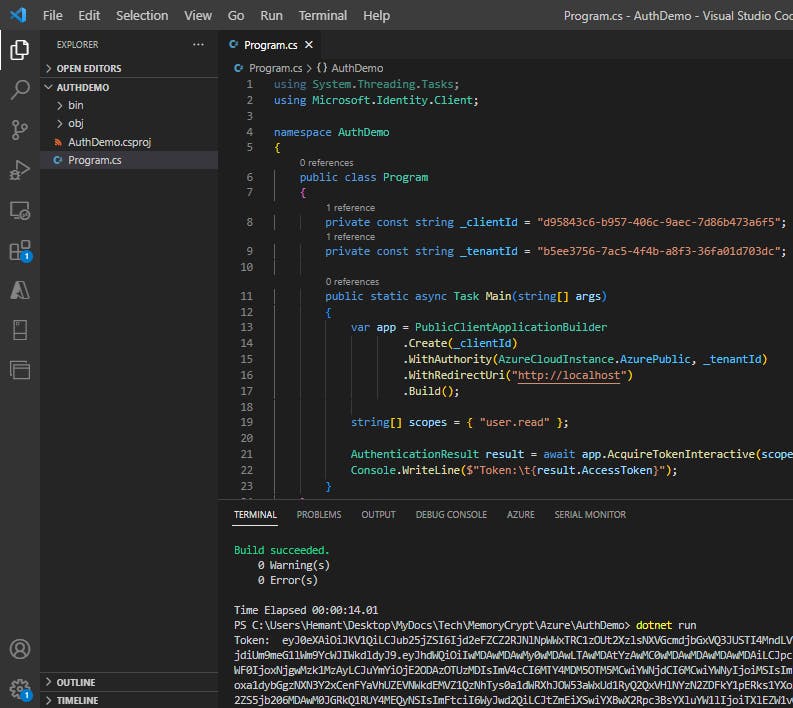
Step 7: Run the application
In the Visual Studio Code terminal run
dotnet buildto check for errors, thendotnet runto run the app.The app will open the default browser prompting you to select the account you want to authenticate with. If there are multiple accounts listed select the one associated with the tenant used in the app.
If this is the first time you've authenticated to the registered app you will receive a Permissions requested notification asking you to approve the app to read data associated with your account. Select Accept.

You should see the results similar to the example below in the console.
Token: eyJ0eXAiOiJKV1QiLCJub25jZSI6IlVhU.....
Shared Access Signature
A shared access signature (SAS) grants restricted access rights to Azure Storage resources.
A shared access signature (SAS) is a signed URI that points to one or more storage resources and includes a token that contains a special set of query parameters. The token indicates how the resources may be accessed by the client. One of the query parameters, the signature, is constructed from the SAS parameters and signed with the key that was used to create the SAS. This signature is used by Azure Storage to authorize access to the storage resource.
Types of shared access signatures
Azure Storage supports three types of shared access signatures:
User delegation SAS: A user delegation SAS is secured with Azure Active Directory credentials and also by the permissions specified for the SAS. A user delegation SAS applies to Blob storage only.
Service SAS: A service SAS is secured with the storage account key. A service SAS delegates access to a resource in the following Azure Storage services: Blob storage, Queue storage, Table storage, or Azure Files.
Account SAS: An account SAS is secured with the storage account key. An account SAS delegates access to resources in one or more of the storage services. All of the operations available via a service or user delegation SAS are also available via an account SAS.
Note: Microsoft recommends that you use Azure Active Directory credentials when possible as a security best practice, rather than using the account key, which can be more easily compromised. When your application design requires shared access signatures for access to Blob storage, use Azure Active Directory credentials to create a user delegation SAS when possible for superior security
How shared access signatures work
When you use a SAS to access data stored in Azure Storage, you need two components. The first is a URI to the resource you want to access. The second part is a SAS token that you've created to authorize access to that resource.
In a single URI, such as https://medicalrecords.blob.core.windows.net/patient-images/patient-116139-nq8z7f.jpg?sp=r&st=2020-01-20T11:42:32Z&se=2020-01-20T19:42:32Z&spr=https&sv=2019-02-02&sr=b&sig=SrW1HZ5Nb6MbRzTbXCaPm%2BJiSEn15tC91Y4umMPwVZs%3D, you can separate the URI from the SAS token as follows:
URI:
https://medicalrecords.blob.core.windows.net/patient-images/patient-116139-nq8z7f.jpg?SAS token:
sp=r&st=2020-01-20T11:42:32Z&se=2020-01-20T19:42:32Z&spr=https&sv=2019-02-02&sr=b&sig=SrW1HZ5Nb6MbRzTbXCaPm%2BJiSEn15tC91Y4umMPwVZs%3D
The SAS token itself is made up of several components.
| Component | Description |
sp=r | Controls the access rights. The values can be a for add, c for create, d for delete, l for list, r for read, or w for write. This example is read only. The example sp=acdlrw grants all the available rights. |
st=2020-01-20T11:42:32Z | The date and time when access starts. |
se=2020-01-20T19:42:32Z | The date and time when access ends. This example grants eight hours of access. |
sv=2019-02-02 | The version of the storage API to use. |
sr=b | The kind of storage being accessed. In this example, b is for blob. |
sig=SrW1HZ5Nb6MbRzTbXCaPm%2BJiSEn15tC91Y4umMPwVZs%3D | The cryptographic signature. |
Best practices
To reduce the potential risks of using a SAS, Microsoft provides some guidance:
To securely distribute a SAS and prevent man-in-the-middle attacks, always use HTTPS.
The most secure SAS is a user delegation SAS. Use it wherever possible because it removes the need to store your storage account key in code. You must use Azure Active Directory to manage credentials. This option might not be possible for your solution.
Try to set your expiration time to the smallest useful value. If a SAS key becomes compromised, it can be exploited for only a short time.
Apply the rule of minimum-required privileges. Only grant the access that's required. For example, in your app, read-only access is sufficient.
SAS isn't always the correct solution. When there's an unacceptable risk of using a SAS, create a middle-tier service to manage users and their access to storage.
When to use shared access signatures
Use a SAS when you want to provide secure access to resources in your storage account to any client who does not otherwise have permissions to those resources.
A common scenario where a SAS is useful is a service where users read and write their own data to your storage account. In a scenario where a storage account stores user data, there are two typical design patterns:
Clients upload and download data via a front-end proxy service, which performs authentication. This front-end proxy service has the advantage of allowing validation of business rules, but for large amounts of data or high-volume transactions, creating a service that can scale to match demand may be expensive or difficult.

A lightweight service authenticates the client as needed and then generates a SAS. Once the client application receives the SAS, they can access storage account resources directly with the permissions defined by the SAS and for the interval allowed by the SAS. The SAS mitigates the need for routing all data through the front-end proxy service.

Many real-world services may use a hybrid of these two approaches. For example, some data might be processed and validated via the front-end proxy, while other data is saved and/or read directly using SAS.
Additionally, a SAS is required to authorize access to the source object in a copy operation in certain scenarios:
When you copy a blob to another blob that resides in a different storage account, you must use a SAS to authorize access to the source blob. You can optionally use a SAS to authorize access to the destination blob as well.
When you copy a file to another file that resides in a different storage account, you must use a SAS to authorize access to the source file. You can optionally use a SAS to authorize access to the destination file as well.
When you copy a blob to a file, or a file to a blob, you must use a SAS to authorize access to the source object, even if the source and destination objects reside within the same storage account.
Stored access policies
A stored access policy provides an additional level of control over service-level shared access signatures (SAS) on the server side. Establishing a stored access policy groups shared access signatures and provides additional restrictions for signatures that are bound by the policy. You can use a stored access policy to change the start time, expiry time, or permissions for a signature, or to revoke it after it has been issued.
The following storage resources support stored access policies:
Blob containers
File shares
Queues
Tables
Creating a stored access policy
The access policy for a SAS consists of the start time, expiry time, and permissions for the signature. You can specify all of these parameters on the signature URI and none within the stored access policy; all on the stored access policy and none on the URI; or some combination of the two. However, you cannot specify a given parameter on both the SAS token and the stored access policy.
To create or modify a stored access policy, call the Set ACL operation for the resource (see Set Container ACL, Set Queue ACL, Set Table ACL, or Set Share ACL) with a request body that specifies the terms of the access policy. The body of the request includes a unique signed identifier of your choosing, up to 64 characters in length, and the optional parameters of the access policy, as follows:
Note: When you establish a stored access policy on a container, table, queue, or share, it may take up to 30 seconds to take effect. During this time requests against a SAS associated with the stored access policy may fail with status code 403 (Forbidden), until the access policy becomes active. Table entity range restrictions (startpk, startrk, endpk, and endrk) cannot be specified in a stored access policy.
Below are examples of creating a stored access policy by using C# .NET and the Azure CLI.
BlobSignedIdentifier identifier = new BlobSignedIdentifier
{
    Id = "stored access policy identifier",
    AccessPolicy = new BlobAccessPolicy
    {
        ExpiresOn = DateTimeOffset.UtcNow.AddHours(1),
        Permissions = "rw"
    }
};

blobContainer.SetAccessPolicy(permissions: new BlobSignedIdentifier[] { identifier });
az storage container policy create \
    --name <stored access policy identifier> \
    --container-name <container name> \
    --start <start time UTC datetime> \
    --expiry <expiry time UTC datetime> \
    --permissions <(a)dd, (c)reate, (d)elete, (l)ist, (r)ead, or (w)rite> \
    --account-key <storage account key> \
    --account-name <storage account name> \
Modifying or revoking a stored access policy
To modify the parameters of the stored access policy you can call the access control list operation for the resource type to replace the existing policy. For example, if your existing policy grants read and write permissions to a resource, you can modify it to grant only read permissions for all future requests.
To revoke a stored access policy you can delete it, rename it by changing the signed identifier, or change the expiry time to a value in the past. Changing the signed identifier breaks the associations between any existing signatures and the stored access policy. Changing the expiry time to a value in the past causes any associated signatures to expire. Deleting or modifying the stored access policy immediately affects all of the SAS associated with it.
To remove a single access policy, call the resource's Set ACL operation, passing in the set of signed identifiers that you wish to maintain on the container. To remove all access policies from the resource, call the Set ACL operation with an empty request body.
Microsoft Graph
Microsoft Graph is the gateway to data and intelligence in Microsoft 365. It provides a unified programmability model that you can use to access the tremendous amount of data in Microsoft 365, Windows 10, and Enterprise Mobility + Security.
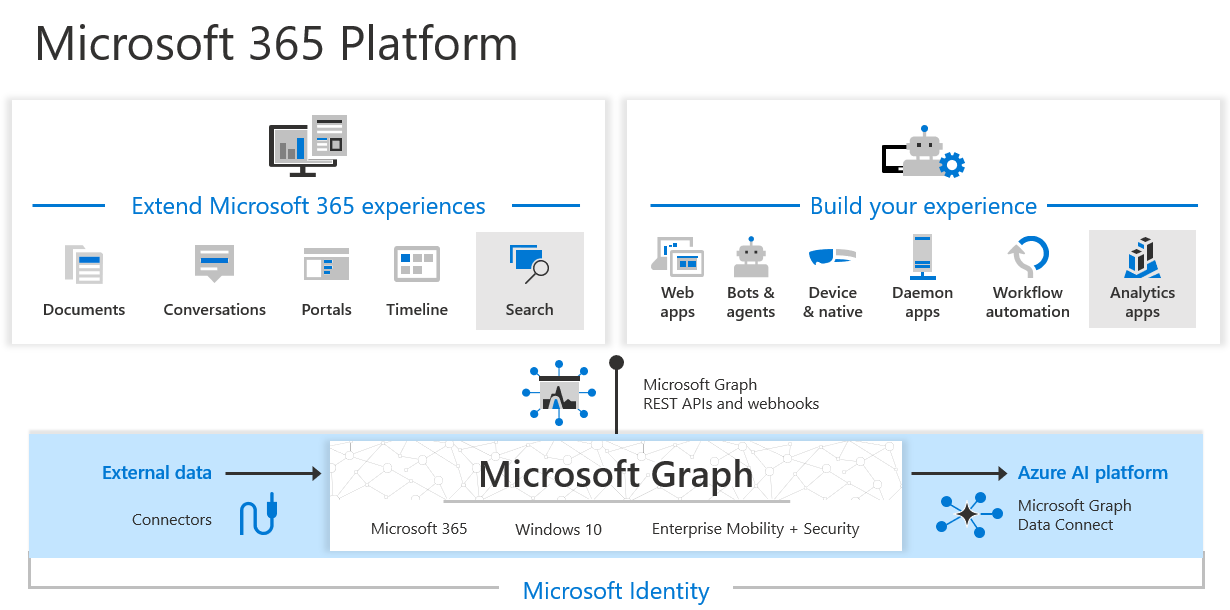
In the Microsoft 365 platform, three main components facilitate the access and flow of data:
The Microsoft Graph API offers a single endpoint,
https://graph.microsoft.com. You can use REST APIs or SDKs to access the endpoint. Microsoft Graph also includes a powerful set of services that manage user and device identity, access, compliance, security, and help protect organizations from data leakage or loss.Microsoft Graph connectors work in the incoming direction, delivering data external to the Microsoft cloud into Microsoft Graph services and applications, to enhance Microsoft 365 experiences such as Microsoft Search. Connectors exist for many commonly used data sources such as Box, Google Drive, Jira, and Salesforce.
Microsoft Graph Data Connect provides a set of tools to streamline secure and scalable delivery of Microsoft Graph data to popular Azure data stores. The cached data serves as data sources for Azure development tools that you can use to build intelligent applications.
Query Microsoft Graph by using REST
Microsoft Graph is a RESTful web API that enables you to access Microsoft Cloud service resources. After you register your app and get authentication tokens for a user or service, you can make requests to the Microsoft Graph API.
The Microsoft Graph API defines most of its resources, methods, and enumerations in the OData namespace, microsoft.graph, in the Microsoft Graph metadata. A few API sets are defined in their sub-namespaces, such as the call records API which defines resources like callRecord in microsoft.graph.callRecords.
Call a REST API method
To read from or write to a resource such as a user or an email message, you construct a request that looks like the following:
{HTTP method} https://graph.microsoft.com/{version}/{resource}?{query-parameters}
The components of a request include:
{HTTP method}- The HTTP method used on the request to Microsoft Graph.{version}- The version of the Microsoft Graph API your application is using.{resource}- The resource in Microsoft Graph that you're referencing.{query-parameters}- Optional OData query options or REST method parameters that customize the response.
After you make a request, a response is returned that includes:
Status code - An HTTP status code that indicates success or failure.
Response message - The data that you requested or the result of the operation. The response message can be empty for some operations.
nextLink- If your request returns a lot of data, you need to page through it by using the URL returned in@odata.nextLink.
HTTP methods
Microsoft Graph uses the HTTP method on your request to determine what your request is doing. The API supports the following methods.
| Method | Description |
| GET | Read data from a resource. |
| POST | Create a new resource, or perform an action. |
| PATCH | Update a resource with new values. |
| PUT | Replace a resource with a new one. |
| DELETE | Remove a resource. |
For the CRUD methods
GETandDELETE, no request body is required.The
POST,PATCH, andPUTmethods require a request body, specified in JSON format, that contains additional information, such as the values for properties of the resource.
Resource
A resource can be an entity or complex type, commonly defined with properties. Entities differ from complex types by always including an id property.
Your URL will include the resource you are interacting with in the request, such as me, user, group, drive, and site. Often, top-level resources also include relationships, which you can use to access other resources, like me/messages or me/drive. You can also interact with resources using methods; for example, to send an email, use me/sendMail.
Each resource might require different permissions to access it. You will often need a higher level of permissions to create or update a resource than to read it. For details about required permissions, see the method reference topic.
Query parameters
Query parameters can be OData system query options, or other strings that a method accepts to customize its response.
You can use optional OData system query options to include more or fewer properties than the default response, filter the response for items that match a custom query, or provide another parameters for a method.
For example, adding the following filter parameter restricts the messages returned to only those with the emailAddress property of jon@contoso.com.
GET https://graph.microsoft.com/v1.0/me/messages?filter=emailAddress eq 'jon@contoso.com'
Query Microsoft Graph by using SDKs
The Microsoft Graph SDKs include two components: a service library and a core library.
The service library contains models and request builders that are generated from Microsoft Graph metadata to provide a rich, strongly typed, and discoverable experience when working with the many datasets available in Microsoft Graph.
The core library provides a set of features that enhance working with all the Microsoft Graph services. Embedded support for retry handling, secure redirects, transparent authentication, and payload compression, improve the quality of your application's interactions with Microsoft Graph, with no added complexity, while leaving you completely in control. The core library also provides support for common tasks such as paging through collections and creating batch requests.
Install the Microsoft Graph .NET SDK
The Microsoft Graph .NET SDK is included in the following NuGet packages:
Microsoft.Graph - Contains the models and request builders for accessing the Graph API endpoint with the fluent API. Microsoft.Graph has a dependency on Microsoft.Graph.Core.
Microsoft.Graph.Core - The core library for making calls to Microsoft Graph.
Create a Microsoft Graph client
The Microsoft Graph client is designed to make it simple to make calls to Microsoft Graph. You can use a single client instance for the lifetime of the application. The following code examples show how to create an instance of a Microsoft Graph client. The authentication provider will handle acquiring access tokens for the application. See Choose an Authentication Provider.
var scopes = new[] { "User.Read" };

// Multi-tenant apps can use "common",
// single-tenant apps must use the tenant ID from the Azure portal
var tenantId = "common";

// Value from app registration
var clientId = "YOUR_CLIENT_ID";

// using Azure.Identity;
var options = new TokenCredentialOptions
{
    AuthorityHost = AzureAuthorityHosts.AzurePublicCloud
};

// Callback function that receives the user prompt
// Prompt contains the generated device code that you must
// enter during the auth process in the browser
Func<DeviceCodeInfo, CancellationToken, Task> callback = (code, cancellation) => {
    Console.WriteLine(code.Message);
    return Task.FromResult(0);
};

// https://learn.microsoft.com/dotnet/api/azure.identity.devicecodecredential
var deviceCodeCredential = new DeviceCodeCredential(
    callback, tenantId, clientId, options);

var graphClient = new GraphServiceClient(deviceCodeCredential, scopes);
Read information from Microsoft Graph
To read information from Microsoft Graph, you first need to create a request object and then run the GET method on the request.
// GET https://graph.microsoft.com/v1.0/me

var user = await graphClient.Me
    .Request()
    .GetAsync();
Retrieve a list of entities
Retrieving a list of entities is similar to retrieving a single entity except there a number of other options for configuring the request. The $filter query parameter can be used to reduce the result set to only those rows that match the provided condition. The $orderBy query parameter will request that the server provide the list of entities sorted by the specified properties.
// GET https://graph.microsoft.com/v1.0/me/messages?$select=subject,sender&$filter=<some condition>&orderBy=receivedDateTime

var messages = await graphClient.Me.Messages
    .Request()
    .Select(m => new {
        m.Subject,
        m.Sender
    })
    .Filter("<filter condition>")
    .OrderBy("receivedDateTime")
    .GetAsync();
Delete an entity
Delete requests are constructed in the same way as requests to retrieve an entity, but use a DELETE request instead of a GET.
// DELETE https://graph.microsoft.com/v1.0/me/messages/{message-id}

string messageId = "AQMkAGUy...";
var message = await graphClient.Me.Messages[messageId]
    .Request()
    .DeleteAsync();
Create a new entity
For SDKs that support a fluent style, new items can be added to collections with an Add method. For template-based SDKs, the request object exposes a post method.
// POST https://graph.microsoft.com/v1.0/me/calendars

var calendar = new Calendar
{
    Name = "Volunteer"
};

var newCalendar = await graphClient.Me.Calendars
    .Request()
    .AddAsync(calendar);
Best practices for Microsoft Graph
Authentication
To access the data in Microsoft Graph, your application will need to acquire an OAuth 2.0 access token, and present it to Microsoft Graph in either of the following:
The HTTP Authorization request header, as a Bearer token
The graph client constructor, when using a Microsoft Graph client library
Use the Microsoft Authentication Library API, MSAL to acquire the access token to Microsoft Graph.
Consent and authorization
Apply the following best practices for consent and authorization in your app:
Use least privilege. Only request permissions that are absolutely necessary, and only when you need them. For the APIs your application calls check the permissions section in the method topics. For example, see creating a user and choose the least privileged permissions.
Use the correct permission type based on scenarios. If you're building an interactive application where a signed in user is present, your application should use delegated permissions. If, however, your application runs without a signed-in user, such as a background service or daemon, your application should use application permissions.
Caution: Using application permissions for interactive scenarios can put your application at compliance and security risk. Be sure to check user's privileges to ensure they don't have undesired access to information, or are circumnavigating policies configured by an administrator.
Consider the end user and admin experience. This will directly affect end user and admin experiences. For example:
Consider who will be consenting to your application, either end users or administrators, and configure your application to request permissions appropriately.
Ensure that you understand the difference between static, dynamic and incremental consent.
Consider multi-tenant applications. Expect customers to have various application and consent controls in different states. For example:
Tenant administrators can disable the ability for end users to consent to applications. In this case, an administrator would need to consent on behalf of their users.
Tenant administrators can set custom authorization policies such as blocking users from reading other user's profiles, or limiting self-service group creation to a limited set of users. In this case, your application should expect to handle 403 error response when acting on behalf of a user.
Handle responses effectively
Depending on the requests you make to Microsoft Graph, your applications should be prepared to handle different types of responses. The following are some of the most important practices to follow to ensure that your application behaves reliably and predictably for your end users. For example:
Pagination: When querying resource collections, you should expect that Microsoft Graph will return the result set in multiple pages, due to server-side page size limits. Your application should always handle the possibility that the responses are paged in nature, and use the
@odata.nextLinkproperty to obtain the next paged set of results, until all pages of the result set have been read. The final page will not contain an@odata.nextLinkproperty. For more details, see paging.Evolvable enumerations: Adding members to existing enumerations can break applications already using these enums. Evolvable enums is a mechanism that Microsoft Graph API uses to add new members to existing enumerations without causing a breaking change for applications. By default, a GET operation returns only known members for properties of evolvable enum types and your application needs to handle only the known members. If you design your application to handle unknown members as well, you can opt-in to receive those members by using an HTTP
Preferrequest header.
Storing data locally
Your application should ideally make calls to Microsoft Graph to retrieve data in real time as necessary. You should only cache or store data locally if necessary for a specific scenario, and if that use case is covered by your terms of use and privacy policy, and does not violate the Microsoft APIs Terms of Use. Your application should also implement proper retention and deletion policies.
Up Next - Implement secure cloud solutions - Developing Solutions for Microsoft Azure - Part 3.2