

Photo by Marcos Luiz Photograph on Unsplash
Event-based solutions - Developing Solutions for Microsoft Azure - Part 5.2


Table of contents
- 5.2 Develop event-based solutions
- Events vs messaging services
- Azure Event Grid
- Event schemas
- Event delivery durability
- Control access to events
- Receive events by using webhooks
- Filter events
- Practical 15: Route custom events to web endpoint by using Azure CLI
- Azure Event Hubs
- Event Hubs Capture
- Dynamically add partitions to an event hub
- Control access to events
- Common operations with the Event Hubs client library
All the notes on this page have been taken from Microsoft's learning portal - learn.microsoft.com. If any of this material is copyrighted, please let me know in the comments below and I will remove it. The main goal here is to learn and understand the concepts for developing solutions for Microsoft Azure. These notes may be helpful to prepare for the certification AZ-204: Developing Solutions for Microsoft Azure
Continuing from Implement API management - Developing Solutions for Microsoft Azure - Part 5.1
5.2 Develop event-based solutions
Events vs messaging services
Event Grid service
Purpose: Reactive programming
Type: Event distribution (discrete)
When to use: React to status change
Event Hubs service
Purpose: Big data pipeline
Type: Event streaming (series)
When to use: Telemetry and distributed data streaming
Service Bus
Purpose: High-value enterprise messaging
Type: Message
When to use: Order processing and financial transactions
Azure Event Grid
Azure Event Grid is an event routing service that lets you easily subscribe and react to any events you are interested in. It enables event-driven, reactive programmin by using the publish-subscribe model. Publishers emit events, but have no expectation about how the events are handled. Subscribers decide on which events they want to handle.
You can use filters to route specific events to different endpoints, multicast to multiple endpoints, and make sure your events are reliably delivered.
This image below shows how Event Grid connects sources and handlers.
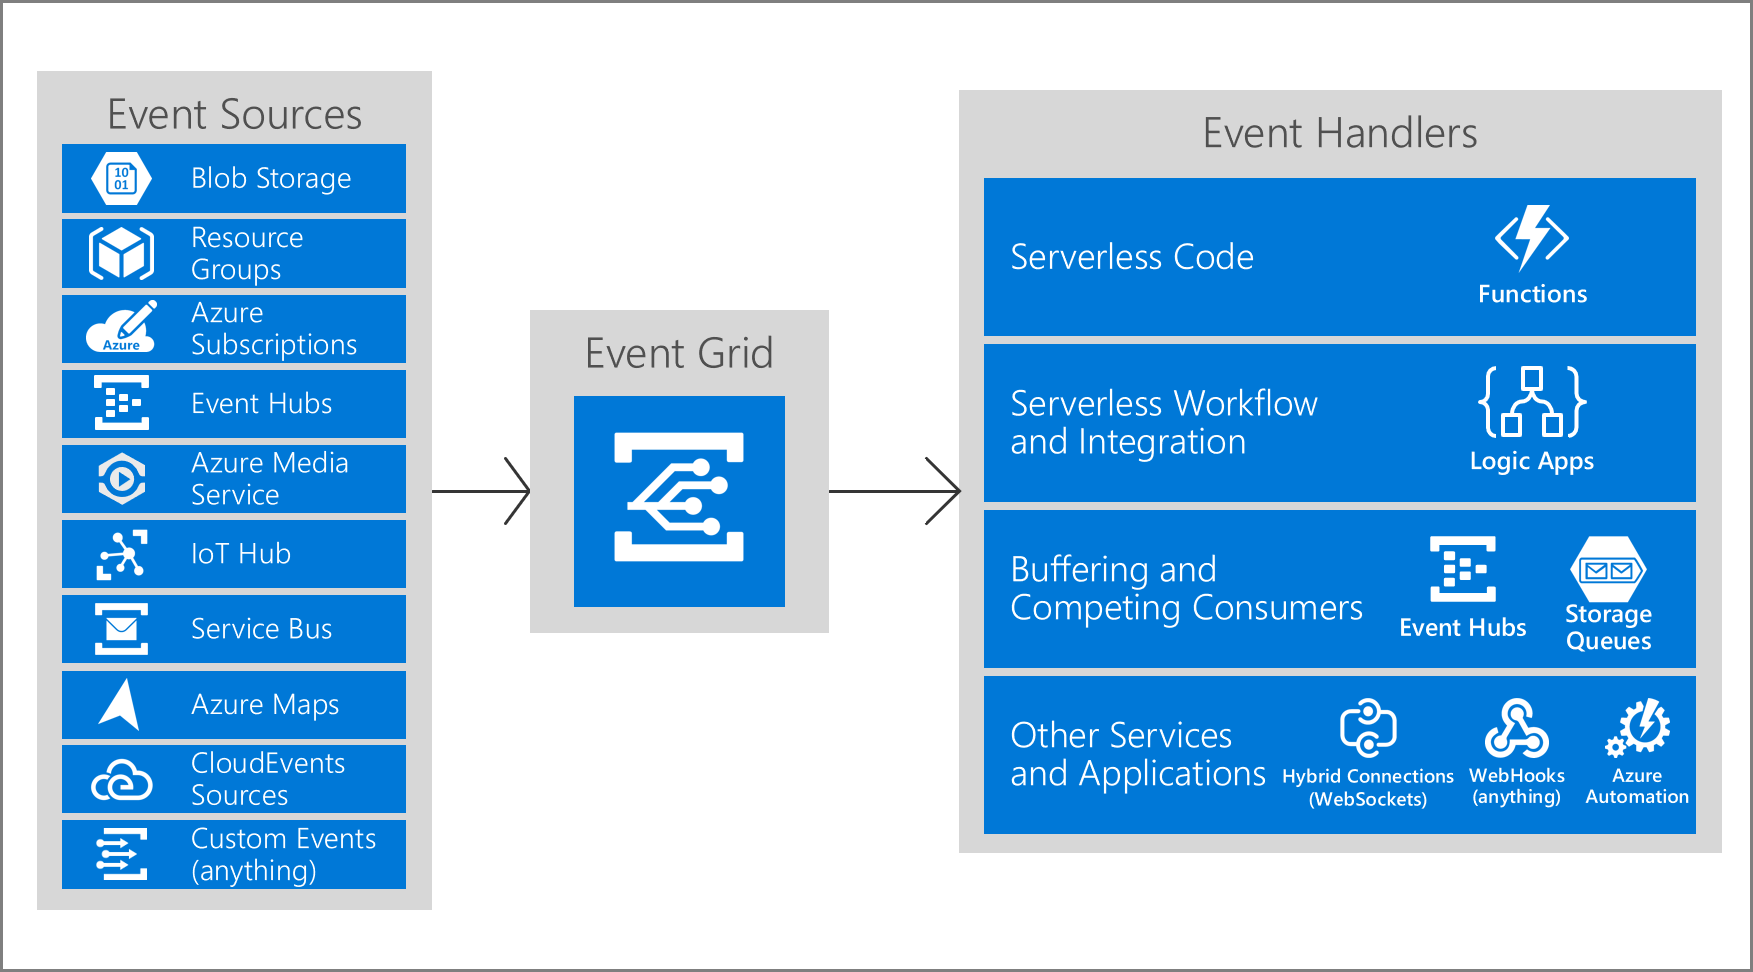
Concepts in Azure Event Grid
There are five concepts in Azure Event Grid you need to understand to help you get started, and are described in more detail below:
Events - What happened.
Event sources - Where the event took place.
Topics - The endpoint where publishers send events.
Event subscriptions - The endpoint or built-in mechanism to route events, sometimes to more than one handler. Subscriptions are also used by handlers to intelligently filter incoming events.
Event handlers - The app or service reacting to the event.
A great tutorial that explains how to setup event routing using Event Grid - https://www.youtube.com/watch?v=yT52fiRVeXI
Events
An event is the smallest amount of information that fully describes something that happened in the system. Every event has common information like: source of the event, time the event took place, and unique identifier. Every event also has specific information that is only relevant to the specific type of event. For example, an event about a new file being created in Azure Storage has details about the file, such as the lastTimeModified value. Or, an Event Hubs event has the URL of the Capture file.
An event of size up to 64 KB is covered by General Availability (GA) Service Level Agreement (SLA). The support for an event of size up to 1 MB is currently in preview. Events over 64 KB are charged in 64-KB increments.
Event sources
An event source is where the event happens. Each event source is related to one or more event types. For example, Azure Storage is the event source for blob created events. IoT Hub is the event source for device created events. Your application is the event source for custom events that you define. Event sources are responsible for sending events to Event Grid.
Topics
The event grid topic provides an endpoint where the source sends events. The publisher creates the event grid topic, and decides whether an event source needs one topic or more than one topic. A topic is used for a collection of related events. To respond to certain types of events, subscribers decide which topics to subscribe to.
System topics are built-in topics provided by Azure services. You don't see system topics in your Azure subscription because the publisher owns the topics, but you can subscribe to them. To subscribe, you provide information about the resource you want to receive events from. As long as you have access to the resource, you can subscribe to its events.
Custom topics are application and third-party topics. When you create or are assigned access to a custom topic, you see that custom topic in your subscription.
Event subscriptions
A subscription tells Event Grid which events on a topic you're interested in receiving. When creating the subscription, you provide an endpoint for handling the event. You can filter the events that are sent to the endpoint. You can filter by event type, or subject pattern. Set an expiration for event subscriptions that are only needed for a limited time and you don't want to worry about cleaning up those subscriptions.
Event handlers
From an Event Grid perspective, an event handler is the place where the event is sent. The handler takes some further action to process the event. Event Grid supports several handler types. You can use a supported Azure service or your own webhook as the handler. Depending on the type of handler, Event Grid follows different mechanisms to guarantee the delivery of the event. For HTTP webhook event handlers, the event is retried until the handler returns a status code of 200 – OK. For Azure Storage Queue, the events are retried until the Queue service successfully processes the message push into the queue.
Event schemas
Events consist of a set of four required string properties. The properties are common to all events from any publisher. The data object has properties that are specific to each publisher. For system topics, these properties are specific to the resource provider, such as Azure Storage or Azure Event Hubs.
Event sources send events to Azure Event Grid in an array, which can have several event objects. When posting events to an Event Grid topic, the array can have a total size of up to 1 MB. Each event in the array is limited to 1 MB. If an event or the array is greater than the size limits, you receive the response 413 Payload Too Large. Operations are charged in 64 KB increments though. So, events over 64 KB will incur operations charges as though they were multiple events. For example, an event that is 130 KB would incur charges as though it were 3 separate events.
Event Grid sends the events to subscribers in an array that has a single event. You can find the JSON schema for the Event Grid event and each Azure publisher's data payload in the Event Schema store.
Event schema
The following example shows the properties that are used by all event publishers:
[
  {
    "topic": string,
    "subject": string,
    "id": string,
    "eventType": string,
    "eventTime": string,
    "data":{
      object-unique-to-each-publisher
    },
    "dataVersion": string,
    "metadataVersion": string
  }
]
Event properties
All events have the same following top-level data:
| Property | Type | Required | Description |
| topic | string | No. If not included, Event Grid will stamp onto the event. If included it must match the Event Grid topic Azure Resource Manager ID exactly. | Full resource path to the event source. This field isn't writeable. Event Grid provides this value. |
| subject | string | Yes | Publisher-defined path to the event subject. |
| eventType | string | Yes | One of the registered event types for this event source. |
| eventTime | string | Yes | The time the event is generated based on the provider's UTC time. |
| id | string | Yes | Unique identifier for the event. |
| data | object | No | Event data specific to the resource provider. |
| dataVersion | string | No. If not included it will be stamped with an empty value. | The schema version of the data object. The publisher defines the schema version. |
| metadataVersion | string | No. If not included, Event Grid will stamp onto the event. If included, must match the Event Grid Schema metadataVersion exactly (currently, only 1). | The schema version of the event metadata. Event Grid defines the schema of the top-level properties. Event Grid provides this value. |
For custom topics, the event publisher determines the data object. The top-level data should have the same fields as standard resource-defined events.
When publishing events to custom topics, create subjects for your events that make it easy for subscribers to know whether they're interested in the event. Subscribers use the subject to filter and route events. Consider providing the path for where the event happened, so subscribers can filter by segments of that path. The path enables subscribers to narrowly or broadly filter events. For example, if you provide a three segment path like /A/B/C in the subject, subscribers can filter by the first segment /A to get a broad set of events. Those subscribers get events with subjects like /A/B/C or /A/D/E. Other subscribers can filter by /A/B to get a narrower set of events.
Sometimes your subject needs more detail about what happened. For example, the Storage Accounts publisher provides the subject /blobServices/default/containers/<container-name>/blobs/<file> when a file is added to a container. A subscriber could filter by the path /blobServices/default/containers/testcontainer to get all events for that container but not other containers in the storage account. A subscriber could also filter or route by the suffix .txt to only work with text files.
CloudEvents v1.0 schema
In addition to its default event schema, Azure Event Grid natively supports events in the JSON implementation of CloudEvents v1.0 and HTTP protocol binding. CloudEvents is an open specification for describing event data.
CloudEvents simplifies interoperability by providing a common event schema for publishing, and consuming cloud based events. This schema allows for uniform tooling, standard ways of routing & handling events, and universal ways of deserializing the outer event schema. With a common schema, you can more easily integrate work across platforms.
Here is an example of an Azure Blob Storage event in CloudEvents format:
{
    "specversion": "1.0",
    "type": "Microsoft.Storage.BlobCreated",
    "source": "/subscriptions/{subscription-id}/resourceGroups/{resource-group}/providers/Microsoft.Storage/storageAccounts/{storage-account}",
    "id": "9aeb0fdf-c01e-0131-0922-9eb54906e209",
    "time": "2019-11-18T15:13:39.4589254Z",
    "subject": "blobServices/default/containers/{storage-container}/blobs/{new-file}",
    "dataschema": "#",
    "data": {
        "api": "PutBlockList",
        "clientRequestId": "4c5dd7fb-2c48-4a27-bb30-5361b5de920a",
        "requestId": "9aeb0fdf-c01e-0131-0922-9eb549000000",
        "eTag": "0x8D76C39E4407333",
        "contentType": "image/png",
        "contentLength": 30699,
        "blobType": "BlockBlob",
        "url": "https://gridtesting.blob.core.windows.net/testcontainer/{new-file}",
        "sequencer": "000000000000000000000000000099240000000000c41c18",
        "storageDiagnostics": {
            "batchId": "681fe319-3006-00a8-0022-9e7cde000000"
        }
    }
}
A detailed description of the available fields, their types, and definitions in CloudEvents v1.0 is available here.
The headers values for events delivered in the CloudEvents schema and the Event Grid schema are the same except for content-type. For CloudEvents schema, that header value is "content-type":"application/cloudevents+json; charset=utf-8". For Event Grid schema, that header value is "content-type":"application/json; charset=utf-8".
You can use Event Grid for both input and output of events in CloudEvents schema. You can use CloudEvents for system events, like Blob Storage events and IoT Hub events, and custom events. It can also transform those events on the wire back and forth.
Event delivery durability
Event Grid provides durable delivery. It tries to deliver each event at least once for each matching subscription immediately. If a subscriber's endpoint doesn't acknowledge receipt of an event or if there is a failure, Event Grid retries delivery based on a fixed retry schedule and retry policy. By default, Event Grid delivers one event at a time to the subscriber, and the payload is an array with a single event.
Note: Event Grid doesn't guarantee order for event delivery, so subscribers may receive them out of order.
Retry schedule
When Event Grid receives an error for an event delivery attempt, Event Grid decides whether it should retry the delivery, dead-letter the event, or drop the event based on the type of the error.
If the error returned by the subscribed endpoint is a configuration-related error that can't be fixed with retries (for example, if the endpoint is deleted), EventGrid will either perform dead-lettering on the event or drop the event if dead-letter isn't configured.
When Event Grid can't deliver an event within a certain time period or after trying to deliver the event a certain number of times, it can send the undelivered event to a storage account. This process is known as dead-lettering.
The following table describes the types of endpoints and errors for which retry doesn't happen:
| Endpoint Type | Error codes |
| Azure Resources | 400 Bad Request, 413 Request Entity Too Large, 403 Forbidden |
| Webhook | 400 Bad Request, 413 Request Entity Too Large, 403 Forbidden, 404 Not Found, 401 Unauthorized |
Important: If Dead-Letter isn't configured for an endpoint, events will be dropped when the above errors happen. Consider configuring Dead-Letter if you don't want these kinds of events to be dropped.
If the error returned by the subscribed endpoint isn't among the above list, Event Grid waits 30 seconds for a response after delivering a message. After 30 seconds, if the endpoint hasn’t responded, the message is queued for retry. Event Grid uses an exponential backoff retry policy for event delivery.
If the endpoint responds within 3 minutes, Event Grid will attempt to remove the event from the retry queue on a best effort basis but duplicates may still be received. Event Grid adds a small randomization to all retry steps and may opportunistically skip certain retries if an endpoint is consistently unhealthy, down for a long period, or appears to be overwhelmed.
Retry policy
You can customize the retry policy when creating an event subscription by using the following two configurations. An event will be dropped if either of the limits of the retry policy is reached.
Maximum number of attempts - The value must be an integer between 1 and 30. The default value is 30.
Event time-to-live (TTL) - The value must be an integer between 1 and 1440. The default value is 1440 minutes
The example below shows setting the maximum number of attempts to 18 by using the Azure CLI.
az eventgrid event-subscription create \
  -g gridResourceGroup \
  --topic-name <topic_name> \
  --name <event_subscription_name> \
  --endpoint <endpoint_URL> \
  --max-delivery-attempts 18
Output batching
You can configure Event Grid to batch events for delivery for improved HTTP performance in high-throughput scenarios. Batching is turned off by default and can be turned on per-subscription via the portal, CLI, PowerShell, or SDKs.
Batched delivery has two settings:
Max events per batch - Maximum number of events Event Grid will deliver per batch. This number will never be exceeded, however fewer events may be delivered if no other events are available at the time of publish. Event Grid doesn't delay events to create a batch if fewer events are available. Must be between 1 and 5,000.
Preferred batch size in kilobytes - Target ceiling for batch size in kilobytes. Similar to max events, the batch size may be smaller if more events aren't available at the time of publish. It's possible that a batch is larger than the preferred batch size if a single event is larger than the preferred size. For example, if the preferred size is 4 KB and a 10-KB event is pushed to Event Grid, the 10-KB event will still be delivered in its own batch rather than being dropped.
Delayed delivery
As an endpoint experiences delivery failures, Event Grid will begin to delay the delivery and retry of events to that endpoint. For example, if the first 10 events published to an endpoint fail, Event Grid will assume that the endpoint is experiencing issues and will delay all subsequent retries, and new deliveries, for some time - in some cases up to several hours.
The functional purpose of delayed delivery is to protect unhealthy endpoints and the Event Grid system. Without back-off and delay of delivery to unhealthy endpoints, Event Grid's retry policy and volume capabilities can easily overwhelm a system.
Dead-letter events
When Event Grid can't deliver an event within a certain time period or after trying to deliver the event a certain number of times, it can send the undelivered event to a storage account. This process is known as dead-lettering. Event Grid dead-letters an event when one of the following conditions is met.
Event isn't delivered within the time-to-live period.
The number of tries to deliver the event exceeds the limit.
If either of the conditions is met, the event is dropped or dead-lettered. By default, Event Grid doesn't turn on dead-lettering. To enable it, you must specify a storage account to hold undelivered events when creating the event subscription. You pull events from this storage account to resolve deliveries.
If Event Grid receives a 400 (Bad Request) or 413 (Request Entity Too Large) response code, it immediately schedules the event for dead-lettering. These response codes indicate delivery of the event will never succeed.
There is a five-minute delay between the last attempt to deliver an event and when it is delivered to the dead-letter location. This delay is intended to reduce the number of Blob storage operations. If the dead-letter location is unavailable for four hours, the event is dropped.
Custom delivery properties
Event subscriptions allow you to set up HTTP headers that are included in delivered events. This capability allows you to set custom headers that are required by a destination. You can set up to 10 headers when creating an event subscription. Each header value shouldn't be greater than 4,096 bytes. You can set custom headers on the events that are delivered to the following destinations:
Webhooks
Azure Service Bus topics and queues
Azure Event Hubs
Relay Hybrid Connections
Control access to events
Azure Event Grid allows you to control the level of access given to different users to do various management operations such as list event subscriptions, create new ones, and generate keys. Event Grid uses Azure role-based access control (Azure RBAC).
Built-in roles
Event Grid provides the following built-in roles:
| Role | Description |
| Event Grid Subscription Reader | Lets you read Event Grid event subscriptions. |
| Event Grid Subscription Contributor | Lets you manage Event Grid event subscription operations. |
| Event Grid Contributor | Lets you create and manage Event Grid resources. |
| Event Grid Data Sender | Lets you send events to Event Grid topics. |
The Event Grid Subscription Reader and Event Grid Subscription Contributor roles are for managing event subscriptions. They're important when implementing event domains because they give users the permissions they need to subscribe to topics in your event domain. These roles are focused on event subscriptions and don't grant access for actions such as creating topics.
The Event Grid Contributor role allows you to create and manage Event Grid resources.
Permissions for event subscriptions
If you're using an event handler that isn't a WebHook (such as an event hub or queue storage), you need write access to that resource. This permissions check prevents an unauthorized user from sending events to your resource.
You must have the Microsoft.EventGrid/EventSubscriptions/Write permission on the resource that is the event source. You need this permission because you're writing a new subscription at the scope of the resource. The required resource differs based on whether you're subscribing to a system topic or custom topic. Both types are described in this section.
| Topic Type | Description |
| System topics | Need permission to write a new event subscription at the scope of the resource publishing the event. The format of the resource is: /subscriptions/{subscription-id}/resourceGroups/{resource-group-name}/providers/{resource-provider}/{resource-type}/{resource-name} |
| Custom topics | Need permission to write a new event subscription at the scope of the event grid topic. The format of the resource is: /subscriptions/{subscription-id}/resourceGroups/{resource-group-name}/providers/Microsoft.EventGrid/topics/{topic-name} |
Receive events by using webhooks
Webhooks are one of the many ways to receive events from Azure Event Grid. When a new event is ready, Event Grid service POSTs an HTTP request to the configured endpoint with the event in the request body.
Like many other services that support webhooks, Event Grid requires you to prove ownership of your Webhook endpoint before it starts delivering events to that endpoint. This requirement prevents a malicious user from flooding your endpoint with events.
When you use any of the three Azure services listed below, the Azure infrastructure automatically handles this validation:
Azure Logic Apps with Event Grid Connector
Azure Automation via webhook
Azure Functions with Event Grid Trigger
Endpoint validation with Event Grid events
If you're using any other type of endpoint, such as an HTTP trigger based Azure function, your endpoint code needs to participate in a validation handshake with Event Grid. Event Grid supports two ways of validating the subscription.
Synchronous handshake: At the time of event subscription creation, Event Grid sends a subscription validation event to your endpoint. The schema of this event is similar to any other Event Grid event. The data portion of this event includes a
validationCodeproperty. Your application verifies that the validation request is for an expected event subscription, and returns the validation code in the response synchronously. This handshake mechanism is supported in all Event Grid versions.Asynchronous handshake: In certain cases, you can't return the ValidationCode in response synchronously. For example, if you use a third-party service (like Zapier or IFTTT), you can't programmatically respond with the validation code.
Event Grid supports a manual validation handshake. It sends a validationUrl property in the data portion of the subscription validation event. To complete the handshake, find that URL in the event data and do a GET request to it. You can use either a REST client or your web browser.
The provided URL is valid for 5 minutes. During that time, the provisioning state of the event subscription is AwaitingManualAction. If you don't complete the manual validation within 5 minutes, the provisioning state is set to Failed. You'll have to create the event subscription again before starting the manual validation.
This authentication mechanism also requires the webhook endpoint to return an HTTP status code of 200 so that it knows that the POST for the validation event was accepted before it can be put in the manual validation mode. In other words, if the endpoint returns 200 but doesn't return back a validation response synchronously, the mode is transitioned to the manual validation mode. If there's a GET on the validation URL within 5 minutes, the validation handshake is considered to be successful.
Note: Using self-signed certificates for validation isn't supported. Use a signed certificate from a commercial certificate authority (CA) instead.
Filter events
When creating an event subscription, you have three options for filtering:
Event types
Subject begins with or ends with
Advanced fields and operators
Event type filtering
By default, all event types for the event source are sent to the endpoint. You can decide to send only certain event types to your endpoint. For example, you can get notified of updates to your resources, but not notified for other operations like deletions. In that case, filter by the Microsoft.Resources.ResourceWriteSuccess event type. Provide an array with the event types, or specify All to get all event types for the event source.
The JSON syntax for filtering by event type is:
"filter": {
  "includedEventTypes": [
    "Microsoft.Resources.ResourceWriteFailure",
    "Microsoft.Resources.ResourceWriteSuccess"
  ]
}
Subject filtering
For simple filtering by subject, specify a starting or ending value for the subject. For example, you can specify the subject ends with .txt to only get events related to uploading a text file to storage account. Or, you can filter the subject begins with /blobServices/default/containers/testcontainer to get all events for that container but not other containers in the storage account.
The JSON syntax for filtering by subject is:
"filter": {
  "subjectBeginsWith": "/blobServices/default/containers/mycontainer/log",
  "subjectEndsWith": ".jpg"
}
Advanced filtering
To filter by values in the data fields and specify the comparison operator, use the advanced filtering option. In advanced filtering, you specify the:
operator type - The type of comparison.
key - The field in the event data that you're using for filtering. It can be a number, boolean, or string.
value or values - The value or values to compare to the key.
The JSON syntax for using advanced filters is:
"filter": {
  "advancedFilters": [
    {
      "operatorType": "NumberGreaterThanOrEquals",
      "key": "Data.Key1",
      "value": 5
    },
    {
      "operatorType": "StringContains",
      "key": "Subject",
      "values": ["container1", "container2"]
    }
  ]
}
Practical 15: Route custom events to web endpoint by using Azure CLI
In this exercise you will learn how to:
Enable an Event Grid resource provider
Create a custom topic
Create a message endpoint
Subscribe to a custom topic
Send an event to a custom topic
Prerequisites
- An Azure account with an active subscription.
Step 1: Create a resource group
Launch the Cloud Shell: https://shell.azure.com
Select Bash as the shell.
Run the commands below to create variables. Replace
<myLocation>with a region near you.let rNum=$RANDOM*$RANDOM myLocation=<myLocation> myTopicName="az204-egtopic-${rNum}" mySiteName="az204-egsite-${rNum}" mySiteURL="https://${mySiteName}.azurewebsites.net"Create a resource group for the new resources you will be creating.
az group create --name az204-evgrid-rg --location $myLocation
Step 2: Enable an Event Grid resource provider
Note: This step is only needed on subscriptions that haven't previously used Event Grid.
Register the Event Grid resource provider by using the az provider register command.
az provider register --namespace Microsoft.EventGrid
It can take a few minutes for the registration to complete. To check the status run the command below.
az provider show --namespace Microsoft.EventGrid --query "registrationState"
Step 3: Create a custom topic
Create a custom topic by using the az eventgrid topic create command. The name must be unique because it is part of the DNS entry.
az eventgrid topic create --name $myTopicName \
    --location $myLocation \
    --resource-group az204-evgrid-rg
Step 4: Create a message endpoint
Before subscribing to the custom topic, we need to create the endpoint for the event message. Typically, the endpoint takes actions based on the event data. The script below uses a pre-built web app that displays the event messages. The deployed solution includes an App Service plan, an App Service web app, and source code from GitHub. It also generates a unique name for the site.
Create a message endpoint. The deployment may take a few minutes to complete.
 az deployment group create \
     --resource-group az204-evgrid-rg \
     --template-uri "https://raw.githubusercontent.com/Azure-Samples/azure-event-grid-viewer/main/azuredeploy.json" \
     --parameters siteName=$mySiteName hostingPlanName=viewerhost

 echo "Your web app URL: ${mySiteURL}"
Note: This command may take a few minutes to complete.
In a new tab navigate to the URL generated at the end of the script above to ensure the web app is running. You should see the site with no messages currently displayed.
Tip: Leave the browser running, it is used to show updates.
Step 5: Subscribe to a custom topic
You subscribe to an event grid topic to tell Event Grid which events you want to track and where to send those events.
Subscribe to a custom topic by using the
az eventgrid event-subscription createcommand. The script below will grab the needed subscription ID from your account and use in the creation of the event subscription.BashCopy
 endpoint="${mySiteURL}/api/updates"
 subId=$(az account show --subscription "" | jq -r '.id')

 az eventgrid event-subscription create \
     --source-resource-id "/subscriptions/$subId/resourceGroups/az204-evgrid-rg/providers/Microsoft.EventGrid/topics/$myTopicName" \
     --name az204ViewerSub \
     --endpoint $endpoint
View your web app again, and notice that a subscription validation event has been sent to it. Select the eye icon to expand the event data. Event Grid sends the validation event so the endpoint can verify that it wants to receive event data. The web app includes code to validate the subscription.
Step 6: Send an event to your custom topic
Trigger an event to see how Event Grid distributes the message to your endpoint.
Retrieve URL and key for the custom topic.
 topicEndpoint=$(az eventgrid topic show --name $myTopicName -g az204-evgrid-rg --query "endpoint" --output tsv)
 key=$(az eventgrid topic key list --name $myTopicName -g az204-evgrid-rg --query "key1" --output tsv)
Create event data to send. Typically, an application or Azure service would send the event data, we're creating data for the purposes of the exercise.
event='[ {"id": "'"$RANDOM"'", "eventType": "recordInserted", "subject": "myapp/vehicles/motorcycles", "eventTime": "'`date +%Y-%m-%dT%H:%M:%S%z`'", "data":{ "make": "Contoso", "model": "Monster"},"dataVersion": "1.0"} ]'Use
curlto send the event to the topic.curl -X POST -H "aeg-sas-key: $key" -d "$event" $topicEndpointView your web app to see the event you just sent. Select the eye icon to expand the event data.
 {
 "id": "29078",
 "eventType": "recordInserted",
 "subject": "myapp/vehicles/motorcycles",
 "eventTime": "2019-12-02T22:23:03+00:00",
 "data": {
     "make": "Contoso",
     "model": "Northwind"
 },
 "dataVersion": "1.0",
 "metadataVersion": "1",
 "topic": "/subscriptions/{subscription-id}/resourceGroups/az204-evgrid-rg/providers/Microsoft.EventGrid/topics/az204-egtopic-589377852"
 }
Clean up resources
When you no longer need the resources in this exercise use the following command to delete the resource group and associated resources.
az group delete --name az204-evgrid-rg --no-wait
Azure Event Hubs
Azure Event Hubs is a big data streaming platform and event ingestion service. It can receive and process millions of events per second. Data sent to an event hub can be transformed and stored by using any real-time analytics provider or batching/storage adapters.
Azure Event Hubs represents the "front door" for an event pipeline, often called an event ingestor in solution architectures. An event ingestor is a component or service that sits between event publishers and event consumers to decouple the production of an event stream from the consumption of those events. Event Hubs provides a unified streaming platform with time retention buffer, decoupling event producers from event consumers.
The table below highlights key features of the Azure Event Hubs service:
| Feature | Description |
| Fully managed PaaS | Event Hubs is a fully managed Platform-as-a-Service (PaaS) with little configuration or management overhead, so you focus on your business solutions. Event Hubs for Apache Kafka ecosystems gives you the PaaS Kafka experience without having to manage, configure, or run your clusters. |
| Real-time and batch processing | Event Hubs uses a partitioned consumer model, enabling multiple applications to process the stream concurrently and letting you control the speed of processing. |
| Scalable | Scaling options, like Auto-inflate, scale the number of throughput units to meet your usage needs. |
| Rich ecosystem | Event Hubs for Apache Kafka ecosystems enables Apache Kafka (1.0 and later) clients and applications to talk to Event Hubs. You do not need to set up, configure, and manage your own Kafka clusters. |
Key concepts
Event Hubs contains the following key components:
An Event Hubs client is the primary interface for developers interacting with the Event Hubs client library. There are several different Event Hub clients, each dedicated to a specific use of Event Hubs, such as publishing or consuming events.
An Event Hubs producer is a type of client that serves as a source of telemetry data, diagnostics information, usage logs, or other log data, as part of an embedded device solution, a mobile device application, a game title running on a console or other device, some client or server based business solution, or a web site.
An Event Hubs consumer is a type of client which reads information from the Event Hub and allows processing of it. Processing may involve aggregation, complex computation and filtering. Processing may also involve distribution or storage of the information in a raw or transformed fashion. Event Hub consumers are often robust and high-scale platform infrastructure parts with built-in analytics capabilities, like Azure Stream Analytics, Apache Spark.
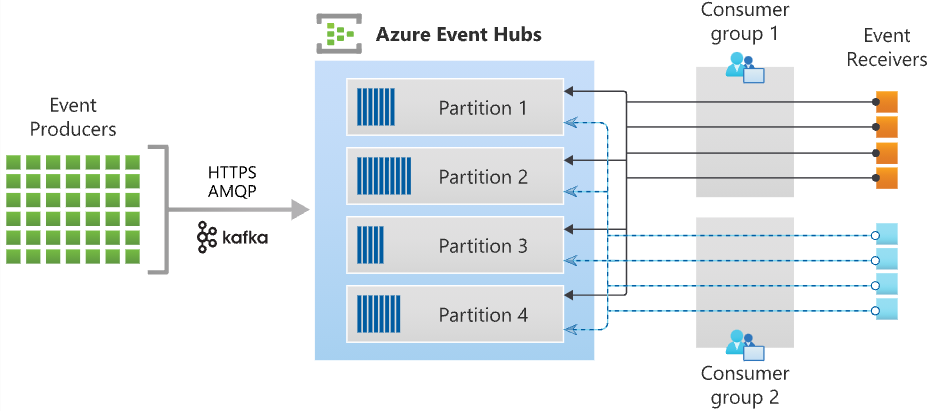
A partition is an ordered sequence of events that is held in an Event Hubs. Partitions are a means of data organization associated with the parallelism required by event consumers. Azure Event Hubs provides message streaming through a partitioned consumer pattern in which each consumer only reads a specific subset, or partition, of the message stream. As newer events arrive, they are added to the end of this sequence. The number of partitions is specified at the time an Event Hub is created and cannot be changed.
A consumer group is a view of an entire Event Hubs. Consumer groups enable multiple consuming applications to each have a separate view of the event stream, and to read the stream independently at their own pace and from their own position. There can be at most 5 concurrent readers on a partition per consumer group; however it is recommended that there is only one active consumer for a given partition and consumer group pairing. Each active reader receives all of the events from its partition; if there are multiple readers on the same partition, then they will receive duplicate events.
Event receivers: Any entity that reads event data from an Event Hubs. All Event Hubs consumers connect via the AMQP 1.0 session. The Event Hubs service delivers events through a session as they become available. All Kafka consumers connect via the Kafka protocol 1.0 and later.
Throughput units or processing units: Pre-purchased units of capacity that control the throughput capacity of Event Hubs.
The following figure shows the Event Hubs stream processing architecture:
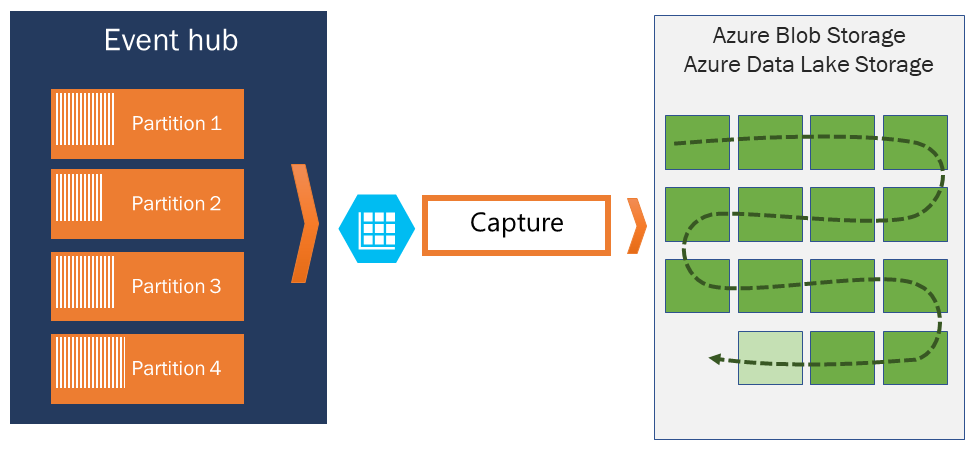
Event Hubs Capture
Azure Event Hubs enables you to automatically capture the streaming data in Event Hubs in an Azure Blob storage or Azure Data Lake Storage account of your choice, with the added flexibility of specifying a time or size interval. Setting up Capture is fast, there are no administrative costs to run it, and it scales automatically with Event Hubs throughput units in the standard tier or processing units in the premium tier.
Event Hubs Capture enables you to process real-time and batch-based pipelines on the same stream. This means you can build solutions that grow with your needs over time.
How Event Hubs Capture works
Event Hubs is a time-retention durable buffer for telemetry ingress, similar to a distributed log. The key to scaling in Event Hubs is the partitioned consumer model. Each partition is an independent segment of data and is consumed independently. Over time this data ages off, based on the configurable retention period. As a result, a given event hub never gets "too full."
Event Hubs Capture enables you to specify your own Azure Blob storage account and container, or Azure Data Lake Store account, which are used to store the captured data. These accounts can be in the same region as your event hub or in another region, adding to the flexibility of the Event Hubs Capture feature.
Captured data is written in Apache Avro format: a compact, fast, binary format that provides rich data structures with inline schema. This format is widely used in the Hadoop ecosystem, Stream Analytics, and Azure Data Factory.
Capture windowing
Event Hubs Capture enables you to set up a window to control capturing. This window is a minimum size and time configuration with a "first wins policy," meaning that the first trigger encountered causes a capture operation. Each partition captures independently and writes a completed block blob at the time of capture, named for the time at which the capture interval was encountered. The storage naming convention is as follows:
{Namespace}/{EventHub}/{PartitionId}/{Year}/{Month}/{Day}/{Hour}/{Minute}/{Second}
Note that the date values are padded with zeroes; an example filename might be:
https://mystorageaccount.blob.core.windows.net/mycontainer/mynamespace/myeventhub/0/2017/12/08/03/03/17.avro
Scaling to throughput units
Event Hubs traffic is controlled by throughput units. A single throughput unit allows 1 MB per second or 1000 events per second of ingress and twice that amount of egress. Standard Event Hubs can be configured with 1-20 throughput units, and you can purchase more with a quota increase support request. Usage beyond your purchased throughput units is throttled. Event Hubs Capture copies data directly from the internal Event Hubs storage, bypassing throughput unit egress quotas and saving your egress for other processing readers, such as Stream Analytics or Spark.
Once configured, Event Hubs Capture runs automatically when you send your first event, and continues running. To make it easier for your downstream processing to know that the process is working, Event Hubs writes empty files when there is no data. This process provides a predictable cadence and marker that can feed your batch processors.
Scale your processing application
To scale your event processing application, you can run multiple instances of the application and have it balance the load among themselves. The EventProcessorClient (.NET and Java), or EventHubConsumerClient (Python and JavaScript) allows you to balance the load between multiple instances of your program and checkpoint events when receiving.
Note: The key to scale for Event Hubs is the idea of partitioned consumers. In contrast to the competing consumers pattern, the partitioned consumer pattern enables high scale by removing the contention bottleneck and facilitating end to end parallelism.
Example scenario
As an example scenario, consider a home security company that monitors 100,000 homes. Every minute, it gets data from various sensors such as a motion detector, door/window open sensor, glass break detector, and so on, installed in each home. The company provides a web site for residents to monitor the activity of their home in near real time.
Each sensor pushes data to an event hub. The event hub is configured with 16 partitions. On the consuming end, you need a mechanism that can read these events, consolidate them, and dump the aggregate to a storage blob, which is then projected to a user-friendly web page.
When designing the consumer in a distributed environment, the scenario must handle the following requirements:
Scale: Create multiple consumers, with each consumer taking ownership of reading from a few Event Hubs partitions.
Load balance: Increase or reduce the consumers dynamically. For example, when a new sensor type (for example, a carbon monoxide detector) is added to each home, the number of events increases. In that case, the operator (a human) increases the number of consumer instances. Then, the pool of consumers can rebalance the number of partitions they own, to share the load with the newly added consumers.
Seamless resume on failures: If a consumer (consumer A) fails (for example, the virtual machine hosting the consumer suddenly crashes), then other consumers can pick up the partitions owned by consumer A and continue. Also, the continuation point, called a checkpoint or offset, should be at the exact point at which consumer A failed, or slightly before that.
Consume events: While the previous three points deal with the management of the consumer, there must be code to consume the events and do something useful with it. For example, aggregate it and upload it to blob storage.
Event processor or consumer client
In .NET or Java SDKs, you use an event processor client (EventProcessorClient), and in Python and JavaScript SDKs, you use EventHubConsumerClient.
For most production scenarios, we recommend that you use the event processor client for reading and processing events. Event processor clients can work cooperatively within the context of a consumer group for a given event hub. Clients will automatically manage distribution and balancing of work as instances become available or unavailable for the group.
Partition ownership tracking
An event processor instance typically owns and processes events from one or more partitions. Ownership of partitions is evenly distributed among all the active event processor instances associated with an event hub and consumer group combination.
Each event processor is given a unique identifier and claims ownership of partitions by adding or updating an entry in a checkpoint store. All event processor instances communicate with this store periodically to update its own processing state as well as to learn about other active instances. This data is then used to balance the load among the active processors.
Receive messages
When you create an event processor, you specify the functions that will process events and errors. Each call to the function that processes events delivers a single event from a specific partition. It's your responsibility to handle this event. If you want to make sure the consumer processes every message at least once, you need to write your own code with retry logic. But be cautious about poisoned messages.
We recommend that you do things relatively fast. That is, do as little processing as possible. If you need to write to storage and do some routing, it's better to use two consumer groups and have two event processors.
Checkpointing
Checkpointing is a process by which an event processor marks or commits the position of the last successfully processed event within a partition. Marking a checkpoint is typically done within the function that processes the events and occurs on a per-partition basis within a consumer group.
If an event processor disconnects from a partition, another instance can resume processing the partition at the checkpoint that was previously committed by the last processor of that partition in that consumer group. When the processor connects, it passes the offset to the event hub to specify the location at which to start reading. In this way, you can use checkpointing to both mark events as "complete" by downstream applications and to provide resiliency when an event processor goes down. It's possible to return to older data by specifying a lower offset from this checkpointing process.
Thread safety and processor instances
By default, the function that processes the events is called sequentially for a given partition. Subsequent events and calls to this function from the same partition queue up behind the scenes as the event pump continues to run in the background on other threads. Events from different partitions can be processed concurrently and any shared state that is accessed across partitions have to be synchronized.
Dynamically add partitions to an event hub
A partition is an ordered sequence of events that is held in an event hub. As newer events arrive, they're added to the end of this sequence. You can specify the number of partitions at the time of creating an event hub. In some scenarios, you may need to add partitions after the event hub has been created.
Dynamic additions of partitions is available only in premium and dedicated tiers of Event Hubs.
az eventhubs eventhub update --resource-group MyResourceGroupName --namespace-name MyNamespaceName --name MyEventHubName --partition-count 12
az eventhubs eventhub Command to manage Azure EventHubs eventhub
--name Name of Eventhub.
--namespace-nameName of Namespace.
--resource-group Name of resource group.
--partition-count Number of partitions created for the Event Hub. By default, allowed values are 2-32. Lower value of 1 is supported with Kafka enabled namespaces. In presence of a custom quota, the upper limit will match the upper limit of the quota.
Control access to events
Azure Event Hubs supports both Azure Active Directory and shared access signatures (SAS) to handle both authentication and authorization. Azure provides the following Azure built-in roles for authorizing access to Event Hubs data using Azure Active Directory and OAuth:
Azure Event Hubs Data Owner: Use this role to give complete access to Event Hubs resources.
Azure Event Hubs Data Sender: Use this role to give send access to Event Hubs resources.
Azure Event Hubs Data Receiver: Use this role to give receiving access to Event Hubs resources.
Authorize access with managed identities
To authorize a request to Event Hubs service from a managed identity in your application, you need to configure Azure role-based access control settings for that managed identity. Azure Event Hubs defines Azure roles that encompass permissions for sending and reading from Event Hubs. When the Azure role is assigned to a managed identity, the managed identity is granted access to Event Hubs data at the appropriate scope.
Authorize access with Microsoft Identity Platform
A key advantage of using Azure AD with Event Hubs is that your credentials no longer need to be stored in your code. Instead, you can request an OAuth 2.0 access token from Microsoft identity platform. Azure AD authenticates the security principal (a user, a group, or service principal) running the application. If authentication succeeds, Azure AD returns the access token to the application, and the application can then use the access token to authorize requests to Azure Event Hubs.
Authorize access to Event Hubs publishers with shared access signatures
An event publisher defines a virtual endpoint for an Event Hub. The publisher can only be used to send messages to an event hub and not receive messages. Typically, an event hub employs one publisher per client. All messages that are sent to any of the publishers of an event hub are enqueued within that event hub. Publishers enable fine-grained access control.
Each Event Hubs client is assigned a unique token which is uploaded to the client. A client that holds a token can only send to one publisher, and no other publisher. If multiple clients share the same token, then each of them shares the publisher.
All tokens are assigned with shared access signature keys. Typically, all tokens are signed with the same key. Clients aren't aware of the key, which prevents clients from manufacturing tokens. Clients operate on the same tokens until they expire.
Authorize access to Event Hubs consumers with shared access signatures
To authenticate back-end applications that consume from the data generated by Event Hubs producers, Event Hubs token authentication requires its clients to either have the manage rights or the listen privileges assigned to its Event Hubs namespace or event hub instance or topic. Data is consumed from Event Hubs using consumer groups. While SAS policy gives you granular scope, this scope is defined only at the entity level and not at the consumer level. It means that the privileges defined at the namespace level or the event hub instance or topic level will be applied to the consumer groups of that entity.
Common operations with the Event Hubs client library
Below are the common operations you can perform with the Event Hubs client library (Azure.Messaging.EventHubs) to interact with an Event Hub.
Inspect an Event Hub
Many Event Hub operations take place within the scope of a specific partition. Because partitions are owned by the Event Hub, their names are assigned at the time of creation. To understand what partitions are available, you query the Event Hub using one of the Event Hub clients. For illustration, the EventHubProducerClient is demonstrated in these examples, but the concept and form are common across clients.
var connectionString = "<< CONNECTION STRING FOR THE EVENT HUBS NAMESPACE >>";
var eventHubName = "<< NAME OF THE EVENT HUB >>";

await using (var producer = new EventHubProducerClient(connectionString, eventHubName))
{
    string[] partitionIds = await producer.GetPartitionIdsAsync();
}
Publish events to an Event Hub
In order to publish events, you'll need to create an EventHubProducerClient. Producers publish events in batches and may request a specific partition, or allow the Event Hubs service to decide which partition events should be published to. We recommended using automatic routing when the publishing of events needs to be highly available or when event data should be distributed evenly among the partitions. Our example will take advantage of automatic routing.
var connectionString = "<< CONNECTION STRING FOR THE EVENT HUBS NAMESPACE >>";
var eventHubName = "<< NAME OF THE EVENT HUB >>";

await using (var producer = new EventHubProducerClient(connectionString, eventHubName))
{
    using EventDataBatch eventBatch = await producer.CreateBatchAsync();
    eventBatch.TryAdd(new EventData(new BinaryData("First")));
    eventBatch.TryAdd(new EventData(new BinaryData("Second")));

    await producer.SendAsync(eventBatch);
}
Read events from an Event Hub
In order to read events from an Event Hub, you'll need to create an EventHubConsumerClient for a given consumer group. When an Event Hub is created, it provides a default consumer group that can be used to get started with exploring Event Hubs. In our example, we will focus on reading all events that have been published to the Event Hub using an iterator.
Note: It is recommended that EventHubConsumerClient not be used in production scenarios. For production use, we recommend using the Event Processor Client, as it provides a more robust and performant experience.
var connectionString = "<< CONNECTION STRING FOR THE EVENT HUBS NAMESPACE >>";
var eventHubName = "<< NAME OF THE EVENT HUB >>";

string consumerGroup = EventHubConsumerClient.DefaultConsumerGroupName;

await using (var consumer = new EventHubConsumerClient(consumerGroup, connectionString, eventHubName))
{
    using var cancellationSource = new CancellationTokenSource();
    cancellationSource.CancelAfter(TimeSpan.FromSeconds(45));

    await foreach (PartitionEvent receivedEvent in consumer.ReadEventsAsync(cancellationSource.Token))
    {
        // At this point, the loop will wait for events to be available in the Event Hub.  When an event
        // is available, the loop will iterate with the event that was received.  Because we did not
        // specify a maximum wait time, the loop will wait forever unless cancellation is requested using
        // the cancellation token.
    }
}
Read events from an Event Hub partition
To read from a specific partition, the consumer will need to specify where in the event stream to begin receiving events; in our example, we will focus on reading all published events for the first partition of the Event Hub.
var connectionString = "<< CONNECTION STRING FOR THE EVENT HUBS NAMESPACE >>";
var eventHubName = "<< NAME OF THE EVENT HUB >>";

string consumerGroup = EventHubConsumerClient.DefaultConsumerGroupName;

await using (var consumer = new EventHubConsumerClient(consumerGroup, connectionString, eventHubName))
{
    EventPosition startingPosition = EventPosition.Earliest;
    string partitionId = (await consumer.GetPartitionIdsAsync()).First();

    using var cancellationSource = new CancellationTokenSource();
    cancellationSource.CancelAfter(TimeSpan.FromSeconds(45));

    await foreach (PartitionEvent receivedEvent in consumer.ReadEventsFromPartitionAsync(partitionId, startingPosition, cancellationSource.Token))
    {
        // At this point, the loop will wait for events to be available in the partition.  When an event
        // is available, the loop will iterate with the event that was received.  Because we did not
        // specify a maximum wait time, the loop will wait forever unless cancellation is requested using
        // the cancellation token.
    }
}
Process events using an Event Processor client
For most production scenarios, it is recommended that the EventProcessorClient be used for reading and processing events. Since the EventProcessorClient has a dependency on Azure Storage blobs for persistence of its state, you'll need to provide a BlobContainerClient for the processor, which has been configured for the storage account and container that should be used.
var cancellationSource = new CancellationTokenSource();
cancellationSource.CancelAfter(TimeSpan.FromSeconds(45));

var storageConnectionString = "<< CONNECTION STRING FOR THE STORAGE ACCOUNT >>";
var blobContainerName = "<< NAME OF THE BLOB CONTAINER >>";

var eventHubsConnectionString = "<< CONNECTION STRING FOR THE EVENT HUBS NAMESPACE >>";
var eventHubName = "<< NAME OF THE EVENT HUB >>";
var consumerGroup = "<< NAME OF THE EVENT HUB CONSUMER GROUP >>";

Task processEventHandler(ProcessEventArgs eventArgs) => Task.CompletedTask;
Task processErrorHandler(ProcessErrorEventArgs eventArgs) => Task.CompletedTask;

var storageClient = new BlobContainerClient(storageConnectionString, blobContainerName);
var processor = new EventProcessorClient(storageClient, consumerGroup, eventHubsConnectionString, eventHubName);

processor.ProcessEventAsync += processEventHandler;
processor.ProcessErrorAsync += processErrorHandler;

await processor.StartProcessingAsync();

try
{
    // The processor performs its work in the background; block until cancellation
    // to allow processing to take place.

    await Task.Delay(Timeout.Infinite, cancellationSource.Token);
}
catch (TaskCanceledException)
{
    // This is expected when the delay is canceled.
}

try
{
    await processor.StopProcessingAsync();
}
finally
{
    // To prevent leaks, the handlers should be removed when processing is complete.

    processor.ProcessEventAsync -= processEventHandler;
    processor.ProcessErrorAsync -= processErrorHandler;
}
Up Next: Message-based solutions - Developing Solutions for Microsoft Azure - Part 5.3