

Photo by Kelly Sikkema on Unsplash
Message-based solutions - Developing Solutions for Microsoft Azure - Part 5.3


Table of contents
- 5.3 Develop message-based solutions
- Choose a message queue solution
- Azure Service Bus
- Service Bus queues, topics, and subscriptions
- Service Bus message payloads and serialization
- Practical 16: Send and receive message from a Service Bus queue by using .NET.
- Azure Queue Storage
- Create and manage Azure Queue Storage and messages by using .NET
All the notes on this page have been taken from Microsoft's learning portal - learn.microsoft.com. If any of this material is copyrighted, please let me know in the comments below and I will remove it. The main goal here is to learn and understand the concepts for developing solutions for Microsoft Azure. These notes may be helpful to prepare for the certification AZ-204: Developing Solutions for Microsoft Azure
Continuing from Event-based solutions - Developing Solutions for Microsoft Azure - Part 5.2
5.3 Develop message-based solutions
Azure supports two types of queue mechanisms: Service Bus queues and Storage queues.
Service Bus queues are part of a broader Azure messaging infrastructure that supports queuing, publish/subscribe, and more advanced integration patterns. They're designed to integrate applications or application components that may span multiple communication protocols, data contracts, trust domains, or network environments.
Storage queues are part of the Azure Storage infrastructure. They allow you to store large numbers of messages. You access messages from anywhere in the world via authenticated calls using HTTP or HTTPS. A queue message can be up to 64 KB in size. A queue may contain millions of messages, up to the total capacity limit of a storage account. Queues are commonly used to create a backlog of work to process asynchronously.
Choose a message queue solution
Consider using Service Bus queues
As a solution architect/developer, you should consider using Service Bus queues when:
Your solution needs to receive messages without having to poll the queue. With Service Bus, you can achieve it by using a long-polling receive operation using the TCP-based protocols that Service Bus supports.
Your solution requires the queue to provide a guaranteed first-in-first-out (FIFO) ordered delivery.
Your solution needs to support automatic duplicate detection.
You want your application to process messages as parallel long-running streams (messages are associated with a stream using the session ID property on the message). In this model, each node in the consuming application competes for streams, as opposed to messages. When a stream is given to a consuming node, the node can examine the state of the application stream state using transactions.
Your solution requires transactional behavior and atomicity when sending or receiving multiple messages from a queue.
Your application handles messages that can exceed 64 KB but won't likely approach the 256-KB limit.
Consider using Storage queues
As a solution architect/developer, you should consider using Storage queues when:
Your application must store over 80 gigabytes of messages in a queue.
Your application wants to track progress for processing a message in the queue. It's useful if the worker processing a message crashes. Another worker can then use that information to continue from where the prior worker left off.
You require server side logs of all of the transactions executed against your queues.
Azure Service Bus
Microsoft Azure Service Bus is a fully managed enterprise integration message broker. Service Bus can decouple applications and services. Data is transferred between different applications and services using messages. A message is a container decorated with metadata, and contains data. The data can be any kind of information, including structured data encoded with the common formats such as the following ones: JSON, XML, Apache Avro, Plain Text.
Some common messaging scenarios are:
Messaging. Transfer business data, such as sales or purchase orders, journals, or inventory movements.
Decouple applications. Improve reliability and scalability of applications and services. Client and service don't have to be online at the same time.
Topics and subscriptions. Enable 1:n relationships between publishers and subscribers.
Message sessions. Implement workflows that require message ordering or message deferral.
Service Bus tiers
Service Bus offers a standard and premium tier. The premium tier of Service Bus Messaging addresses common customer requests around scale, performance, and availability for mission-critical applications. The premium tier is recommended for production scenarios. Although the feature sets are nearly identical, these two tiers of Service Bus Messaging are designed to serve different use cases.
Some high-level differences are highlighted in the following table.
| Premium | Standard |
| High throughput | Variable throughput |
| Predictable performance | Variable latency |
| Fixed pricing | Pay as you go variable pricing |
| Ability to scale workload up and down | N/A |
| Message size up to 100 MB | Message size up to 256 KB |
Advanced features
Service Bus includes advanced features that enable you to solve more complex messaging problems. The following table describes several of these features.
| Feature | Description |
| Message sessions | To create a first-in, first-out (FIFO) guarantee in Service Bus, use sessions. Message sessions enable exclusive, ordered handling of unbounded sequences of related messages. |
| Autoforwarding | The autoforwarding feature chains a queue or subscription to another queue or topic that is in the same namespace. |
| Dead-letter queue | Service Bus supports a dead-letter queue (DLQ). A DLQ holds messages that can't be delivered to any receiver. Service Bus lets you remove messages from the DLQ and inspect them. |
| Scheduled delivery | You can submit messages to a queue or topic for delayed processing. You can schedule a job to become available for processing by a system at a certain time. |
| Message deferral | A queue or subscription client can defer retrieval of a message until a later time. The message remains in the queue or subscription, but it's set aside. |
| Batching | Client-side batching enables a queue or topic client to delay sending a message for a certain period of time. |
| Transactions | A transaction groups two or more operations together into an execution scope. Service Bus supports grouping operations against a single messaging entity within the scope of a single transaction. A message entity can be a queue, topic, or subscription. |
| Filtering and actions | Subscribers can define which messages they want to receive from a topic. These messages are specified in the form of one or more named subscription rules. |
| Autodelete on idle | Autodelete on idle enables you to specify an idle interval after which a queue is automatically deleted. The minimum duration is 5 minutes. |
| Duplicate detection | An error could cause the client to have a doubt about the outcome of a send operation. Duplicate detection enables the sender to resend the same message, or for the queue or topic to discard any duplicate copies. |
| Security protocols | Service Bus supports security protocols such as Shared Access Signatures (SAS), Role Based Access Control (RBAC) and Managed identities for Azure resources. |
| Geo-disaster recovery | When Azure regions or datacenters experience downtime, Geo-disaster recovery enables data processing to continue operating in a different region or datacenter. |
| Security | Service Bus supports standard AMQP 1.0 and HTTP/REST protocols. |
Compliance with standards and protocols
The primary wire protocol for Service Bus is Advanced Messaging Queueing Protocol (AMQP) 1.0, an open ISO/IEC standard. It allows customers to write applications that work against Service Bus and on-premises brokers such as ActiveMQ or RabbitMQ. The AMQP protocol guide provides detailed information in case you want to build such an abstraction.
Service Bus Premium is fully compliant with the Java/Jakarta EE Java Message Service (JMS) 2.0 API.
Client libraries
Fully supported Service Bus client libraries are available via the Azure SDK.
Service Bus queues, topics, and subscriptions
The messaging entities that form the core of the messaging capabilities in Service Bus are queues, topics and subscriptions, and rules/actions.
Queues
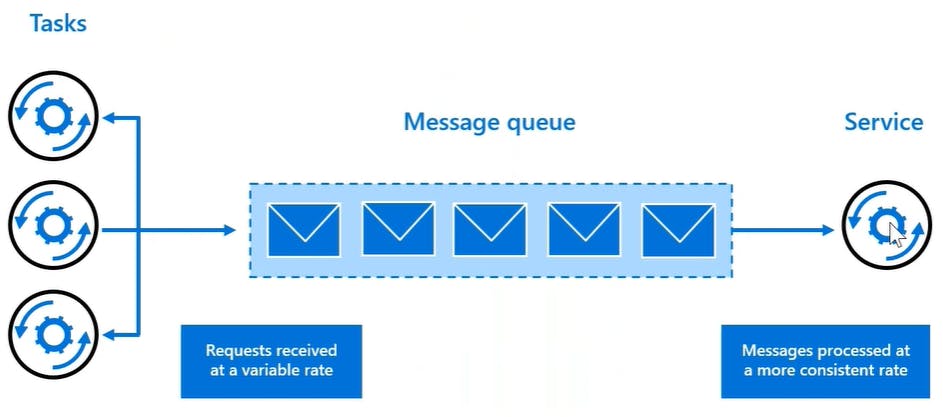
Queues offer First In, First Out (FIFO) message delivery to one or more competing consumers. That is, receivers typically receive and process messages in the order in which they were added to the queue. And, only one message consumer receives and processes each message. Because messages are stored durably in the queue, producers (senders) and consumers (receivers) don't have to process messages concurrently.
A related benefit is load-leveling, which enables producers and consumers to send and receive messages at different rates. In many applications, the system load varies over time. However, the processing time required for each unit of work is typically constant. Intermediating message producers and consumers with a queue means that the consuming application only has to be able to handle average load instead of peak load.
Using queues to intermediate between message producers and consumers provides an inherent loose coupling between the components. Because producers and consumers aren't aware of each other, a consumer can be upgraded without having any effect on the producer.
You can create queues using the Azure portal, PowerShell, CLI, or Resource Manager templates. Then, send and receive messages using clients written in C#, Java, Python, and JavaScript.
Receive modes
You can specify two different modes in which Service Bus receives messages: Receive and delete or Peek lock.
Receive and delete
In this mode, when Service Bus receives the request from the consumer, it marks the message as being consumed and returns it to the consumer application. This mode is the simplest model. It works best for scenarios in which the application can tolerate not processing a message if a failure occurs. For example, consider a scenario in which the consumer issues the receive request and then crashes before processing it. As Service Bus marks the message as being consumed, the application begins consuming messages upon restart. It misses the message that it consumed before the crash.
Peek lock
In this mode, the receive operation becomes two-stage, which makes it possible to support applications that can't tolerate missing messages.
Finds the next message to be consumed, locks it to prevent other consumers from receiving it, and then, return the message to the application.
After the application finishes processing the message, it requests the Service Bus service to complete the second stage of the receive process. Then, the service marks the message as being consumed.
If the application is unable to process the message for some reason, it can request the Service Bus service to abandon the message. Service Bus unlocks the message and makes it available to be received again, either by the same consumer or by another competing consumer. Secondly, there's a timeout associated with the lock. If the application fails to process the message before the lock timeout expires, Service Bus unlocks the message and makes it available to be received again.
Topics and subscriptions

A queue allows processing of a message by a single consumer. In contrast to queues, topics and subscriptions provide a one-to-many form of communication in a publish and subscribe pattern. It's useful for scaling to large numbers of recipients. Each published message is made available to each subscription registered with the topic. Publisher sends a message to a topic and one or more subscribers receive a copy of the message, depending on filter rules set on these subscriptions. The subscriptions can use more filters to restrict the messages that they want to receive.
Publishers send messages to a topic in the same way that they send messages to a queue. But, consumers don't receive messages directly from the topic. Instead, consumers receive messages from subscriptions of the topic. A topic subscription resembles a virtual queue that receives copies of the messages that are sent to the topic. Consumers receive messages from a subscription identically to the way they receive messages from a queue.
Creating a topic is similar to creating a queue, as described in the previous section. You can create topics and subscriptions using the Azure portal, PowerShell, CLI, or Resource Manager templates. Then, send messages to a topic and receive messages from subscriptions using clients written in C#, Java, Python, and JavaScript.
Rules and actions
In many scenarios, messages that have specific characteristics must be processed in different ways. To enable this processing, you can configure subscriptions to find messages that have desired properties and then perform certain modifications to those properties. While Service Bus subscriptions see all messages sent to the topic, you can only copy a subset of those messages to the virtual subscription queue. This filtering is accomplished using subscription filters. Such modifications are called filter actions. When a subscription is created, you can supply a filter expression that operates on the properties of the message. The properties can be both the system properties (for example, Label) and custom application properties (for example, StoreName.) The SQL filter expression is optional in this case. Without a SQL filter expression, any filter action defined on a subscription is performed on all the messages for that subscription.
Service Bus message payloads and serialization
Messages carry a payload and metadata. The metadata is in the form of key-value pair properties, and describes the payload, and gives handling instructions to Service Bus and applications. Occasionally, that metadata alone is sufficient to carry the information that the sender wants to communicate to receivers, and the payload remains empty.
The object model of the official Service Bus clients for .NET and Java maps to and from the wire protocols Service Bus supports.
A Service Bus message consists of a binary payload section that Service Bus never handles in any form on the service-side, and two sets of properties. The broker properties are system defined. These predefined properties either control message-level functionality inside the broker, or they map to common and standardized metadata items. The user properties are a collection of key-value pairs defined and set by the application.
Message routing and correlation
A subset of the broker properties, specifically To, ReplyTo, ReplyToSessionId, MessageId, CorrelationId, and SessionId, help applications route messages to particular destinations. The following patterns describe the routing:
Simple request/reply: A publisher sends a message into a queue and expects a reply from the message consumer. The publisher owns a queue to receive the replies. The address of that queue is contained in the
ReplyToproperty of the outbound message. When the consumer responds, it copies theMessageIdof the handled message into theCorrelationIdproperty of the reply message and delivers the message to the destination indicated by theReplyToproperty. One message can yield multiple replies, depending on the application context.Multicast request/reply: As a variation of the prior pattern, a publisher sends the message into a topic and multiple subscribers become eligible to consume the message. Each of the subscribers might respond in the fashion described previously. If
ReplyTopoints to a topic, such a set of discovery responses can be distributed to an audience.Multiplexing: This session feature enables multiplexing of streams of related messages through a single queue or subscription such that each session (or group) of related messages, identified by matching
SessionIdvalues, are routed to a specific receiver while the receiver holds the session under lock. Learn more about the details of sessions here.Multiplexed request/reply: This session feature enables multiplexed replies, allowing several publishers to share a reply queue. By setting
ReplyToSessionId, the publisher can instruct the consumer(s) to copy that value into theSessionIdproperty of the reply message. The publishing queue or topic doesn't need to be session-aware. When the message is sent the publisher can wait for a session with the givenSessionIdto materialize on the queue by conditionally accepting a session receiver.
Routing inside of a Service Bus namespace uses autoforward chaining and topic subscription rules. Routing across namespaces can be performed using Azure LogicApps. The To property is reserved for future use. Applications that implement routing should do so based on user properties and not lean on the To property; however, doing so now won't cause compatibility issues.
Payload serialization
When in transit or stored inside of Service Bus, the payload is always an opaque, binary block. The ContentType property enables applications to describe the payload, with the suggested format for the property values being a MIME content-type description according to IETF RFC2045; for example, application/json;charset=utf-8.
Unlike the Java or .NET Standard variants, the .NET Framework version of the Service Bus API supports creating BrokeredMessage instances by passing arbitrary .NET objects into the constructor.
The legacy SBMP protocol serializes objects with the default binary serializer, or with a serializer that is externally supplied. The AMQP protocol serializes objects into an AMQP object. The receiver can retrieve those objects with the GetBody<T>() method, supplying the expected type. With AMQP, the objects are serialized into an AMQP graph of ArrayList and IDictionary<string,object> objects, and any AMQP client can decode them.
While this hidden serialization magic is convenient, if applications should take explicit control of object serialization and turn their object graphs into streams before including them into a message, they should do the reverse operation on the receiver side. While AMQP has a powerful binary encoding model, it's tied to the AMQP messaging ecosystem and HTTP clients have trouble decoding such payloads.
Practical 16: Send and receive message from a Service Bus queue by using .NET.
In this exercise you learn how to:
Create a Service Bus namespace, and queue, using the Azure CLI.
Create a .NET console application to send and receive messages from the queue.
Prerequisites
An Azure account with an active subscription.
Visual Studio Code on one of the supported platforms.
The C# extension for Visual Studio Code.
.NET 6 is the target framework for the exercise.
Step 1: Sign in to Azure
Launch the Azure Cloud Shell and select Bash and the environment.
Create variables used in the Azure CLI commands. Replace
<myLocation>with a region near you.myLocation=<myLocation> myNameSpaceName=az204svcbus$RANDOM
Step 2: Create Azure resources
Create a resource group to hold the Azure resources you're creating.
az group create --name az204-svcbus-rg --location $myLocationCreate a Service Bus messaging namespace. The following command creates a namespace using the variable you created earlier. The operation takes a few minutes to complete.
 az servicebus namespace create \
     --resource-group az204-svcbus-rg \
     --name $myNameSpaceName \
     --location $myLocation
Create a Service Bus queue
 az servicebus queue create --resource-group az204-svcbus-rg \
     --namespace-name $myNameSpaceName \
     --name az204-queue
Step 3: Retrieve the connection string for the Service Bus Namespace
Open the Azure portal and navigate to the az204-svcbus-rg resource group.
Select the az204svcbus resource you created.
Select Shared access policies in the Settings section, then select the RootManageSharedAccessKey policy.
Copy the Primary Connection String from the dialog box that opens up and save it to a file, or leave the portal open and copy the key when needed.
Step 4: Create console app to send messages to the queue
Open a local terminal and create, and change in to, a directory named az204svcbus and then run the command to launch Visual Studio Code.
BashCopy
code .Open the terminal in Visual Studio Code by selecting Terminal > New Terminal in the menu bar and run the following commands to create the console app and add the Azure.Messaging.ServiceBus package.
 dotnet new console
 dotnet add package Azure.Messaging.ServiceBus
In Program.cs, add the following
usingstatements at the top of the file after the currentusingstatement.using Azure.Messaging.ServiceBus;Add the following variables to the code and set the
connectionStringvariable to the connection string that you obtained earlier.// connection string to your Service Bus namespace string connectionString = "<CONNECTION STRING>"; // name of your Service Bus topic string queueName = "az204-queue";Add the following code below the variables you just added. See code comments for details.
 // the client that owns the connection and can be used to create senders and receivers
 ServiceBusClient client;

 // the sender used to publish messages to the queue
 ServiceBusSender sender;

 // Create the clients that we'll use for sending and processing messages.
 client = new ServiceBusClient(connectionString);
 sender = client.CreateSender(queueName);

 // create a batch
 using ServiceBusMessageBatch messageBatch = await sender.CreateMessageBatchAsync();

 for (int i = 1; i <= 3; i++)
 {
     // try adding a message to the batch
     if (!messageBatch.TryAddMessage(new ServiceBusMessage($"Message {i}")))
     {
         // if an exception occurs
         throw new Exception($"Exception {i} has occurred.");
     }
 }

 try
 {
     // Use the producer client to send the batch of messages to the Service Bus queue
     await sender.SendMessagesAsync(messageBatch);
     Console.WriteLine($"A batch of three messages has been published to the queue.");
 }
 finally
 {
     // Calling DisposeAsync on client types is required to ensure that network
     // resources and other unmanaged objects are properly cleaned up.
     await sender.DisposeAsync();
     await client.DisposeAsync();
 }

 Console.WriteLine("Follow the directions in the exercise to review the results in the Azure portal.");
 Console.WriteLine("Press any key to continue");
 Console.ReadKey();
Save the file and run the
dotnet buildcommand to ensure there are no errors.Run the program using the
dotnet runcommand and wait for the following confirmation message. Then press any key to exit the program.A batch of three messages has been published to the queue.
Step 5: Review results
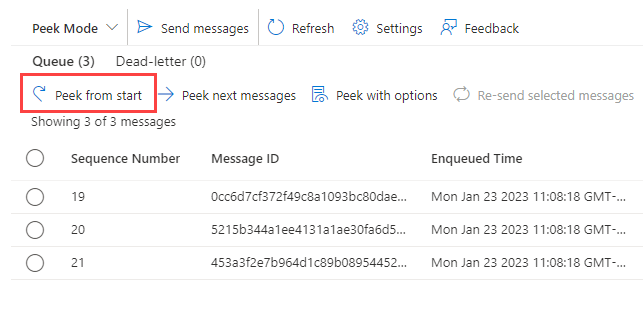
Sign in to the Azure portal and navigate to your Service Bus namespace. Select the Service Bus Explorer in the Service Bus Queue navigation pane.
Select Peek from start and the three messages that were sent appear.
Step 6: Update project to receive messages to the queue
In this section, you update the program to receive messages from the queue.
Add the following code at the end of the existing code. See code comments for details.
 ServiceBusProcessor processor;
 client = new ServiceBusClient(connectionString);

 // create a processor that we can use to process the messages
 processor = client.CreateProcessor(queueName, new ServiceBusProcessorOptions());

 try
 {
     // add handler to process messages
     processor.ProcessMessageAsync += MessageHandler;

     // add handler to process any errors
     processor.ProcessErrorAsync += ErrorHandler;

     // start processing
     await processor.StartProcessingAsync();

     Console.WriteLine("Wait for a minute and then press any key to end the processing");
     Console.ReadKey();

     // stop processing
     Console.WriteLine("\nStopping the receiver...");
     await processor.StopProcessingAsync();
     Console.WriteLine("Stopped receiving messages");
 }
 finally
 {
     // Calling DisposeAsync on client types is required to ensure that network
     // resources and other unmanaged objects are properly cleaned up.
     await processor.DisposeAsync();
     await client.DisposeAsync();
 }

 // handle received messages
 async Task MessageHandler(ProcessMessageEventArgs args)
 {
     string body = args.Message.Body.ToString();
     Console.WriteLine($"Received: {body}");

     // complete the message. messages is deleted from the queue.
     await args.CompleteMessageAsync(args.Message);
 }

 // handle any errors when receiving messages
 Task ErrorHandler(ProcessErrorEventArgs args)
 {
     Console.WriteLine(args.Exception.ToString());
     return Task.CompletedTask;
 }
Use the
dotnet buildcommand to ensure there are no errors.Use the
dotnet runcommand to run the application. It sends three more messages to the queue and then retrieve all six messages. Press any key to stop the receiver and the application.Wait for a minute and then press any key to end the processing Received: Message 1 Received: Message 2 Received: Message 3 Received: Message 1 Received: Message 2 Received: Message 3 Stopping the receiver... Stopped receiving messagesNote: Since the application sent two batches of messages before retrieving them, you should see two batches of three messages represented in the output.
Return to the portal and select Peek from start again. Notice that no messages appear in the queue since we've retrieved them all.
Step 7: Clean up resources
When the resources are no longer needed, you can use the az group delete command in the Azure Cloud Shell to remove the resource group.
az group delete --name az204-svcbus-rg --no-wait
Azure Queue Storage
Azure Queue Storage is a service for storing large numbers of messages. You access messages from anywhere in the world via authenticated calls using HTTP or HTTPS. A queue message can be up to 64 KB in size. A queue may contain millions of messages, up to the total capacity limit of a storage account. Queues are commonly used to create a backlog of work to process asynchronously.
The Queue service contains the following components:
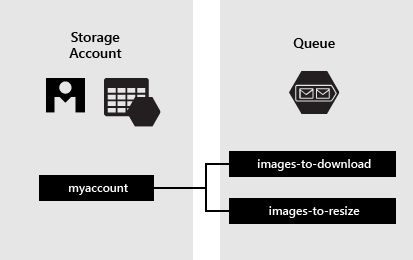
URL format: Queues are addressable using the URL format
https://<storage account>.queue.core.windows.net/<queue>. For example, the following URL addresses a queue in the diagram abovehttps://myaccount.queue.core.windows.net/images-to-downloadStorage account: All access to Azure Storage is done through a storage account.
Queue: A queue contains a set of messages. All messages must be in a queue. The queue name must be all lowercase.
Message: A message, in any format, of up to 64 KB. The maximum time-to-live can be any positive number, or -1 indicating that the message doesn't expire. If this parameter is omitted, the default time-to-live is seven days.
Create and manage Azure Queue Storage and messages by using .NET
The code examples rely on the following NuGet packages:
Azure.Core library for .NET: This package provides shared primitives, abstractions, and helpers for modern .NET Azure SDK client libraries.
Azure.Storage.Common client library for .NET: This package provides infrastructure shared by the other Azure Storage client libraries.
Azure.Storage.Queues client library for .NET: This package enables working with Azure Queue Storage for storing messages that accessed by a client.
System.Configuration.ConfigurationManager library for .NET: This package provides access to configuration files for client applications.
Create the Queue service client
The QueueClient class enables you to retrieve queues stored in Queue storage. Here's one way to create the service client:
QueueClient queueClient = new QueueClient(connectionString, queueName);
Create a queue
This example shows how to create a queue if it doesn't already exist:
// Get the connection string from app settings
string connectionString = ConfigurationManager.AppSettings["StorageConnectionString"];

// Instantiate a QueueClient which will be used to create and manipulate the queue
QueueClient queueClient = new QueueClient(connectionString, queueName);

// Create the queue
queueClient.CreateIfNotExists();
Insert a message into a queue
To insert a message into an existing queue, call the SendMessage method. A message can be either a string (in UTF-8 format) or a byte array. The following code creates a queue (if it doesn't exist) and inserts a message:
// Get the connection string from app settings
string connectionString = ConfigurationManager.AppSettings["StorageConnectionString"];

// Instantiate a QueueClient which will be used to create and manipulate the queue
QueueClient queueClient = new QueueClient(connectionString, queueName);

// Create the queue if it doesn't already exist
queueClient.CreateIfNotExists();

if (queueClient.Exists())
{
    // Send a message to the queue
    queueClient.SendMessage(message);
}
Peek at the next message
You can peek at the messages in the queue without removing them from the queue by calling the PeekMessages method. If you don't pass a value for the maxMessages parameter, the default is to peek at one message.
// Get the connection string from app settings
string connectionString = ConfigurationManager.AppSettings["StorageConnectionString"];

// Instantiate a QueueClient which will be used to manipulate the queue
QueueClient queueClient = new QueueClient(connectionString, queueName);

if (queueClient.Exists())
{
    // Peek at the next message
    PeekedMessage[] peekedMessage = queueClient.PeekMessages();
}
Change the contents of a queued message
You can change the contents of a message in-place in the queue. If the message represents a work task, you could use this feature to update the status of the work task. The following code updates the queue message with new contents, and sets the visibility timeout to extend another 60 seconds. This saves the state of work associated with the message, and gives the client another minute to continue working on the message.
// Get the connection string from app settings
string connectionString = ConfigurationManager.AppSettings["StorageConnectionString"];

// Instantiate a QueueClient which will be used to manipulate the queue
QueueClient queueClient = new QueueClient(connectionString, queueName);

if (queueClient.Exists())
{
    // Get the message from the queue
    QueueMessage[] message = queueClient.ReceiveMessages();

    // Update the message contents
    queueClient.UpdateMessage(message[0].MessageId,
            message[0].PopReceipt,
            "Updated contents",
            TimeSpan.FromSeconds(60.0)  // Make it invisible for another 60 seconds
        );
}
Dequeue the next message
Dequeue a message from a queue in two steps. When you call ReceiveMessages, you get the next message in a queue. A message returned from ReceiveMessages becomes invisible to any other code reading messages from this queue. By default, this message stays invisible for 30 seconds. To finish removing the message from the queue, you must also call DeleteMessage. This two-step process of removing a message assures that if your code fails to process a message due to hardware or software failure, another instance of your code can get the same message and try again. Your code calls DeleteMessage right after the message has been processed.
// Get the connection string from app settings
string connectionString = ConfigurationManager.AppSettings["StorageConnectionString"];

// Instantiate a QueueClient which will be used to manipulate the queue
QueueClient queueClient = new QueueClient(connectionString, queueName);

if (queueClient.Exists())
{
    // Get the next message
    QueueMessage[] retrievedMessage = queueClient.ReceiveMessages();

    // Process (i.e. print) the message in less than 30 seconds
    Console.WriteLine($"Dequeued message: '{retrievedMessage[0].Body}'");

    // Delete the message
    queueClient.DeleteMessage(retrievedMessage[0].MessageId, retrievedMessage[0].PopReceipt);
}
Get the queue length
You can get an estimate of the number of messages in a queue. The GetProperties method returns queue properties including the message count. The ApproximateMessagesCount property contains the approximate number of messages in the queue. This number isn't lower than the actual number of messages in the queue, but could be higher.
/// Instantiate a QueueClient which will be used to manipulate the queue
QueueClient queueClient = new QueueClient(connectionString, queueName);

if (queueClient.Exists())
{
    QueueProperties properties = queueClient.GetProperties();

    // Retrieve the cached approximate message count.
    int cachedMessagesCount = properties.ApproximateMessagesCount;

    // Display number of messages.
    Console.WriteLine($"Number of messages in queue: {cachedMessagesCount}");
}
Delete a queue
To delete a queue and all the messages contained in it, call the Delete method on the queue object.
/// Get the connection string from app settings
string connectionString = ConfigurationManager.AppSettings["StorageConnectionString"];

// Instantiate a QueueClient which will be used to manipulate the queue
QueueClient queueClient = new QueueClient(connectionString, queueName);

if (queueClient.Exists())
{
    // Delete the queue
    queueClient.Delete();
}