

Photo by Brecht Corbeel on Unsplash
Implement API management - Developing Solutions for Microsoft Azure - Part 5.1


All the notes on this page have been taken from Microsoft's learning portal - learn.microsoft.com. If any of this material is copyrighted, please let me know in the comments below and I will remove it. The main goal here is to learn and understand the concepts for developing solutions for Microsoft Azure. These notes may be helpful to prepare for the certification AZ-204: Developing Solutions for Microsoft Azure
Continuing from Monitoring and logging - Developing Solutions for Microsoft Azure - Part 4.2
5. Connect to and consume Azure services and third-party services
5.1 Implement API management
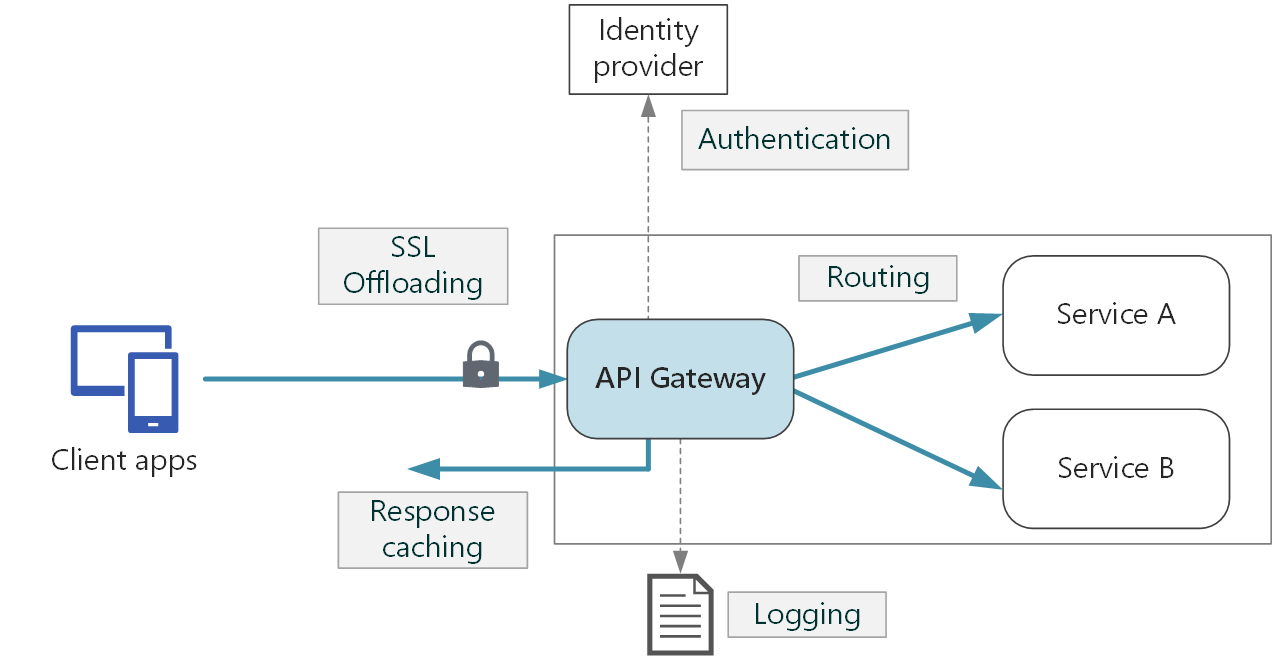
API Management service
API Management provides the core functionality to ensure a successful API program through developer engagement, business insights, analytics, security, and protection.
The system is made up of the following components:
The API gateway is the endpoint that:
Accepts API calls and routes them to your backend(s).
Verifies API keys, JWT tokens, certificates, and other credentials.
Enforces usage quotas and rate limits.
Transforms your API on the fly without code modifications.
Caches backend responses where set up.
Logs call metadata for analytics purposes.
The Azure portal is the administrative interface where you set up your API program. Use it to:
Define or import API schema.
Package APIs into products.
Set up policies like quotas or transformations on the APIs.
Get insights from analytics.
Manage users.
The Developer portal serves as the main web presence for developers, where they can:
Read API documentation.
Try out an API via the interactive console.
Create an account and subscribe to get API keys.
Access analytics on their own usage.
Terminology
Backend API: A HTTP service that you implement with your business logic
Frontend API: A HTTP service facade hosted by API Management to obfuscate your back-end API
Operation: A specific operation in the front-end API that correlates to a specific request/response from the backend API
Product: One or more APIs, along with a usage quota and terms of use
Subscription: A way for consumers to access an API using keys
Products
Products are how APIs are surfaced to developers. Products in API Management have one or more APIs, and are configured with a title, description, and terms of use. Products can be Open or Protected. Protected products must be subscribed to before they can be used, while open products can be used without a subscription. Subscription approval is configured at the product level and can either require administrator approval, or be auto-approved.
Groups
Groups are used to manage the visibility of products to developers. API Management has the following immutable system groups:
Administrators - Azure subscription administrators are members of this group. Administrators manage API Management service instances, creating the APIs, operations, and products that are used by developers.
Developers - Authenticated developer portal users fall into this group. Developers are the customers that build applications using your APIs. Developers are granted access to the developer portal and build applications that call the operations of an API.
Guests - Unauthenticated developer portal users, such as prospective customers visiting the developer portal of an API Management instance fall into this group. They can be granted certain read-only access, such as the ability to view APIs but not call them.
In addition to these system groups, administrators can create custom groups or leverage external groups in associated Azure Active Directory tenants.
Developers
Developers represent the user accounts in an API Management service instance. Developers can be created or invited to join by administrators, or they can sign up from the Developer portal. Each developer is a member of one or more groups, and can subscribe to the products that grant visibility to those groups.
Policies
Policies are a powerful capability of API Management that allow the Azure portal to change the behavior of the API through configuration. Policies are a collection of statements that are executed sequentially on the request or response of an API. Popular statements include format conversion from XML to JSON and call rate limiting to restrict the number of incoming calls from a developer, and many other policies are available.
Developer portal
The developer portal is where developers can learn about your APIs, view and call operations, and subscribe to products. Prospective customers can visit the developer portal, view APIs and operations, and sign up. The URL for your developer portal is located on the dashboard in the Azure portal for your API Management service instance.
API gateways
Your solution may contain several front- and back-end services. In this scenario, how does a client know what endpoints to call? What happens when new services are introduced, or existing services are refactored? How do services handle SSL termination, authentication, and other concerns? An API gateway can help to address these challenges.
An API gateway sits between clients and services. It acts as a reverse proxy, routing requests from clients to services. It may also perform various cross-cutting tasks such as authentication, SSL termination, and rate limiting. If you don't deploy a gateway, clients must send requests directly to front-end services. However, there are some potential problems with exposing services directly to clients:
It can result in complex client code. The client must keep track of multiple endpoints, and handle failures in a resilient way.
It creates coupling between the client and the backend. The client needs to know how the individual services are decomposed. That makes it harder to maintain the client and also harder to refactor services.
A single operation might require calls to multiple services. That can result in multiple network round trips between the client and the server, adding significant latency.
Each public-facing service must handle concerns such as authentication, SSL, and client rate limiting.
Services must expose a client-friendly protocol such as HTTP or WebSocket. This limits the choice of communication protocols.
Services with public endpoints are a potential attack surface, and must be hardened.
A gateway helps to address these issues by decoupling clients from services. Gateways can perform a number of different functions, and you may not need all of them. The functions can be grouped into the following design patterns:
Gateway routing: Use the gateway as a reverse proxy to route requests to one or more backend services, using layer 7 routing. The gateway provides a single endpoint for clients, and helps to decouple clients from services.
Gateway aggregation: Use the gateway to aggregate multiple individual requests into a single request. This pattern applies when a single operation requires calls to multiple backend services. The client sends one request to the gateway. The gateway dispatches requests to the various backend services, and then aggregates the results and sends them back to the client. This helps to reduce chattiness between the client and the backend.
Gateway Offloading: Use the gateway to offload functionality from individual services to the gateway, particularly cross-cutting concerns. It can be useful to consolidate these functions into one place, rather than making every service responsible for implementing them.
Here are some examples of functionality that could be offloaded to a gateway:
SSL termination
Authentication
IP allow/block list
Client rate limiting (throttling)
Logging and monitoring
Response caching
GZIP compression
Servicing static content
API Management policies
In Azure API Management, policies allow the publisher to change the behavior of the API through configuration. Policies are a collection of Statements that are executed sequentially on the request or response of an API.
Policies are applied inside the gateway which sits between the API consumer and the managed API. The gateway receives all requests and usually forwards them unaltered to the underlying API. However a policy can apply changes to both the inbound request and outbound response. Policy expressions can be used as attribute values or text values in any of the API Management policies, unless the policy specifies otherwise.
Understanding policy configuration
The policy definition is a simple XML document that describes a sequence of inbound and outbound statements. The XML can be edited directly in the definition window.
The configuration is divided into inbound, backend, outbound, and on-error. The series of specified policy statements is executed in order for a request and a response.
<policies>
  <inbound>
    <!-- statements to be applied to the request go here -->
  </inbound>
  <backend>
    <!-- statements to be applied before the request is forwarded to
         the backend service go here -->
  </backend>
  <outbound>
    <!-- statements to be applied to the response go here -->
  </outbound>
  <on-error>
    <!-- statements to be applied if there is an error condition go here -->
  </on-error>
</policies>
If there is an error during the processing of a request, any remaining steps in the inbound, backend, or outbound sections are skipped and execution jumps to the statements in the on-error section. By placing policy statements in the on-error section you can review the error by using the context.LastError property, inspect and customize the error response using the set-body policy, and configure what happens if an error occurs.
Examples
Apply policies specified at different scopes
If you have a policy at the global level and a policy configured for an API, then whenever that particular API is used both policies will be applied. API Management allows for deterministic ordering of combined policy statements via the base element.
<policies>
    <inbound>
        <cross-domain />
        <base />
        <find-and-replace from="xyz" to="abc" />
    </inbound>
</policies>
In the example policy definition above, the cross-domain statement would execute before any higher policies which would in turn, be followed by the find-and-replace policy.
Filter response content
The policy defined in example below demonstrates how to filter data elements from the response payload based on the product associated with the request.
The snippet assumes that response content is formatted as JSON and contains root-level properties named "minutely", "hourly", "daily", "flags".
<policies>
  <inbound>
    <base />
  </inbound>
  <backend>
    <base />
  </backend>
  <outbound>
    <base />
    <choose>
      <when condition="@(context.Response.StatusCode == 200 && context.Product.Name.Equals("Starter"))">
        <!-- NOTE that we are not using preserveContent=true when deserializing response body stream into a JSON object since we don't intend to access it again. See details on https://learn.microsoft.com/azure/api-management/api-management-transformation-policies#SetBody -->
        <set-body>
          @{
            var response = context.Response.Body.As<JObject>();
            foreach (var key in new [] {"minutely", "hourly", "daily", "flags"}) {
            response.Property (key).Remove ();
           }
          return response.ToString();
          }
    </set-body>
      </when>
    </choose>
  </outbound>
  <on-error>
    <base />
  </on-error>
</policies>
Create advanced policies
Following are the advanced API Management policies:
Control flow - Conditionally applies policy statements based on the results of the evaluation of Boolean expressions.
Forward request - Forwards the request to the backend service.
Limit concurrency - Prevents enclosed policies from executing by more than the specified number of requests at a time.
Rate Limit - Prevents API usage spikes by limiting the call rate to a specified number per a specified time period.
Log to Event Hub - Sends messages in the specified format to an Event Hub defined by a Logger entity.
Mock response - Aborts pipeline execution and returns a mocked response directly to the caller.
Retry - Retries execution of the enclosed policy statements, if and until the condition is met. Execution will repeat at the specified time intervals and up to the specified retry count.
Control flow
The choose policy applies enclosed policy statements based on the outcome of evaluation of boolean expressions, similar to an if-then-else or a switch construct in a programming language.
<choose>
    <when condition="Boolean expression | Boolean constant">
        <!— one or more policy statements to be applied if the above condition is true  -->
    </when>
    <when condition="Boolean expression | Boolean constant">
        <!— one or more policy statements to be applied if the above condition is true  -->
    </when>
    <otherwise>
        <!— one or more policy statements to be applied if none of the above conditions are true  -->
</otherwise>
</choose>
The control flow policy must contain at least one <when/> element. The <otherwise/> element is optional. Conditions in <when/> elements are evaluated in order of their appearance within the policy. Policy statement(s) enclosed within the first <when/> element with condition attribute equals true will be applied. Policies enclosed within the <otherwise/> element, if present, will be applied if all of the <when/> element condition attributes are false.
Forward request
The forward-request policy forwards the incoming request to the backend service specified in the request context. The backend service URL is specified in the API settings and can be changed using the set backend service policy.
Removing this policy results in the request not being forwarded to the backend service and the policies in the outbound section are evaluated immediately upon the successful completion of the policies in the inbound section.
<forward-request timeout="time in seconds" follow-redirects="true | false"/>
Rate Limit
The rate-limit policy prevents API usage spikes on a per subscription basis by limiting the call rate to a specified number per a specified time period. When the call rate is exceeded, the caller receives a 429 Too Many Requests response status code.
Example
<rate-limit calls="20" renewal-period="90" remaining-calls-variable-name="remainingCallsPerSubscription"/>
| Attribute | Description | Required | Default |
| calls | The maximum total number of calls allowed during the time interval specified in renewal-period. Policy expressions aren't allowed. | Yes | N/A |
| renewal-period | The length in seconds of the sliding window during which the number of allowed requests should not exceed the value specified in calls. Maximum allowed value: 300 seconds. Policy expressions aren't allowed. | Yes | N/A |
| remaining-calls-header-name | The name of a response header whose value after each policy execution is the number of remaining calls allowed for the time interval specified in the renewal-period. Policy expressions aren't allowed. | No | N/A |
Limit concurrency
The limit-concurrency policy prevents enclosed policies from executing by more than the specified number of requests at any time. Upon exceeding that number, new requests will fail immediately with a 429 Too Many Requests status code.
<limit-concurrency key="expression" max-count="number">
        <!— nested policy statements -->
</limit-concurrency>
Log to Event Hub
The log-to-eventhub policy sends messages in the specified format to an Event Hub defined by a Logger entity. As its name implies, the policy is used for saving selected request or response context information for online or offline analysis.
<log-to-eventhub logger-id="id of the logger entity" partition-id="index of the partition where messages are sent" partition-key="value used for partition assignment">
  Expression returning a string to be logged
</log-to-eventhub>
Mock response
The mock-response, as the name implies, is used to mock APIs and operations. It aborts normal pipeline execution and returns a mocked response to the caller. The policy always tries to return responses of highest fidelity. It prefers response content examples, whenever available. It generates sample responses from schemas, when schemas are provided and examples are not. If neither examples or schemas are found, responses with no content are returned.
<mock-response status-code="code" content-type="media type"/>
Retry
The retry policy executes its child policies once and then retries their execution until the retry condition becomes false or retry count is exhausted.
<retry
    condition="boolean expression or literal"
    count="number of retry attempts"
    interval="retry interval in seconds"
    max-interval="maximum retry interval in seconds"
    delta="retry interval delta in seconds"
    first-fast-retry="boolean expression or literal">
        <!-- One or more child policies. No restrictions -->
</retry>
Return response
The return-response policy aborts pipeline execution and returns either a default or custom response to the caller. Default response is 200 OK with no body. Custom response can be specified via a context variable or policy statements. When both are provided, the response contained within the context variable is modified by the policy statements before being returned to the caller.
<return-response response-variable-name="existing context variable">
  <set-header/>
  <set-body/>
  <set-status/>
</return-response>
Secure APIs by using subscriptions
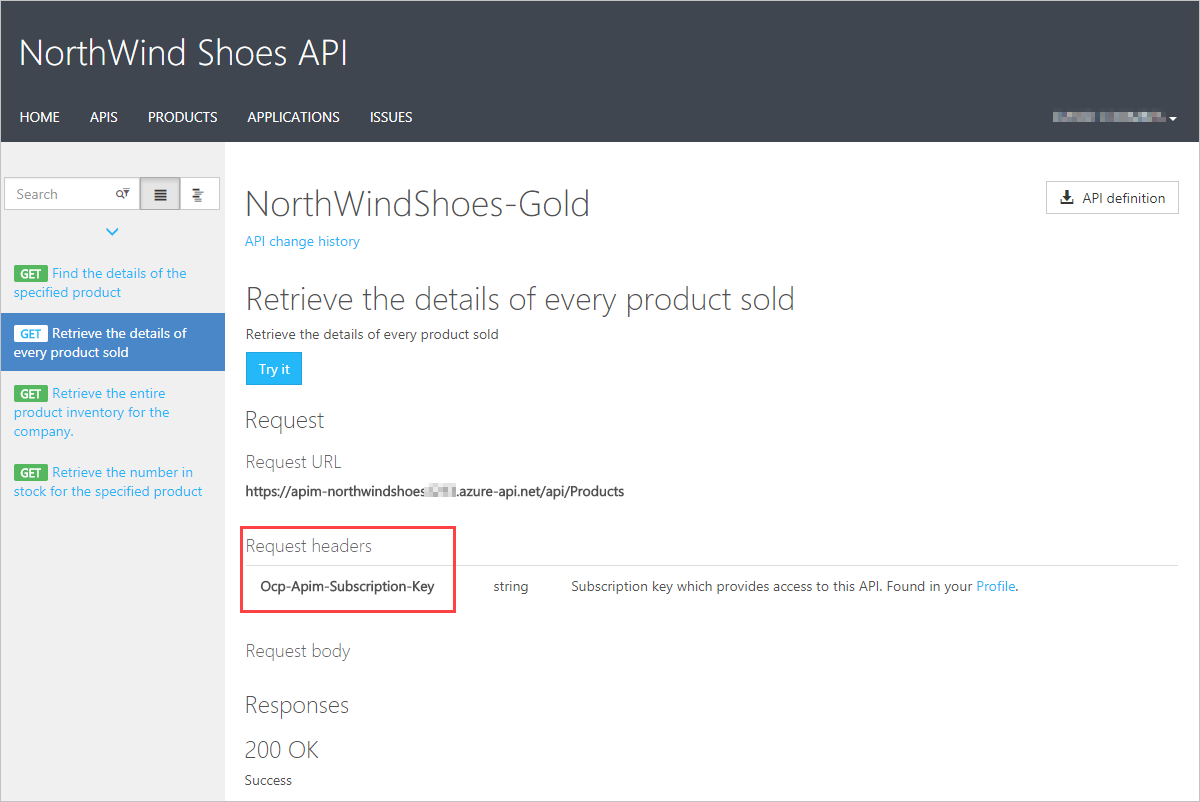
When you publish APIs through API Management, it's easy and common to secure access to those APIs by using subscription keys. Developers who need to consume the published APIs must include a valid subscription key in HTTP requests when they make calls to those APIs. Otherwise, the calls are rejected immediately by the API Management gateway. They aren't forwarded to the back-end services.
To get a subscription key for accessing APIs, a subscription is required. A subscription is essentially a named container for a pair of subscription keys. Developers who need to consume the published APIs can get subscriptions. And they don't need approval from API publishers. API publishers can also create subscriptions directly for API consumers.
Note: API Management also supports other mechanisms for securing access to APIs, including: OAuth2.0, Client certificates, and IP allow listing.
Subscriptions and Keys
A subscription key is a unique auto-generated key that can be passed through in the headers of the client request or as a query string parameter. The key is directly related to a subscription, which can be scoped to different areas. Subscriptions give you granular control over permissions and policies.
The three main subscription scopes are:
| Scope | Details |
| All APIs | Applies to every API accessible from the gateway |
| Single API | This scope applies to a single imported API and all of its endpoints |
| Product | A product is a collection of one or more APIs that you configure in API Management. You can assign APIs to more than one product. Products can have different access rules, usage quotas, and terms of use. |
Applications that call a protected API must include the key in every request.
You can regenerate these subscription keys at any time, for example, if you suspect that a key has been shared with unauthorized users.

Every subscription has two keys, a primary and a secondary. Having two keys makes it easier when you do need to regenerate a key. For example, if you want to change the primary key and avoid downtime, use the secondary key in your apps.
For products where subscriptions are enabled, clients must supply a key when making calls to APIs in that product. Developers can obtain a key by submitting a subscription request. If you approve the request, you must send them the subscription key securely, for example, in an encrypted message. This step is a core part of the API Management workflow.
Call an API with the subscription key
Applications must include a valid key in all HTTP requests when they make calls to API endpoints that are protected by a subscription. Keys can be passed in the request header, or as a query string in the URL.
The default header name is Ocp-Apim-Subscription-Key, and the default query string is subscription-key.
To test out your API calls, you can use the developer portal, or command-line tools, such as curl. Here's an example of a GET request using the developer portal, which shows the subscription key header:
Here's how you can pass a key in the request header using curl:
curl --header "Ocp-Apim-Subscription-Key: <key string>" https://<apim gateway>.azure-api.net/api/path
Here's an example curl command that passes a key in the URL as a query string:
curl https://<apim gateway>.azure-api.net/api/path?subscription-key=<key string>
If the key is not passed in the header, or as a query string in the URL, you'll get a 401 Access Denied response from the API gateway.
Secure APIs by using certificates
Certificates can be used to provide Transport Layer Security (TLS) mutual authentication between the client and the API gateway. You can configure the API Management gateway to allow only requests with certificates containing a specific thumbprint. The authorization at the gateway level is handled through inbound policies.
Transport Layer Security client authentication
With TLS client authentication, the API Management gateway can inspect the certificate contained within the client request and check for properties like:
| Property | Description |
| Certificate Authority (CA) | Only allow certificates signed by a particular CA |
| Thumbprint | Allow certificates containing a specified thumbprint |
| Subject | Only allow certificates with a specified subject |
| Expiration Date | Only allow certificates that have not expired |
These properties are not mutually exclusive and they can be mixed together to form your own policy requirements. For instance, you can specify that the certificate passed in the request is signed by a certain certificate authority and hasn't expired.
Client certificates are signed to ensure that they are not tampered with. When a partner sends you a certificate, verify that it comes from them and not an imposter. There are two common ways to verify a certificate:
Check who issued the certificate. If the issuer was a certificate authority that you trust, you can use the certificate. You can configure the trusted certificate authorities in the Azure portal to automate this process.
If the certificate is issued by the partner, verify that it came from them. For example, if they deliver the certificate in person, you can be sure of its authenticity. These are known as self-signed certificates.
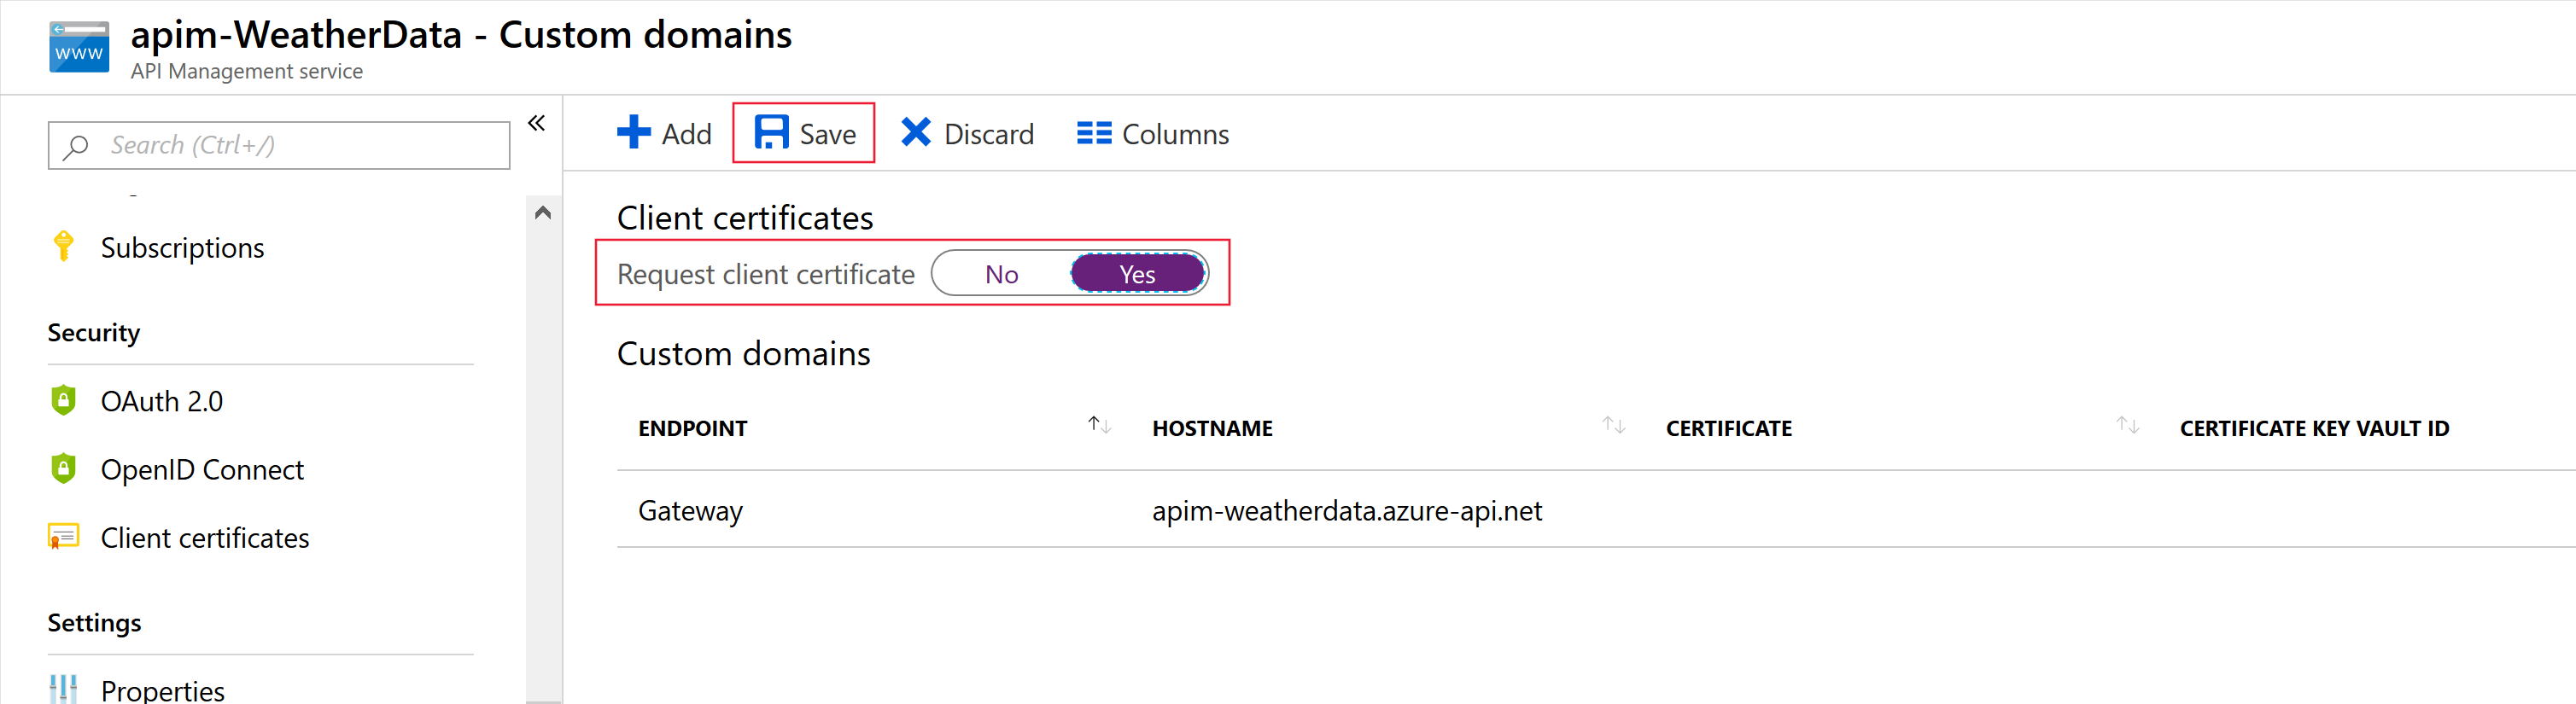
Accepting client certificates in the Consumption tier
The Consumption tier in API Management is designed to conform with serverless design principals. If you build your APIs from serverless technologies, such as Azure Functions, this tier is a good fit. In the Consumption tier, you must explicitly enable the use of client certificates, which you can do on the Custom domains page. This step is not necessary in other tiers.
Certificate Authorization Policies
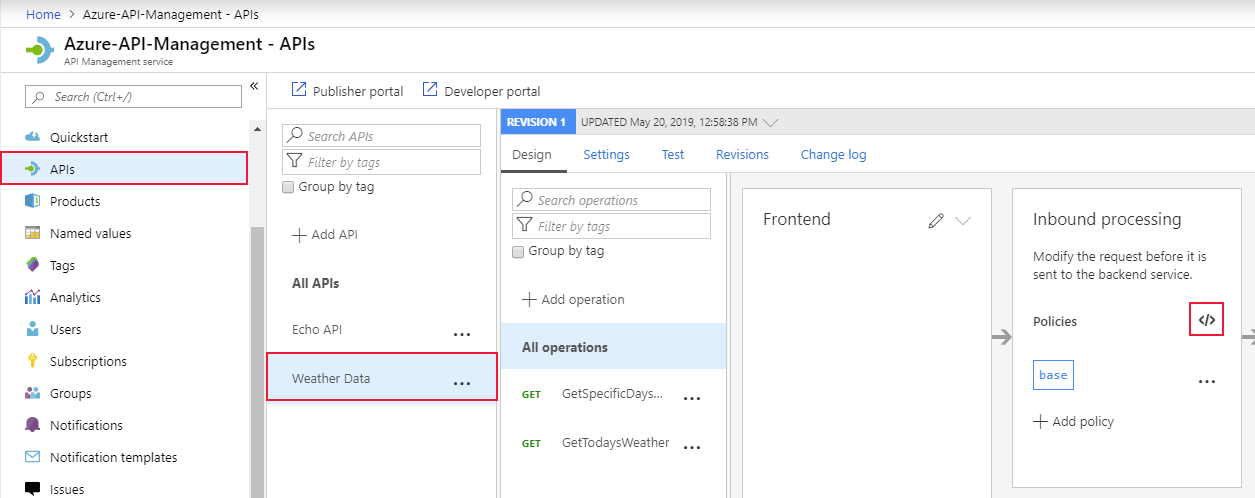
Create these policies in the inbound processing policy file within the API Management gateway:
Check the thumbprint of a client certificate
Every client certificate includes a thumbprint, which is a hash, calculated from other certificate properties. The thumbprint ensures that the values in the certificate have not been altered since the certificate was issued by the certificate authority. You can check the thumbprint in your policy. The following example checks the thumbprint of the certificate passed in the request:
<choose>
    <when condition="@(context.Request.Certificate == null || context.Request.Certificate.Thumbprint != "desired-thumbprint")" >
        <return-response>
            <set-status code="403" reason="Invalid client certificate" />
        </return-response>
    </when>
</choose>
Check the thumbprint against certificates uploaded to API Management
In the previous example, only one thumbprint would work so only one certificate would be validated. Usually, each customer or partner company would pass a different certificate with a different thumbprint. To support this scenario, obtain the certificates from your partners and use the Client certificates page in the Azure portal to upload them to the API Management resource. Then add this code to your policy:
<choose>
    <when condition="@(context.Request.Certificate == null || !context.Request.Certificate.Verify()  || !context.Deployment.Certificates.Any(c => c.Value.Thumbprint == context.Request.Certificate.Thumbprint))" >
        <return-response>
            <set-status code="403" reason="Invalid client certificate" />
        </return-response>
    </when>
</choose>
Check the issuer and subject of a client certificate
This example checks the issuer and subject of the certificate passed in the request:
<choose>
    <when condition="@(context.Request.Certificate == null || context.Request.Certificate.Issuer != "trusted-issuer" || context.Request.Certificate.SubjectName.Name != "expected-subject-name")" >
        <return-response>
            <set-status code="403" reason="Invalid client certificate" />
        </return-response>
    </when>
</choose>
Practical 14: Create a backend API
In this exercise you'll learn how to perform the following actions:
Create an API Management (APIM) instance
Import an API
Configure the backend settings
Test the API
Prerequisites
- An Azure account with an active subscription.
Step 1: Login to Azure
Login to the Azure portal and open the Cloud Shell.

After the shell opens be sure to select the Bash environment.

Step 2: Create an API Management instance
Let's set some variables for the CLI commands to use to reduce the amount of retyping. Replace
<myLocation>with a region that makes sense for you. The APIM name needs to be a globally unique name, and the script below generates a random string. Replace<myEmail>with an email address you can access.myApiName=demo-apim-$RANDOM myLocation=<myLocation> myEmail=<myEmail>Create a resource group. The commands below will create a resource group named demo-apim-rg.
az group create --name demo-apim-rg --location $myLocationCreate an APIM instance. The
az apim createcommand is used to create the instance. The--sku-name Consumptionoption is used to speed up the process for the walkthrough.az apim create -n $myApiName \ --location $myLocation \ --publisher-email $myEmail \ --resource-group demo-apim-rg \ --publisher-name demo-APIM-Exercise \ --sku-name ConsumptionNote: The operation should complete in about five minutes.
Step 3: Import a backend API
This section shows how to import and publish an OpenAPI specification backend API.
In the Azure portal, search for and select API Management services.
On the API Management screen, select the API Management instance you created.
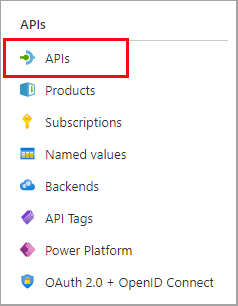
Select APIs in the API management service navigation pane.
Select OpenAPI from the list and select Full in the pop-up.
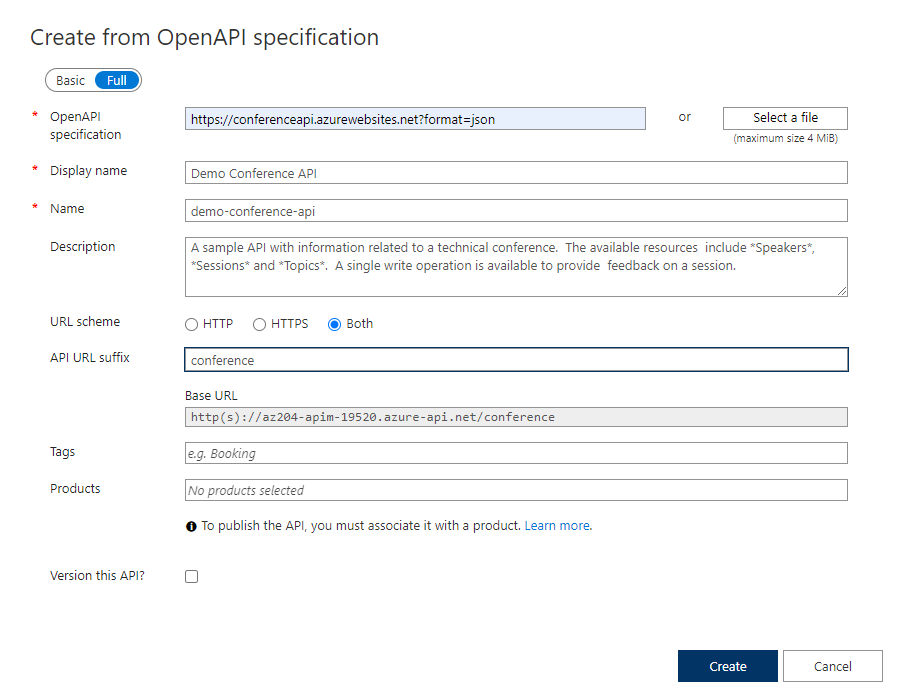
Use the values from the table below to fill out the form. You can leave any fields not mentioned their default value.
OpenAPI Specification:
https://conferenceapi.azurewebsites.net?format=json
References the service implementing the API, requests are forwarded to this address. Most of the necessary information in the form is automatically populated after you enter thisDisplay name: Demo Conference API
This name is displayed in the Developer portalName: demo-conference-api
Provides a unique name for the API.Description: Automatically populated
Provide an optional description of the APIAPI URL suffix: conference
The suffix is appended to the base URL for the API management service. API Management distinguishes APIs by their suffix and therefore the suffix must be unique for every API for a given publisher.Select Create.
Step 4: Configure the backend settings
The Demo Conference API is created and a backend needs to be specified.
Select Settings in the blade to the right and enter
https://conferenceapi.azurewebsites.net/in the Web service URL field.Deselect the Subscription required checkbox.
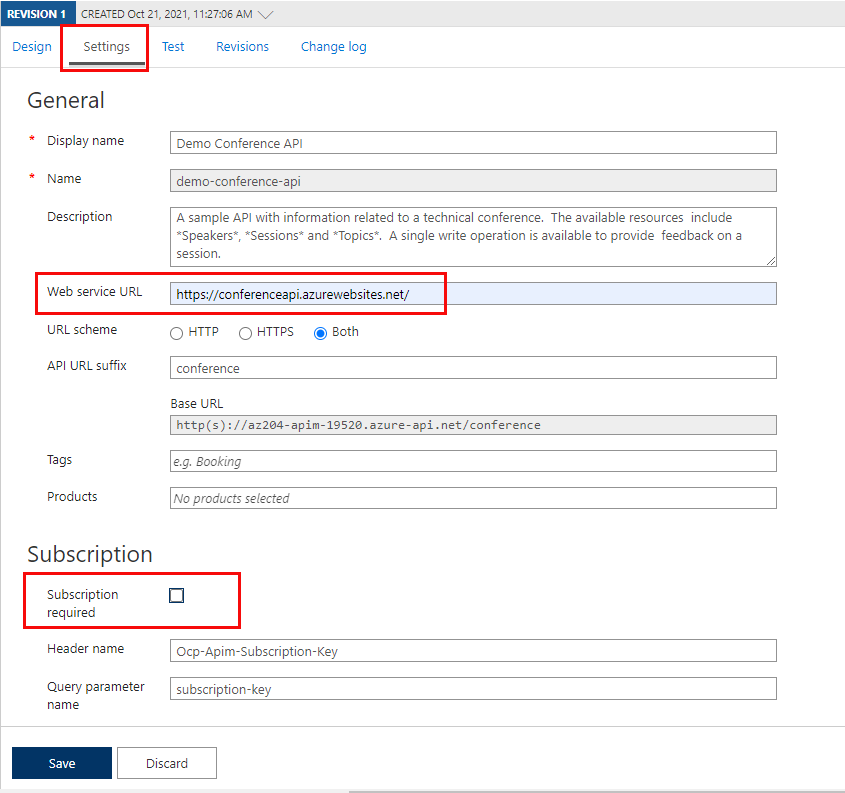
Select Save.
Step 5: Test the API
Now that the API has been imported and the backend configured it is time to test the API.
Select Test.
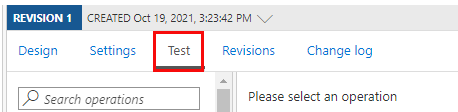
Select GetSpeakers. The page shows Query parameters and Headers, if any. The
Ocp-Apim-Subscription-Keyis filled in automatically for the subscription key associated with this API.Select Send.
Backend responds with 200 OK and some data.
Step 6: Clean up Azure resources
When you are finished with the resources you created in this exercise you can use the command below to delete the resource group and all related resources.
az group delete --name az204-apim-rg --no-wait
Up next: Event-based solutions - Developing Solutions for Microsoft Azure - Part 5.2