.NET MVC App Calling Web API for Authentication

Hi there! In a previous article, we learnt how to create a Web API with JWT Authentication and ASP.NET Core Identity. Let us now see how we can call this Web API from an MVC application. Our MVC app will make HTTP calls to the Web API for all the tasks such as new user registration, login, logout, as well as for CRUD operations on our database. The MVC app will store the auth tokens received from the WebAPI in a cookie on client's browser.
If you are in a bit of a hurry, you can find the final code here.
We will follow the below sequence in our development process.
Create an MVC application in .NET
Add web api urls in appsettings.json
Add Landing page
Add user authentication flow
Add Articles CRUD Operations
.NET version: 6.0 (SDK version 6.0.8)
IDE: VS Code
1. Create an MVC application in .NET
First of all, we will create a Web application.
Step 1. Create a new project in Visual Studio Code
Open VSCode -> Go to Terminal -> Type below command
dotnet new mvc

Let us run this default api once to see it is working. Run the below command
dotnet run
Click on the localhost url that is shown in the Terminal, it will redirect you to your default browser (for me that is Chrome)

You should be able to see the default page as shown below.

2. Add web api urls in appsettings.json
Let us add the web api urls that we are going to call. The web api is currently running on my system so url will be localhost. We are providing the urls for user registration, login, token validate, refresh, revoke, and articles url.
"apiService":{
    "userRegisterUrl": "https://localhost:7110/auth/register",
    "userLoginUrl": "https://localhost:7110/auth/login",
    "tokenValidateUrl": "https://localhost:7110/auth/tokenValidate",
    "tokenRefreshUrl": "https://localhost:7110/auth/refresh",
    "tokenRevokeUrl": "https://localhost:7110/auth/revoke",
    "articlesUrl": "https://localhost:7110/articles"
  }
3. Add Landing Page
We need a landing page for our website from where user can navigate to other pages. The landing page will show options for User Registration, Login, Logout, and CRUD operations for articles.
public class ArticlesController : Controller
{
    [HttpGet]
    public IActionResult Index()
    {
        return View();
    }
}
Add a view named Index.cshtml under Views/Articles folder and add the code below
<h1>Articles Homepage</h1>

<h4>Please click on one of the options below</h4>

<a class="btn btn-primary" asp-controller="articles" asp-action="getArticles">View All Articles</a>
<a class="btn btn-success" asp-controller="articles" asp-action="createArticle">Create New Article</a>
<a class="btn btn-danger" asp-controller="auth" asp-action="logout">Logout</a>
<a class="btn btn-primary" asp-controller="auth" asp-action="register">Register</a>
<a class="btn btn-success" asp-controller="auth" asp-action="login">Login</a>
Let us also ensure that our project always defaults to this page at startup. Go to Program.cs and change this section of code
app.MapControllerRoute(
    name: "default",
    pattern: "{controller=Home}/{action=Index}/{id?}");
to this: we have changed the default controller from Home to Articles
app.MapControllerRoute(
    name: "default",
    pattern: "{controller=Articles}/{action=Index}/{id?}");
Now run the project

4. Add user authentication flow
We will now create an Auth controller which will allow users to register, login, and logout.
Step 1. Add AuthController
We will add the AuthController as shown below.
using Microsoft.AspNetCore.Mvc;
using MvcClient.Models;

namespace MvcClient.Controllers;

public class AuthController: Controller
{

}
Now let us add the endpoints in this controller one by one.
Step 2. HttpGet - Register
This endpoint will be hit when user tries to access New User Registration page. This endpoint will display the empty User Registration page and user will need to fill and submit this form.
First, let us add a model to represent a register request.
public class RegisterRequest
{
    [Required]
    [EmailAddress]
    public string Email { get; set; }

    [Required]
    [StringLength(50, MinimumLength = 1)]
    public string Username { get; set; }

    [Required]
    [DataType(DataType.Password)]
    [StringLength(50, MinimumLength = 8)]
    public string Password { get; set; }

    [Required]
    [DataType(DataType.Password)]
    [Compare("Password")]
    [Display(Name="Confirm Password")]
    public string ConfirmPassword { get; set; }

    [Required]
    [StringLength(50, MinimumLength = 3)]
    [Display(Name="Display Name")]
    public string DisplayName { get; set; }
}
Next, let us add the register endpoint.
[HttpGet]
public async Task<IActionResult> Register()
{
     return View();
}
We will create a Register.cshtml view for this action.
@model MvcClient.Models.RegisterRequest
@{
    ViewData["Title"] = "Registration";
}

<h1>Register</h1>

<h4>User</h4>

<hr />

<div class="row">
    <div class="col-md-4">
        <form asp-action="register">
             <div asp-validation-summary="All" class="text-danger"></div>

              <!-- Add the fields for user registration here -->

             <div class="form-group">
                <input type="submit" value="Create" class="btn btn-primary" />
             </div>
        </form>
    </div>
</div>
In the above file, we are doing the following:
First, we are declaring the model
MvcClient.Models.RegisterRequeston which this view is based.Next, we are setting the title of our view.
After adding a few headers, we have added a
<form>element, withasp-actionset toregister. This means when the form is submitted, it will hit theregisterendpoint. The default method for a form ispostso we don't need to mention that explicitly.The
<div>tag withasp-validation-summary="All"attribute is added to display a list of all the validation errors.After this, we have added the fields for user registration one by one. Finally, we add a submit button which submits the form back to server.
The final html in the browser will look like this (when looking at source code):
<h1>Register</h1>

<h4></h4>User

<hr>

<div class="row">
    <div class="col-md-4">
        <form action="/Auth/register" method="post">
            <div class="text-danger validation-summary-valid" data-valmsg-summary="true"><ul><li style="display:none"></li>
</ul></div>

             <!-- Add the fields for user registration here -->

             <div class="form-group">
                <input type="submit" value="Create" class="btn btn-primary">
             </div>

             <input name="__RequestVerificationToken" type="hidden" value="CfDJ8C-O7tiqLYFInutgHH2BJFzVMa4uCXbF698sBVtAeN6Ma9FgLs8ZelUb0AlU3feH0TaUSEqXffSNvrHFuec3RYSG2QpYJa_aWVTk-zjnz3hXOr_prf9tdWw0NF1-4aCw6jAQCdUXCenDoPa60WUQTf4">
         </form>
    </div>
</div>
One thing you may notice is the hidden input element named __RequestVerificationToken. This is an anti-forgery token that is autmoatically added by .NET Core whenever we add a form element, which we did here. Earlier .NET version explicitly required Antiforgery attribute, but .NET Core onwards, this token is added by default. You can read more about Antiforgery tokens here - Prevent Cross-Site Request Forgery (XSRF/CSRF) attacks in ASP.NET Core.
Let us now add the html elements for each property in RegisterRequest class
Email
           <div class="form-group">
                <label asp-for="Email" class="control-label"></label>
                <input asp-for="Email" class="form-control" />
                <span asp-validation-for="Email" class="text-danger"></span>
           </div>
First, we create a <div> element. Inside, we create 3 elements - the label, the input text field, and a span to show any validation message. The asp-for is a tag helper provided to link our model field Email with this respective tag.
Similarly, we can add the remaining fields, so that the overall code looks like this
@model MvcClient.Models.RegisterRequest
@{
    ViewData["Title"] = "Registration";
}

<h1>Register</h1>

<h4></h4>User</h4>

<hr />

<div class="row">
    <div class="col-md-4">
        <form asp-action="register">
            <div asp-validation-summary="All" class="text-danger"></div>

            <div class="form-group">
                <label asp-for="Email" class="control-label"></label>
                <input asp-for="Email" class="form-control" />
                <span asp-validation-for="Email" class="text-danger"></span>
            </div>

            <div class="form-group">
                <label asp-for="Password" class="control-label"></label>
                <input asp-for="Password" class="form-control" type="password" />
                <span asp-validation-for="Password" class="text-danger"></span>
            </div>

             <div class="form-group">
                <label asp-for="ConfirmPassword" class="control-label"></label>
                <input asp-for="ConfirmPassword" class="form-control" type="password" />
                <span asp-validation-for="ConfirmPassword" class="text-danger"></span>
            </div>

             <div class="form-group">
                <label asp-for="Username" class="control-label"></label>
                <input asp-for="Username" class="form-control" />
                <span asp-validation-for="Username" class="text-danger"></span>
            </div>

              <div class="form-group">
                <label asp-for="DisplayName" class="control-label"></label>
                <input asp-for="DisplayName" class="form-control" />
                <span asp-validation-for="DisplayName" class="text-danger"></span>
            </div>

            <div class="form-group">
                <input type="submit" value="Create" class="btn btn-primary" />
            </div>
        </form>
    </div>
</div>
Once this is compiled by our mvc, click on Register button from the home page

The register page will look like this:

Step 3. HttpPost - Register
This endpoint will be hit when the user tries to submit the form on the New User Registration page. If there is any validation error in the user inputs, then we will return the same view to the user so that they can rectify the errors. If there are no validation errors, we will make a call to the web api. If call to web api fails for any reason, we will show that as an error message on the same view. If, on the other hand, user is successfully registered, then we will show a success message. Later on in this article, we will auto-login the user once their registration is complete.
We are injecting an instance of IAuthService which we are going to implement shortly. It will handle all authentication related tasks.
private IAuthService _authService;
public AuthController(IAuthService authService)
{
        _authService = authService;
}

[HttpPost]
public async Task<IActionResult> Register(RegisterRequest registerRequest)
{
        if(!ModelState.IsValid)
        {
            //return error messages
            return View(registerRequest);
        }
        else
        {
             //register the user info
            var response = await _authService.RegisterAsync(registerRequest);

            if (response.Status != HttpStatusCode.OK)
            {
                ModelState.AddModelError(string.Empty, response.Message);
                return View(registerRequest);
            }

            //return success message on browser
            return Ok("Registration Successful");
        }
}
Let us now add IAuthService and its implementation AuthService to our project.
The interface -
public interface IAuthService
{
    Task<RegisterResponse> RegisterAsync(RegisterRequest request);
}
The RegisterResponse class is added to store details of whether the Web Api request succeeded or failed.
public class RegisterResponse
{
    public HttpStatusCode Status { get; set; }

    public string Message { get; set; }

}
The AuthService class looks like shown below. We are injecting an instance of IApiCallerService, to be implemented, which will take care of making a call to the Web Api.
public class AuthService: IAuthService
{
    private IApiCallerService _apiService;
    private IConfiguration _config;
    public AuthService(IConfiguration config, IApiCallerService apiService)
    {
        _config = config;
        _apiService = apiService;    }

    public async Task<RegisterResponse> RegisterAsync(RegisterRequest request)
    {
          //Code to call the Web Api
    }
}
Let us now add code to the RegisterAsync function.
public async Task<RegisterResponse> RegisterAsync(RegisterRequest request)
{
        var url = _config["apiService:userRegisterUrl"];
        var httpResponse = await _apiService.MakeHttpCallAsync(
            httpMethod: HttpMethod.Post,
            url: url,
            bodyContent: request);

        var response = new RegisterResponse
        {
            Status = httpResponse.StatusCode
        };

        if (httpResponse.StatusCode != HttpStatusCode.OK)
        {
            //add error message
            response.Message = await httpResponse.Content.ReadAsStringAsync();
        }

        return response;
}
In the above code, first we are fetching the user registration endpoint of the Web Api that we are going to hit. Next, we are invoking _apiService.MakeHttpCallAsync() that is going to make the actual HTTP call and return the response. Finally, we create a response object and return it. In case our api call failed, we add the error message as part of our response object.
Let us now implement the IApiCallerService interface which actually makes a call to the Web Api, and which we have used in the above code.
The interface -
public interface IApiCallerService
{
   Task<HttpResponseMessage> MakeHttpCallAsync(
        HttpMethod httpMethod,
        string url,
        object bodyContent = null,
        string acceptHeader = "application/json",
        string authScheme = null,
        string authToken = null,
        Dictionary<string, string> extraHeaders = null);
}
Here, we have added the following parameters as part of our MakeHttpCallAsync() function httpMethod - specifies the HTTP call method such as a GET, POST, PUT etc. url - the url that needs to be called bodyContent - in case we wanted to pass some data in the request body. Default is null acceptHeader - defaults to application/json authScheme - used in case we want to provide auth token e.g bearer. Default is null authToken - auth token, default is null extraHeaders - in case we wants to add any extra headers
The implementation class is ApiCallerService and is implemented as below:
public class ApiCallerService : IApiCallerService
{
    private HttpClient _httpClient;

    public ApiCallerService(HttpClient httpClient)
    {
        //http client is a singleton
        _httpClient = httpClient;
    }


    public async Task<HttpResponseMessage> MakeHttpCallAsync(
        HttpMethod httpMethod,
        string url,
        object bodyContent = null,
        string acceptHeader = "application/json",
        string authScheme = null,
        string authToken = null,
        Dictionary<string, string> extraHeaders = null)
    {
        using (var httpRequest = new HttpRequestMessage(httpMethod, url))
        {
            httpRequest.Headers.Accept.Add(new MediaTypeWithQualityHeaderValue(acceptHeader));

            //add auth token if provided
            if (!string.IsNullOrEmpty(authToken) && !string.IsNullOrEmpty(authScheme))
            {
                httpRequest.Headers.Authorization = new AuthenticationHeaderValue(authScheme, authToken);
            }

            //add any additional headers
            if (extraHeaders != null)
            {
                foreach (var header in extraHeaders)
                {
                    httpRequest.Headers.Add(header.Key, header.Value);
                }
            }

            //add body if provided
            if (bodyContent != null)
            {
                var content = JsonSerializer.Serialize(bodyContent);
                httpRequest.Content = new StringContent(content, Encoding.UTF8, "application/json");
            }

            var response = await _httpClient.SendAsync(httpRequest);

            return response;
        }
    }
}
We inject an instance of HttpClient in the ApiCallerService constructor. Then, inside the MakeHttpCallAsync function, we create an instance of HttpRequestMessage class and assign the headers, auth token and body to it. At the end, we call the _httpClient.SendAsync() method, passing the request object to it, and returning the response object.
Finally, let us add the dependencies in Program.cs for all the constructor injections we have added in the code above.
// Add services to the container.
builder.Services.AddTransient<IAuthService, AuthService>();
builder.Services.AddTransient<IApiCallerService, ApiCallerService>();
builder.Services.AddSingleton<HttpClient>();
Now, let us run the project and try to submit the registration form. Ensure that the Web Api project is also running in parallel.
First, let us submit the empty form. This should hit the if block that is checking if ModelState is valid or not, and return the view with error messages. And that is what we see.

Now, let us fill the information for an existing user. This should make a call to web api but the api will return conflict, which we will show on our page.

Note: In case you are getting an error like below, please follow the steps mentioned in this StackOverflow thread System.Security.Authentication.AuthenticationException: The remote certificate is invalid because of errors in the certificate chain: UntrustedRoot
Let us now fill details of a completely new user and submit.


As explained before, we will modify this flow later to auto-login the user immediately after registration.
Side note: If you see an error like this A network-related or instance-specific error occurred while establishing a connection to SQL Server. The server was not found or was not accessible. Verify that the instance name is correct and that SQL Server is configured to allow remote connections. (provider: SQL Network Interfaces, error: 26 - Error Locating Server/Instance Specified) (Microsoft SQL Server, Error: -1) For help, click: http://go.microsoft.com/fwlink?ProdName=Microsoft%20SQL%20Server&EvtSrc=MSSQLServer&EvtID=-1&LinkId=20476
To fix this, you need to make sure that the SQL Service is showing status as running. In my case, the service name is SQL Server (SQLEXPRESS).

Step 4. HttpGet - Login
This endpoint will be hit when user tries to access Login page. This endpoint will display the empty Login page and user will need to fill and submit this form. We will create a Login.cshtml view for this.
The Login request model will look like this
public class LoginRequest
{
    [Required]
    [EmailAddress]
    public string Email { get; set; }

    [Required]
    [DataType(DataType.Password)]
    public string Password { get; set; }
}
Next, we add the login endpoint
[HttpGet]
public async Task<IActionResult> Login()
{
        return View();
}
We will create a Login.cshtml view for this action. This time, our model is LoginRequest.
@model MvcClient.Models.LoginRequest
@{
    ViewData["Title"] = "Login";
}

<h1>Login</h1>

<h4></h4>User</h4>

<hr />

<div class="row">
    <div class="col-md-4">
        <form asp-action="login">
            <div asp-validation-summary="All" class="text-danger"></div>

            <div class="form-group">
                <label asp-for="Email" class="control-label"></label>
                <input asp-for="Email" class="form-control" />
                <span asp-validation-for="Email" class="text-danger"></span>
            </div>

            <div class="form-group">
                <label asp-for="Password" class="control-label"></label>
                <input asp-for="Password" class="form-control" type="password" />
                <span asp-validation-for="Password" class="text-danger"></span>
            </div>

            <div class="form-group">
                <input type="submit" value="Login" class="btn btn-primary" />
            </div>
        </form>
    </div>
</div>
Now, let us run the project and click on the Login button from home page. The login page will look like this:

Step 5. HttpPost - Login
This endpoint will be hit when user tries to submit the form on the Login page. If there is any validation error in the user inputs, then we will return the same view to the user so that they can rectify the errors. If there are no validation errors, we will make a call to the web api for login. If the call fails for any reason, we will show that as an error message on the same view. If, on the other hand, the user is authenticated, then we will store the auth token in a browser cookie. From that point on, we can make requests to the Articles endpoint, by sending the auth token as part of every request. Let's get started!
The Login endpoint for POST request will look like shown below. We are making a call to _authService.LoginAsync(loginRequest) which will return the status of web api call along with the tokens. We will add the code to store the tokens in a cookie in a moment.
[HttpPost]
public async Task<IActionResult> Login(LoginRequest loginRequest)
{
        if(!ModelState.IsValid)
        {
            //return error messages
            return View(loginRequest);
        }
        else
        {
            //log the user in
            var response = await _authService.LoginAsync(loginRequest);

            if (response.Status == HttpStatusCode.OK)
            {
                  //Instruct the browser to store the auth tokens in a cookie
                  //TODO
            }
            else
            {
                ModelState.AddModelError(string.Empty, response.Message);
                return View(loginRequest);
            }

            return Ok("Login successful");
        }
}
Let us now add the Login method to IAuthService and its implementation AuthService.
public interface IAuthService
{
     Task<RegisterResponse> RegisterAsync(RegisterRequest request);
     Task<LoginResponse> LoginAsync(LoginRequest request);
}
The LoginResponse class is added to store details of whether the Web Api request succeeded or failed, along with the access and refresh tokens received from the web api.
public class LoginResponse
{
    public HttpStatusCode Status { get; set; }
    public string Message { get; set; }
    public string Email { get; set; }
    public string AccessToken { get; set; }
    public string RefreshToken { get; set; }
}
The AuthService service implements the LoginAsync function as shown below:
public class AuthService: IAuthService
{
    . . .
    public async Task<LoginResponse> LoginAsync(LoginRequest request)
    {
        var url = _config["apiService:userLoginUrl"];
        var httpResponse = await _apiService.MakeHttpCallAsync(
            httpMethod: HttpMethod.Post,
            url: url,
            bodyContent: request);
        LoginResponse loginResponse = new LoginResponse();

        //if login was successful
        if (httpResponse.StatusCode == HttpStatusCode.OK)
        {
            //map the login response
            loginResponse = await httpResponse.Content.ReadFromJsonAsync<LoginResponse>();
            loginResponse.Status = httpResponse.StatusCode;
            loginResponse.Email = request.Email;
        }
        else
        {
            //else if login failed, map the error message
            var errMessage = await httpResponse.Content.ReadAsStringAsync();
            loginResponse.Status = httpResponse.StatusCode;
            loginResponse.Message = errMessage;
        }
        return loginResponse;
    }

}
Now, let us run the project and submit the login form. Ensure that the Web Api project is also running in parallel.
First, let us submit the empty form. This should hit the if block that is checking if ModelState is valid or not, and return the view with error messages. And that is what we see.

Now, let us submit the form for a non-existing user


Now, let us fill the wrong password for an existing user.


Finally, let us fill valid credentials. We will see a message saying Login Successful.


Step 6. Store auth tokens in cookies
As discussed in this article, there are multiple ways of storing the auth tokens in the browser, but the safest option as of now is to store the tokens in cookies on the client side.
To add cookie authentication in our MVC project, we will need to add the following lines of code in Program.cs
builder.Services.AddAuthentication(CookieAuthenticationDefaults.AuthenticationScheme)
                .AddCookie(options => {
                    options.LoginPath = "/auth/login";
                    options.Cookie.HttpOnly = true;
                    options.Cookie.SecurePolicy = CookieSecurePolicy.Always;
                    options.Cookie.SameSite = SameSiteMode.Strict;
                });
Notice we have provided the default login path as /auth/login which is the page where our app will be redirected to in case the cookie has expired or the cookie is not found. By default, a cookie stays active until the session is closed by the user, usually by logging out or by closing the browser. By default, the auth cookie created by .NET is saved by the name of .AspNetCore.Cookies in the client browser. By default, the cookie is HttpOnly and Secure which is what we want. However, we have anyway gone ahead and explicitly set both properties above. The Samesite.Strict property needs to be set explicitly though, as the default is Samesite.Lax in .NET. These three properties HttpOnly, Secure and SameSite.Strict tell the browser how we want our cookies to be handled by it.
The HttpOnly setting ensures that the cookie can't be accessed via javascript on the client browser. The Secure property ensures that the cookie transfer (as well as authentication) happens over HTTPS and not HTTP. The Samesite.Strict ensures that the browser does not send this cookie as part of a request unless that request is directed to our server/domain.
This way, we can be assured that a malicious attacker cannot read our cookie contents over the network (due to Https). They also cannot read it by injecting and running any malicious javascript code, nor can they redirect our cookie to any third party website due to Samesite.Strict.
Next, let us go back to our login action, to the location where we have the below code
[HttpPost]
public async Task<IActionResult> Login(LoginRequest loginRequest)
{
    . . .
     if (response.Status == HttpStatusCode.OK)
     {
            //Instruct the browser to store the auth tokens in a cookie
            //TODO
      }
}
Basically if control goes inside the if block, it means that the web api authentication request was successful, and we received the auth tokens in the response. Now, let us store these tokens in a cookie. We will call a function _authService.LoginWithCookieAsync() that will do this for us.
[HttpPost]
public async Task<IActionResult> Login(LoginRequest loginRequest)
{
    . . .
     if (response.Status == HttpStatusCode.OK)
     {
        //generate claims for email, access token, and refresh token
        await _authService.LoginWithCookieAsync(response.Email, response.AccessToken, response.RefreshToken);
      }
}
Let us now add this function LoginWithCookieAsync() in IAuthService and its implementation AuthService.
Interface -
public interface IAuthService
{
    Task<RegisterResponse> RegisterAsync(RegisterRequest request);
    Task<LoginResponse> LoginAsync(LoginRequest request);
    Task LoginWithCookieAsync(string email, string accessToken, string refreshToken);
}
Implementation -
In the AuthService class, we inject an instance of IHttpContextAccessor in the constructor. We need it to access HttpContext. Then, in the LoginWithCookieAsync function, we will create a ClaimsPrincipal object based on the tokens we received from WebApi. Then, we will use the IHttpContextAccessor object to call HttpContext.SignInAsync() function. This function is provided by .NET to log the user in with a cookie. Basically, it instructs the client browser to create an encrypted cookie with the contents we provided in the ClaimsPrincipal object.
public class AuthService : IAuthService
{
    private IApiCallerService _apiService;
    private IHttpContextAccessor _contextAccessor;
    private IConfiguration _config;
    public AuthService(IConfiguration config, IApiCallerService apiService, IHttpContextAccessor contextAccessor)
    {
        _config = config;
        _apiService = apiService;
        _contextAccessor = contextAccessor;
    }

    public async Task LoginWithCookieAsync(string email, string accessToken, string refreshToken)
    {
        //generate claims for email, access token, and refresh token
        var principal = GeneratePrincipal(email, accessToken, refreshToken);

        //create a cookie with above claims
        await _contextAccessor.HttpContext.SignInAsync(CookieAuthenticationDefaults.AuthenticationScheme, principal);
    }

    private ClaimsPrincipal GeneratePrincipal(string email, string accessToken, string refreshToken)
    {
        var identity = new ClaimsIdentity(CookieAuthenticationDefaults.AuthenticationScheme);
        identity.AddClaim(new Claim(ClaimTypes.Email, email));
        identity.AddClaim(new Claim("token", accessToken));
        identity.AddClaim(new Claim("refresh", refreshToken));

        var principal = new ClaimsPrincipal(identity);
        return principal;
    }
}
The IHttpContextAccessor DI is added in Program..cs as shown below:
//add DI for IHttpContextAccessor to access HttpContext object
builder.Services.AddHttpContextAccessor();
Now let us run our project again. First, open the landing page, go to dev tools --> Application --> Cookies. You should be able to see two cookies added by .NET that are related to AntiForgery.

Now, let us click on the Login button and enter our credentials.

We see the Login Successful message, and at the same time, we can see a new cookie added by the name .AspNetCore.Cookies. This is our auth cookie that contains all the claims we added.

Step 7. Change landing page options based on whether user is logged in or not
Now that we have completed the login flow, let us customize our landing page to show one set of options when logged in, and another set of options when logged out. For example, when the user is logged in, we will show options like Logout, View All Articles, and Create a New Article. But when the user is logged out, we will only show two options - Login and Register.
To do that, we can modify our code as shown below:
@using System.Security.Claims
<h1>Articles Homepage</h1>

<h4>Please click on one of the options below</h4>

@if(User.Identity.IsAuthenticated)
{
    <p>Hello @(User.Claims.FirstOrDefault(c => c.Type == ClaimTypes.Email).Value)</p>

    <a class="btn btn-primary" asp-controller="articles" asp-action="getArticles">View All Articles</a>
    <a class="btn btn-success" asp-controller="articles" asp-action="createArticle">Create New Article</a>
    <a class="btn btn-danger" asp-controller="auth" asp-action="logout">Logout</a>
}
else
{
    <a class="btn btn-primary" asp-controller="auth" asp-action="register">Register</a>
    <a class="btn btn-success" asp-controller="auth" asp-action="login">Login</a>
}
We have added @if(User.Identity.IsAuthenticated) which is a built in flag provided by Identity to check whether a user is logged in or not. Additionally, if a user is logged in, we show a welcome message Hello <email>.
Currently, once user is logged in, we are showing a message Login Successful. Let us go to our Login endpoint and instead redirect to landing page once user is logged in.
[HttpPost]
public async Task<IActionResult> Login(LoginRequest loginRequest)
{
            . . .
            //once login is done
            return RedirectToAction("Index", "Articles");
            . . .
}
Now let us run our project. Initially, when the user is logged out, we will see this screen

Enter your credentials and login

Once you are logged in, you see the welcome message followed by Logout and articles view and create options

Step 8. HttpGet - Logout
This endpoint will be hit when user tries to Logout. This endpoint will basically log the user out by removing the cookie that was created at the time of login.
[HttpGet]
public async Task<IActionResult> Logout()
{
        //remove stored tokens from database by calling web api
        await _authService.RevokeTokenAsync();

        //log the user out by removing cookie from mvc app
        await _authService.LogoutAsync();

        //redirect to home page once logged out
        return RedirectToAction("Index", "Articles");
}
First, we call _authService.RevokeTokenAsync() that will make a call to our Web API to remove from the database the refresh token stored for this user. Then, we call the await _authService.LogoutAsync() function, and Identity framework will instruct the browser to remove the auth cookie from browser. Finally, we redirect the user to the home page.
The _authService.RevokeTokenAsync() function is defined as below. It basically removes the refresh token from the authentication database.
Interface -
public interface IAuthService
{
    Task<RegisterResponse> RegisterAsync(RegisterRequest request);
    Task<LoginResponse> LoginAsync(LoginRequest request);
    Task LoginWithCookieAsync(string email, string accessToken, string refreshToken);
    Task<bool> RevokeTokenAsync();
}
Implementation -
The RevokeTokenAsync() function first fetches the claims from http context object, and retrieves the tokens from these claims. Thereafter, it makes a call to the Web Api to revoke the refresh token, basically removing the refresh token from the authentication database, so that it can't be used anymore. If the revoke request is successful, it returns true, else it returns false.
public async Task<bool> RevokeTokenAsync()
{
        var url = _config["apiService:tokenRevokeUrl"];

        var currentClaims = GetSavedClaims();

        if (!(string.IsNullOrEmpty(currentClaims.AuthToken) || string.IsNullOrEmpty(currentClaims.RefreshToken)))
        {
            var revokeRequest = new RevokeRequest
            {
                RefreshToken = currentClaims.RefreshToken
            };

            var httpResponse = await _apiService.MakeHttpCallAsync(
            httpMethod: HttpMethod.Post,
            url: url,
            bodyContent: revokeRequest,
            authScheme: "bearer",
            authToken: currentClaims.AuthToken);

            if (httpResponse.StatusCode == HttpStatusCode.OK)
            {
                return true;
            }
        }

        return false;
}

public Claims GetSavedClaims()
{
        var claimsList = _contextAccessor.HttpContext.User.Claims;
        var claimsObject = GenerateClaimsObject(claimsList);
        return claimsObject;
}

private Claims GenerateClaimsObject(IEnumerable<Claim> claims)
{
        var email = claims.FirstOrDefault(c => c.Type == ClaimTypes.Email)?.Value;
        var token = claims.FirstOrDefault(c => c.Type == "token")?.Value;
        var refreshToken = claims.FirstOrDefault(c => c.Type == "refresh")?.Value;
        return new Claims { Email = email, AuthToken = token, RefreshToken = refreshToken };
}
The Claims class is defined by us as shown below.
public class Claims
{
    public string Email { get; set; }

    public string AuthToken { get; set; }

    public string RefreshToken { get; set; }

}
The _authService.LogoutAsync() function that is called as part of Logout is defined as below. It instructs the client browser to delete the cookie that was created as part of the login.
Interface -
public interface IAuthService
{
    Task<RegisterResponse> RegisterAsync(RegisterRequest request);
    Task<LoginResponse> LoginAsync(LoginRequest request);
    Task LoginWithCookieAsync(string email, string accessToken, string refreshToken);
    Task<bool> RevokeTokenAsync();
    Task LogoutAsync();
}
Implementation -
public async Task LogoutAsync()
{
        await _contextAccessor.HttpContext.SignOutAsync();
}
Let us run our project. Currently, we are logged in, and our auth cookie is visible. Let us click on the Logout button.

You can see that the auth cookie is gone, our options on landing page are back to Login and Register.

Step 9. Silent Login during registration
Let us go back to the registration endpoint and once user registration is complete, we want to perform a silent login. All we need to do is call the Login POST endpoint and provide the user credentials that we got as part of registration. The login endpoint will log the user in with those credentials and redirect to the landing page.
[HttpPost]
public async Task<IActionResult> Register(RegisterRequest registerRequest)
{
       . . .
       //silent login
       var loginRequest = new LoginRequest { Email = registerRequest.Email, Password = registerRequest.Password };
       return await Login(loginRequest);
       . . .
}
Let us run the project now and click on Register button

Add your new user details

The user is automatically logged in and redirected to landing page

Step 10. Silent refresh on token expiry
Okay, so we have completed the process to store the access token and refresh token in a cookie at client side. Later in this article, we are going to make REST calls to our Web API app to perform CRUD operations on our Articles. However, those CRUD endpoints are secured, so we will need to pass the access token token as part of our HTTP request. At some point, the token will expire, leading to the Web API returning 401 response. When this happens, we want to do a silent token refresh using the refresh token which is also stored in our cookie. Once the token is refreshed, we will make a second attempt to call the Web API with the new token.
To support this flow, we will add a refresh endpoint to our AuthController. Any time we need to refresh token, we can redirect to this endpoint. What the refresh endpoint will do is to get the new set of access and refresh tokens from the Web API, and login the user with these tokens, basically rewriting the cookie with new claims.
This endpoint will also have a returnUrl parameter, so that once the tokens are refreshed, the user is taken back to the original url that the user was on.
[HttpGet]
public async Task<IActionResult> Refresh(string returnUrl)
{
        var response = await _authService.RefreshTokenAsync();
        if (response.Status == HttpStatusCode.OK)
        {
            await _authService.LoginWithCookieAsync(response.Email, response.AccessToken, response.RefreshToken);
            return RedirectTo(returnUrl);
        }
        else
        {
            //if refresh request failed, redirect to login page
            return RedirectToAction("login");
        }
}

private IActionResult RedirectTo(string returnUrl = null)
{
        if (!string.IsNullOrEmpty(returnUrl) && Url.IsLocalUrl(returnUrl))
        {
            return LocalRedirect(returnUrl);
        }
        else
        {
            //default redirect
            return RedirectToAction("Index", "Articles");
        }
}
We are making a call to _authService.RefreshTokenAsync() to refresh the tokens, and then we are making a call to _authService.LoginWithCookieAsync() by passing the new tokens received.
Note
Note that even though we make a call to
HttpContext.SignInAsync()in our_authService.LoginWithCookieAsync(), the cookie is created only when the control is returned to the browser. Not only that, theHttpContext.User.Claimsproperty is updated with new claims only in subsequent requests (after the cookie is created). If you immediately check the value of this property after callingHttpContext.SignInAsync(), it will still have the older values. This is done intentionally by design by the .NET framework. There is a way to update the claims immediately, and we will use it as part of cookie+token validation logic that we are going to implement later.Another thing to note is that once the tokens are refreshed, the user is taken back to the
returnUrl. However, if the user was trying to submit a form, they will have to re-fill it, as form data is lost during a refresh operation because we are not saving it. Even if we saved the data, there is no way for us to pass this form data as part of a redirect operation (as far as I am aware). We have tried to circumvent this issue later by ensuring that token validation happens as part of the cookie authentication itself (cookie+token validation) so that there is very little to no chance that this refresh endpoint will ever need to be called. But we have added the endpoint in the rare scenario that a token expires within the small window between token validation and the actual call to a protected endpoint.
Coming back, the RefreshTokenAsync function called above is defined as shown below in AuthService. We make a call to the Web Api to get the new tokens.
Interface -
public interface IAuthService
{
    Task<RegisterResponse> RegisterAsync(RegisterRequest request);
    Task<LoginResponse> LoginAsync(LoginRequest request);
    Task LoginWithCookieAsync(string email, string accessToken, string refreshToken);
    Task<bool> RevokeTokenAsync();
    Task LogoutAsync();
    Task<LoginResponse> RefreshTokenAsync(Claims claims = null);
}
Implementation -
public async Task<LoginResponse> RefreshTokenAsync(Claims claims = null)
{
        var url = _config["apiService:tokenRefreshUrl"];

        var currentClaims = claims == null ? GetSavedClaims() : claims;

        LoginResponse response = null;
        if (!(string.IsNullOrEmpty(currentClaims.AuthToken) || string.IsNullOrEmpty(currentClaims.RefreshToken)))
        {
            var refreshRequest = new RefreshRequest
            {
                AccessToken = currentClaims.AuthToken,
                RefreshToken = currentClaims.RefreshToken
            };

            //make a call to web api to get new tokens
            var httpResponse = await _apiService.MakeHttpCallAsync(
            httpMethod: HttpMethod.Post,
            url: url,
            bodyContent: refreshRequest);

            //if call was successful
            if (httpResponse.StatusCode == HttpStatusCode.OK)
            {
                response = await httpResponse.Content.ReadFromJsonAsync<LoginResponse>();
                response.Status = httpResponse.StatusCode;
                response.Email = currentClaims.Email;
            }
            else
            {
                //if call failed
                response = new LoginResponse
                {
                    Status = httpResponse.StatusCode,
                    Message = await httpResponse.Content.ReadAsStringAsync()
                };
            }
        }
        return response;
}
We are fetching both access and refresh tokens from the claims, and mapping them to a RefreshRequest object, which looks like this
public class RefreshRequest
{
    public string AccessToken { get; set; }
    public string RefreshToken { get; set; }
}
Then we make an HTTP call to our Web Api by providing the above object, to fetch new access and refresh tokens. The response received from Web Api is returned to the Refresh action, where either the user is logged in with the new tokens/cookie and redirected to the original url, or else they are redirected to the Login page if new tokens cannot be obtained.
The context accessor object that we used above is injected in Program.cs as shown below
//add DI for IHttpContextAccessor to access HttpContext object
builder.Services.AddHttpContextAccessor();
We will test run this endpoint later, once we have added our CRUD operations for Articles, as that is where this endpoint will be called.
Step 11. Silent refresh on token expiry at the time of cookie validation (i.e. Cookie + token validation)
The cookie authentication that comes built in by .NET can only validate that the cookie has all the expected claims and that it has not expired. However, in our case, the claims are our access and refresh tokens, and the cookie authentication logic cannot (will not) check the expiry of these tokens. Due to this, even though the tokens may have expired, the cookie authentication logic will still allow a user to login to the UI. However, as soon as a call is made from our app to the Web API, we will get a 401 Unauthorized response. At that point, we will have to redirect to the Refresh endpoint to refresh our tokens. Our app is already doing this. However, as mentioned earlier, once the tokens are refreshed, the user will be redirected to the returnUrl, but all the data they had entered up until that point would be lost.
To avoid this scenario, we will now try to ensure that our tokens are authenticated at the same time when cookie validation happens. To do this, we will modify the cookie authentication setup in Program.cs by adding our token authentication logic to the OnValidatePrincipal event.
Currently, the cookie authentication setup looks like this
builder.Services.AddAuthentication(CookieAuthenticationDefaults.AuthenticationScheme)
                .AddCookie(options => {
                    options.LoginPath = "/auth/login";
                    options.Cookie.HttpOnly = true;
                    options.Cookie.SecurePolicy = CookieSecurePolicy.Always;
                    options.Cookie.SameSite = SameSiteMode.Strict;
                });
Let us now add OnValidatePrincipal event. We are specifying that whenever the OnValidatePrincipal event is triggered, we also want to execute the authService.TakeActionIfTokenExpired() method. We will implement the TakeActionIfTokenExpired function in our AuthService class.
builder.Services.AddAuthentication(CookieAuthenticationDefaults.AuthenticationScheme)
                .AddCookie(options => {
                    options.LoginPath = "/auth/login";
                    options.Cookie.HttpOnly = true;
                    options.Cookie.SecurePolicy = CookieSecurePolicy.Always;
                    options.Cookie.SameSite = SameSiteMode.Strict;
                    options.Events.OnValidatePrincipal = async context =>
                    {
                        var authService = context.HttpContext.RequestServices.GetRequiredService<IAuthService>();
                        await authService.TakeActionIfTokenExpired(context);
                    };
                });
The TakeActionIfTokenExpired() method is implemented in AuthService as shown below:
Interface -
public interface IAuthService
{
    Task<RegisterResponse> RegisterAsync(RegisterRequest request);
    Task<LoginResponse> LoginAsync(LoginRequest request);
    Task LoginWithCookieAsync(string email, string accessToken, string refreshToken);
    Task<bool> RevokeTokenAsync();
    Task LogoutAsync();
    Task<LoginResponse> RefreshTokenAsync(Claims claims = null);
    Task TakeActionIfTokenExpired(CookieValidatePrincipalContext context);
}
Implementation -
public async Task TakeActionIfTokenExpired(CookieValidatePrincipalContext context)
{
        //get current claims from CookieValidatePrincipalContext
        var currentClaims = GenerateClaimsObject(context.Principal.Claims); //can't fetch from user claims yet as they are not saved
        var shouldRedirectToLogin = false;

        if (string.IsNullOrEmpty(currentClaims.AuthToken))
        {
            shouldRedirectToLogin = true;
        }
        else
        {
            //check if auth token is still valid
            var isTokenValid = await ValidateToken(currentClaims.AuthToken);
            if (!isTokenValid)
            {
                //refresh auth token
                var refreshResponse = await RefreshTokenAsync(currentClaims);
                if(refreshResponse.Status != HttpStatusCode.OK)
                {
                    shouldRedirectToLogin = true;
                }
                else
                {
                    //update the principal (claims) in context object
                    var newPrincipal = GeneratePrincipal(refreshResponse.Email, refreshResponse.AccessToken, refreshResponse.RefreshToken);
                    context.ReplacePrincipal(newPrincipal);
                    context.ShouldRenew = true;
                }
            }
        }

        if(shouldRedirectToLogin)
        {
            //if for any reason tokens could not be refreshed
            //reject the principal and remove the current cookie
            context.RejectPrincipal();
            await context.HttpContext.SignOutAsync();
        }
}

private async Task<bool> ValidateToken(string authToken)
{
        var url = _config["apiService:tokenValidateUrl"];

        if (!(string.IsNullOrEmpty(authToken)))
        {
            var httpResponse = await _apiService.MakeHttpCallAsync(
                    httpMethod: HttpMethod.Post,
                    url: url,
                    authScheme: "bearer",
                    authToken: authToken);

            if (httpResponse.StatusCode == HttpStatusCode.OK)
            {
                return true;
            }
        }

        return false;
}
We fetch the auth token from the current claims from the CookieValidatePrincipalContext object (HttpContext will not have the claims yet in the authentication flow). Then make a call to the Web API to verify if the token is valid. If token is valid then exit the function. However, if the token is not valid, then make a refresh call to Web API to get new tokens, generate a new principal using these tokens, and replace the existing principal with this new principal. If for any reason we were unable to refresh the tokens, then we make a call to context.RejectPrincipal() which means auth logic considers the cookie as invalid and redirects to the login page. Furthermore, we invoke context.HttpContext.SignOutAsync() which instructs the client browser to remove the cookie.
That's it, we are done with the silent refresh of the token and cookie at the time of cookie validation itself. Let us say that a user clicks on the Submit button of a Create Article form, which triggers a POST request to CreateArticle action which is secured by [Authorize] attribute. But the token has already expired. The cookie authentication flow will now run our TakeActionIfTokenExpired function and refresh the tokens if needed. Only after this step will the POST request step inside the CreateArticle action, which means the POST request's data will not be lost. No redirect operation required!
5. Add Articles CRUD Operations
We have already added an Index() endpoint in ArticlesCotroller class as our landing page. Let us now add endpoints for CRUD operations on the Articles.
HttpGet - Create a new Article
This endpoint will display the Article form where user can fill the article details and click on Submit
 [HttpGet]
public async Task<IActionResult> CreateArticle()
{
        return View();
}
The Article model class will look like this
public class Article
{
        public Guid Id { get; set; }
        [Required]
        public string? Title { get; set; }
        [Required]
        public string? Author { get; set; }
        [Required]
        public string? Content { get; set; }
        public int? Views { get; set; }
        public int? UpVotes { get; set; }
}
The view will be created for this action as shown below
@model MvcClient.Models.Article
@{
    ViewData["Title"] = "Create Article";
}

<h1>New Article</h1>

<hr />

<div class="row">
    <div class="col-md-4">
        <form asp-action="createArticle">
            <div asp-validation-summary="All" class="text-danger"></div>

            <div class="form-group">
                <label asp-for="Title" class="control-label"></label>
                <textarea asp-for="Title" class="form-control"></textarea>
                <span asp-validation-for="Title" class="text-danger"></span>
            </div>

             <div class="form-group">
                <label asp-for="Author" class="control-label"></label>
                <input asp-for="Author" value="@(User.Claims.FirstOrDefault(c=>c.Type == ClaimTypes.Email).Value)" class="form-control"/>
                <span asp-validation-for="Author" class="text-danger"></span>
            </div>

             <div class="form-group">
                <label asp-for="Content" class="control-label"></label>
                <textarea asp-for="Content" class="form-control"></textarea>
                <span asp-validation-for="Content" class="text-danger"></span>
            </div>

            <div class="form-group">
                <input type="submit" value="Create" class="btn btn-primary" />
            </div>
        </form>
    </div>
</div>
Let us run our project now. On the landing page, let us click on Create a New Article button


This is the form the user will see. Notice that the author email id is pre-populated as we are getting this value from the claims and adding it in the view. Let us now add the POST endpoint to handle the request when the user clicks on Create button.
HttpPost - Create a new Article
This endpoint will be hit when the user clicks on Create button in the Create Article form.
[HttpPost]
public async Task<IActionResult> CreateArticle(Article article)
{
        if (!ModelState.IsValid)
        {
            //return error messages
            return View(article);
        }

        var response = await _articleService.CreateArticleAsync(article);
        if (response.Status == HttpStatusCode.Unauthorized)
        {
            //if response is 401, it means access token has expired
            return RedirectToAction("refresh", "auth", new { returnUrl = "/articles/createArticle" });
        }
        if (response.Status != HttpStatusCode.OK)
        {
            ModelState.AddModelError(string.Empty, "An Error Occurred while processing this request. Please try again in some time.");
        }
        return Ok("Article Created");
}
First we check if the ModelState is valid, basically ensuring that any data annotations like [Required] or minlength or maxlength are in compliance. After that, we make a call to _articleService.CreateArticleAsync() which we will implement in a second. The article service will make a call to the Web API to create an article in the database. If a 401 response is received (very unlikely due to cookie+token validation), we will redirect to Refresh endpoint. If any other error code is received, we will return an error message on the UI. However, if everything went fine, we will show a message "Article Created".
The ArticleService class looks like shown below
Interface:
public interface IArticleService
{
    Task<ArticlesResponse> CreateArticleAsync(Article article);
}
Implementation:
public class ArticleService : IArticleService
{
    private IConfiguration _config;
    private IAuthService _authService;
    private IApiCallerService _apiService;
    private string _url;
    public ArticleService(IConfiguration config, IApiCallerService apiService, IAuthService authService)
    {
        _config = config;
        _apiService = apiService;
        _authService = authService;
        _url = _config["apiService:articlesUrl"];
    }

    public async Task<ArticlesResponse> CreateArticleAsync(Article article)
    {
        var token = _authService.GetSavedClaims().AuthToken;

        var httpResponse = await _apiService.MakeHttpCallAsync(
            httpMethod: HttpMethod.Post,
            url: _url,
            bodyContent: article,
            authScheme: "bearer",
            authToken: token
        );
        ArticlesResponse response = new ArticlesResponse();
        if (httpResponse.StatusCode == HttpStatusCode.OK)
        {
            var createdArticle = await httpResponse.Content.ReadFromJsonAsync<Article>();
            response.Status = httpResponse.StatusCode;
            response.Articles = new List<Article> { createdArticle };
        }
        else
        {
            response.Status = httpResponse.StatusCode;
            response.Message = await httpResponse.Content.ReadAsStringAsync();
        }
        return response;
    }
}
Now let us run the application and fill the details in the New Article form.

Click on Create button

HttpGet: Fetch a list of all articles
This endpoint will display a list of all the articles
[HttpGet]
public async Task<IActionResult> GetArticles()
{
        var articlesResponse = await _apiService.GetArticlesAsync();
        if (articlesResponse.Status == HttpStatusCode.Unauthorized)
        {
            //if response is 401, it means access token has expired
            return RedirectToAction("refresh", "auth", new { returnUrl = "/articles/getArticles" });
        }
        if (articlesResponse.Status != HttpStatusCode.OK)
        {
            ModelState.AddModelError(string.Empty, "An Error Occurred while processing this request. Please try again in some time.");
        }
        return View(articlesResponse.Articles);
}
The GetArticlesAsync function is defined in ArticleService as shown below:
public async Task<ArticlesResponse> GetArticlesAsync()
{

        var token = _authService.GetSavedClaims().AuthToken;

        var httpResponse = await _apiService.MakeHttpCallAsync(
            httpMethod: HttpMethod.Get,
            url: _url,
            authScheme: "bearer",
            authToken: token
        );
        ArticlesResponse response = new ArticlesResponse();
        if (httpResponse.StatusCode == HttpStatusCode.OK)
        {
            var articles = await httpResponse.Content.ReadFromJsonAsync<List<Article>>();
            response.Status = httpResponse.StatusCode;
            response.Articles = articles;
        }
        else
        {
            response.Status = httpResponse.StatusCode;
            response.Message = await httpResponse.Content.ReadAsStringAsync();
        }
        return response;
}
The view looks like this
@model IEnumerable<MvcClient.Models.Article>
@{
    ViewData["Title"] = "Articles";
}

<div asp-validation-summary="All" class="text-danger"></div>

<table class="table">
    <thead>
        <tr>
            <th>Title</th>
            <th>Content</th>
            <th>Author</th>
            <th>Upvotes</th>
            <th>Views</th>
            <th></th>
        </tr>
    </thead>
    <tbody>
        @foreach(var article in Model)
        {
            <tr>
                <td>
                    @article.Title
                </td>
                <td>
                    @article.Content
                </td>
                <td>
                    @article.Author
                </td>
                <td>
                    @article.UpVotes
                </td>
                <td>
                    @article.Views
                </td>
                <td>
                    <a asp-action="edit" asp-route-id=@article.Id>Edit</a>
                    <a asp-action="delete" asp-route-id=@article.Id>Delete</a>
                </td>
            </tr>
        }
    </tbody>
</table>
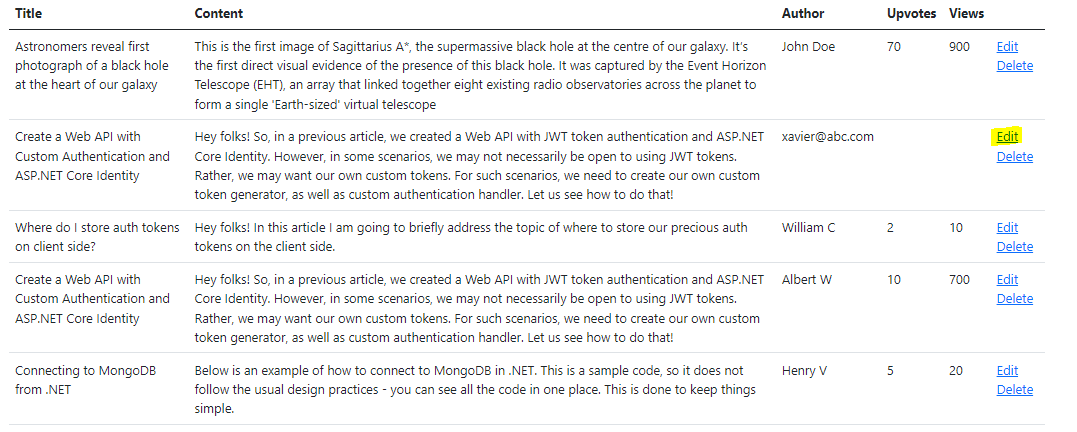
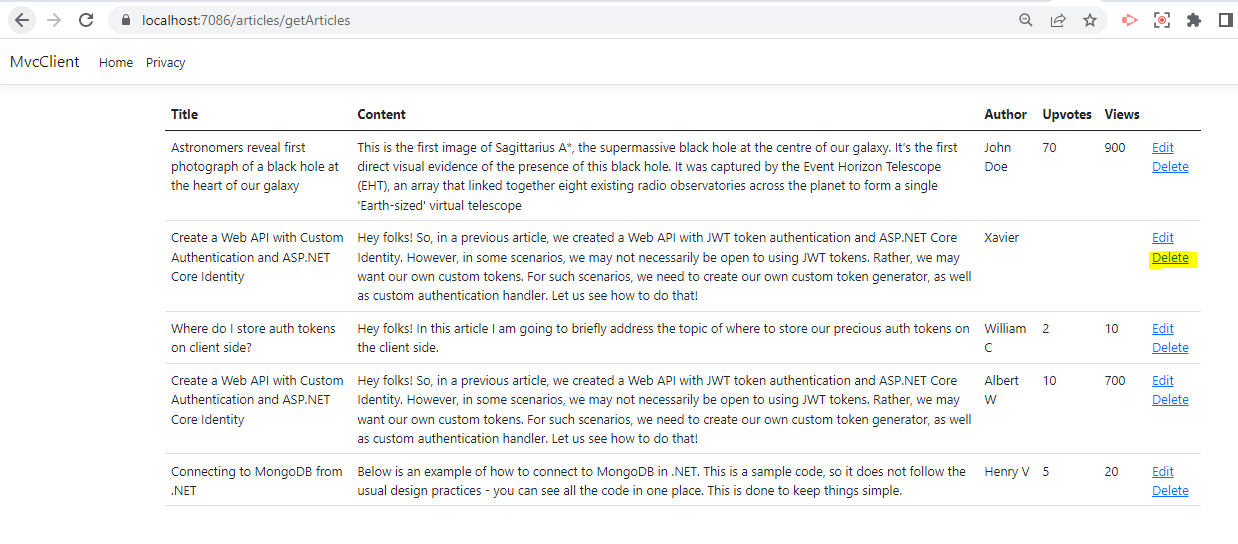
When you run this project, you can see a list of all the articles


You can also see two options Edit and Delete in front of every article. Let us implement these next.
Modify the Create Article endpoint to redirect to GetArticles once article is created
[HttpPost]
public async Task<IActionResult> CreateArticle(Article article)
{
        . . .
        return RedirectToAction("getArticles");
}
HttpGet: Edit an article
This endpoint will display a form to edit an article.
Action looks like this
[HttpGet]
public async Task<IActionResult> Edit(string id)
{
        var response = await _articleService.GetArticleAsync(id);
        if (response.Status == HttpStatusCode.Unauthorized)
        {
            //if response is 401, it means access token has expired
            return RedirectToAction("refresh", "auth", new { returnUrl = "/articles/edit" });
        }
        var article = response.Articles.FirstOrDefault();
        return View(article);
}
The GetArticleAsync function in ArticleService looks like this
public async Task<ArticlesResponse> GetArticleAsync(string id)
{
        var getUrl = $"{_url}/{id}";
        var token = _authService.GetSavedClaims().AuthToken;

        var httpResponse = await _apiService.MakeHttpCallAsync(
            httpMethod: HttpMethod.Get,
            url: getUrl,
            authScheme: "bearer",
            authToken: token
        );
        ArticlesResponse response = new ArticlesResponse();
        if (httpResponse.StatusCode == HttpStatusCode.OK)
        {
            var article = await httpResponse.Content.ReadFromJsonAsync<Article>();
            response.Status = httpResponse.StatusCode;
            response.Articles = new List<Article> { article };
        }
        else
        {
            response.Status = httpResponse.StatusCode;
            response.Message = await httpResponse.Content.ReadAsStringAsync();
        }
        return response;
}
View looks like this:
@using System.Security.Claims

@model MvcClient.Models.Article
@{
    ViewData["Title"] = "Edit Article";
}

<h1>Edit Article</h1>

<hr />

<div class="row">
    <div class="col-md-4">
        <form asp-action="edit">
            <div asp-validation-summary="All" class="text-danger"></div>
            <input type="hidden" asp-for="Id" class="form-control"/>

            <div class="form-group">
                <label asp-for="Title" class="control-label"></label>
                <textarea asp-for="Title" class="form-control"></textarea>
                <span asp-validation-for="Title" class="text-danger"></span>
            </div>

            <div class="form-group">
                <label asp-for="Author" class="control-label"></label>
                <input asp-for="Author" class="form-control"/>
                <span asp-validation-for="Author" class="text-danger"></span>
            </div>

             <div class="form-group">
                <label asp-for="Content" class="control-label"></label>
                <textarea asp-for="Content" class="form-control"></textarea>
                <span asp-validation-for="Content" class="text-danger"></span>
            </div>

            <div class="form-group">
                <input type="submit" value="Update" class="btn btn-primary" />
            </div>
        </form>
    </div>
</div>
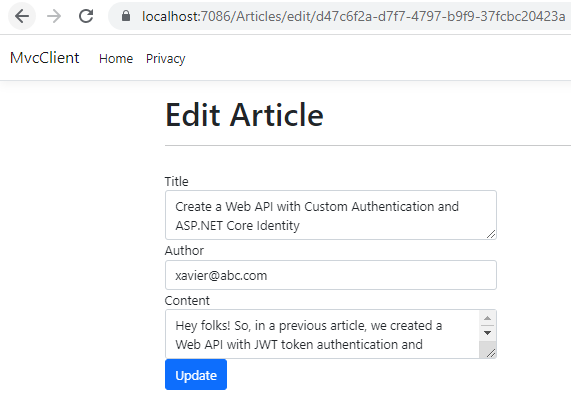
Let us run our project and click on Edit option.
This is the update screen
HttpPost: Edit an article
This endpoint will be hit when user clicks on the Update button on the Edit screen
[HttpPost]
public async Task<IActionResult> Edit(Article article)
{
        var response = await _articleService.UpdateArticleAsync(article);
        if (response.Status == HttpStatusCode.Unauthorized)
        {
            //if response is 401, it means access token has expired
            return RedirectToAction("refresh", "auth", new { returnUrl = "/articles/createArticle" });
        }
         if (response.Status != HttpStatusCode.OK)
        {
            ModelState.AddModelError(string.Empty, "An Error Occurred while processing this request. Please try again in some time.");
        }
        return RedirectToAction("getArticles");
}
The UpdateArticleAsync method in ArticleService is defined as follows:
public async Task<ArticlesResponse> UpdateArticleAsync(Article article)
{
        var token = _authService.GetSavedClaims().AuthToken;

        var putUrl = $"{_url}/{article.Id.ToString()}";
        var httpResponse = await _apiService.MakeHttpCallAsync(
            httpMethod: HttpMethod.Put,
            url: putUrl,
            bodyContent: article,
            authScheme: "bearer",
            authToken: token
        );
        ArticlesResponse response = new ArticlesResponse();
        if (httpResponse.StatusCode == HttpStatusCode.OK)
        {
            var createdArticle = await httpResponse.Content.ReadFromJsonAsync<Article>();
            response.Status = httpResponse.StatusCode;
            response.Articles = new List<Article> { createdArticle };
        }
        else
        {
            response.Status = httpResponse.StatusCode;
            response.Message = await httpResponse.Content.ReadAsStringAsync();
        }
        return response;
}
Let us run our project and click on Edit option.
This is the update screen
I have slightly modified the author field


HttpGet: Delete an article
This endpoint will be hit when user clicks on the Delete option from the list of articles
[HttpGet]
public async Task<IActionResult> Delete(string id)
    {
        var response = await _articleService.GetArticleAsync(id);
        if (response.Status == HttpStatusCode.Unauthorized)
        {
            //if response is 401, it means access token has expired
            return RedirectToAction("refresh", "auth", new { returnUrl = "/articles/edit" });
        }
        var article = response.Articles.FirstOrDefault();
        return View(article);
}
The view looks like this
@using System.Security.Claims

@model MvcClient.Models.Article
@{
    ViewData["Title"] = "Delete Article";
}

<h1>Delete Article</h1>

<hr />

<div class="row">
    <div class="col-md-4">
        <form asp-action="delete">
            <div asp-validation-summary="All" class="text-danger"></div>
            <input type="hidden" asp-for="Id" class="form-control"/>

            <div class="form-group">
                <label asp-for="Title" class="control-label"></label>
                <textarea disabled asp-for="Title" class="form-control"></textarea>
                <span asp-validation-for="Title" class="text-danger"></span>
            </div>

            <div class="form-group">
                <label asp-for="Author" class="control-label"></label>
                <input disabled asp-for="Author" class="form-control"/>
                <span asp-validation-for="Author" class="text-danger"></span>
            </div>

             <div class="form-group">
                <label asp-for="Content" class="control-label"></label>
                <textarea disabled asp-for="Content" class="form-control"></textarea>
                <span asp-validation-for="Content" class="text-danger"></span>
            </div>

            <div class="form-group">
                <input type="submit" value="Delete" class="btn btn-primary" />
            </div>
        </form>
    </div>
</div>
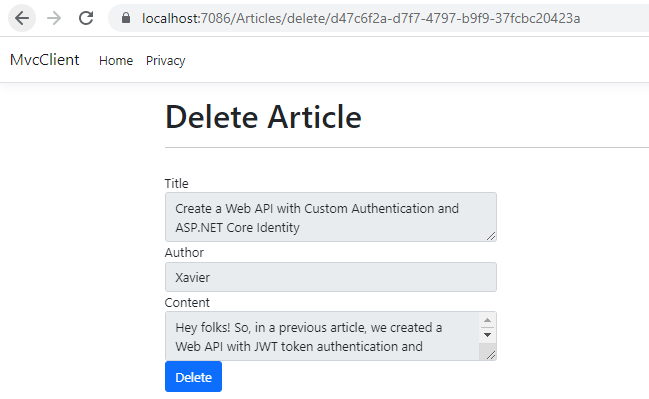
Now let us run our project and click on Delete option for one of the articles.
The next screen will show us the details of the article you are going to delete.
HttpPost: Delete an article
This endpoint will be hit when user clicks on the Delete option on the Delete screen
[HttpPost]
public async Task<IActionResult> Delete(Article article)
{
        var response = await _articleService.DeleteArticleAsync(article);
        if (response.Status == HttpStatusCode.Unauthorized)
        {
            //if response is 401, it means access token has expired
            return RedirectToAction("refresh", "auth", new { returnUrl = "/articles/delete" });
        }
        if (response.Status != HttpStatusCode.OK)
        {
            ModelState.AddModelError(string.Empty, "An Error Occurred while processing this request. Please try again in some time.");
        }
        return RedirectToAction("getArticles");
}
The DeleteArticleAsync function in ArticleService is defined as below:
public async Task<ArticlesResponse> DeleteArticleAsync(Article article)
{
        var token = _authService.GetSavedClaims().AuthToken;

        var deleteUrl = $"{_url}/{article.Id.ToString()}";
        var httpResponse = await _apiService.MakeHttpCallAsync(
            httpMethod: HttpMethod.Delete,
            url: deleteUrl,
            authScheme: "bearer",
            authToken: token
        );
        ArticlesResponse response = new ArticlesResponse();
        if (httpResponse.StatusCode == HttpStatusCode.OK)
        {
            response.Status = httpResponse.StatusCode;
            response.Articles = new List<Article> { article };
        }
        else
        {
            response.Status = httpResponse.StatusCode;
            response.Message = await httpResponse.Content.ReadAsStringAsync();
        }
        return response;
}
Now let us run our project and click on Delete option for one of the articles.
The next screen will show us the details of the article you are going to delete. Click on the delete button.

Overall Project structure-

Thanks for your patience :)


