

Photo by Silvestre Leon on Unsplash
Azure app service - Developing Solutions for Microsoft Azure - Part 1.2


Table of contents
- 1. Develop Azure Compute Solutions
- 1.2 Create Azure app service web apps
- Azure App Service
- Limitations
- Azure App Service plans
- App Service Environment
- Deploy to App Service
- Webjobs
- Authentication and authorization in App Service
- App Service networking features
- PRACTICAL 05: Create a static HTML web app by using Azure Cloud Shell
- Configure application settings
- Configure general settings
- Configure path mappings
- Enable diagnostic logging in Web Apps
- Configure security certificates
- Manage app features
- Autoscaling
- Azure App Service deployment slots
- Route traffic in App Service
All the notes on this page have been taken from Microsoft's learning portal - learn.microsoft.com. If any of this material is copyrighted, please let me know in the comments below and I will remove it. The main goal here is to learn and understand the concepts for developing solutions for Microsoft Azure. These notes may be helpful to prepare for the certification AZ-204: Developing Solutions for Microsoft Azure
Continuing from IaaS - Developing Solutions for Microsoft Azure - Part 1.1
1. Develop Azure Compute Solutions
1.2 Create Azure app service web apps
Azure App Service
Azure App Service is an HTTP-based service for hosting web applications, REST APIs, and mobile back ends.
Built-in auto scale support
Depending on the usage of the web app, you can scale the resources of the underlying machine that is hosting your web app up/down. Resources include the number of cores or the amount of RAM available. Similarly, you can scale in/out by increasing or decreasing the number of machine instances that are running your web app
Continuous integration/deployment support
The Azure portal provides out-of-the-box continuous integration and deployment with Azure DevOps, GitHub, Bitbucket, FTP, or a local Git repository on your development machine.
Deployment slots
When you deploy your web app, you can use a separate deployment slot instead of the default production slot when you're running in the Standard, Premium, or Isolated App Service plan tier. Deployment slots are live apps with their own host names. App content and configurations elements can be swapped between two deployment slots, including the production slot.
App Service on Linux
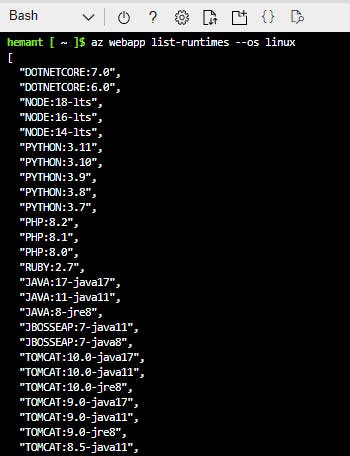
App Service can also host web apps natively on Linux for supported application stacks. Supported languages and frameworks include: Node.js, Java (JRE 8 & JRE 11), PHP, Python, .NET, and Ruby. If the runtime your application requires is not supported in the built-in images, you can deploy it with a custom container.
You can retrieve the current list by using the following command in the Cloud Shell.
az webapp list-runtimes --os-type linux
Limitations
App Service on Linux does have some limitations:
App Service on Linux is not supported on Shared pricing tier.
You can't mix Windows and Linux apps in the same App Service plan.
The Azure portal shows only features that currently work for Linux apps. As features are enabled, they're activated on the portal.
Azure App Service plans
Introduction
An App Service plan defines a set of compute resources for a web app to run. One or more apps can be configured to run on the same computing resources (or in the same App Service plan)
Each App Service plan defines:
Region (West US, East US, etc.)
Number of VM instances
Size of VM instances (Small, Medium, Large)
Pricing tier (Free, Shared, Basic, Standard, Premium, PremiumV2, PremiumV3, Isolated)
Pricing tiers of an App Service plan
Shared Compute: Both Free and Shared tiers share the resource pools of your apps with the apps of other customers. These tiers allocate CPU quotas to each app that runs on the shared resources, and the resources can't scale out.
Dedicated Compute: The Basic, Standard, Premium, PremiumV2, and PremiumV3 tiers run apps on dedicated Azure VMs. Only apps in the same App Service plan share the same compute resources. The higher the tier, the more VM instances are available to you for scale-out.
Isolated: This tier runs dedicated Azure VMs on dedicated Azure Virtual Networks. It provides network isolation on top of compute isolation to your apps. It provides the maximum scale-out capabilities.
Consumption: This tier is only available to function apps. It scales the functions dynamically depending on workload.
How does my app run and scale?
In the Free and Shared tiers, an app receives CPU minutes on a shared VM instance and can't scale out.
In other tiers, an app runs and scales as follows:
An app runs on all the VM instances configured in the App Service plan.
If multiple apps are in the same App Service plan, they all share the same VM instances.
If you have multiple deployment slots for an app, all deployment slots also run on the same VM instances.
If you enable diagnostic logs, perform backups, or run WebJobs, they also use CPU cycles and memory on these VM instances.
The App Service plan is the scale unit of the App Service apps. If the plan is configured to run five VM instances, then all apps in the plan run on all five instances. If the plan is configured for autoscaling, then all apps in the plan are scaled out together based on the autoscale settings.
If you want to improve an app's performance by isolating the compute resources, you can do it by moving the app into a separate App Service plan. Isolate your app into a new App Service plan when:
The app is resource-intensive.
You want to scale the app independently from the other apps in the existing plan.
The app needs resource in a different geographical region.
App Service Environment
An App Service Environment is an Azure App Service feature that provides a fully isolated and dedicated environment for running App Service apps securely at high scale.
An App Service Environment can host your:
Windows web apps
Linux web apps
Docker containers (Windows and Linux)
Functions
Logic apps (Standard)
App Service Environments are appropriate for application workloads that require:
High scale.
Isolation and secure network access.
High memory utilization.
High requests per second (RPS). You can create multiple App Service Environments in a single Azure region or across multiple Azure regions. This flexibility makes an App Service Environment ideal for horizontally scaling stateless applications with a high RPS requirement.
An App Service Environment can host applications from only one customer, and they do so on one of their virtual networks. Customers have fine-grained control over inbound and outbound application network traffic. Applications can establish high-speed secure connections over VPNs to on-premises corporate resources.
Usage scenarios
App Service Environments have many use cases, including:
Internal line-of-business applications.
Applications that need more than 30 App Service plan instances.
Single-tenant systems to satisfy internal compliance or security requirements.
Network-isolated application hosting.
Multi-tier applications.
Deployment
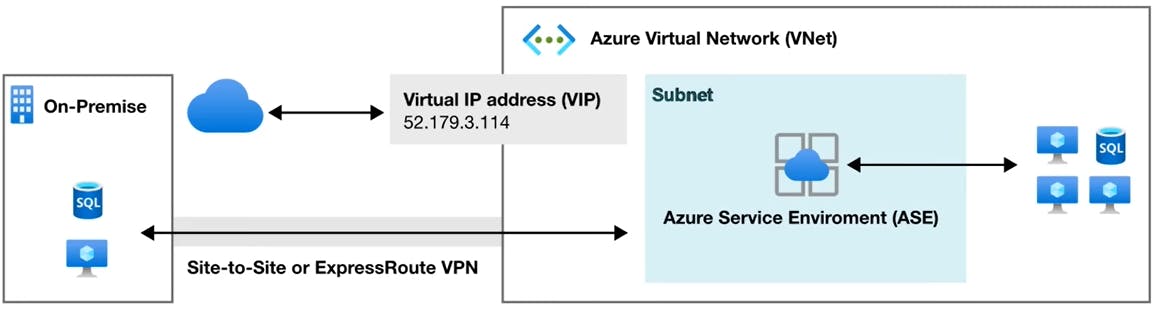
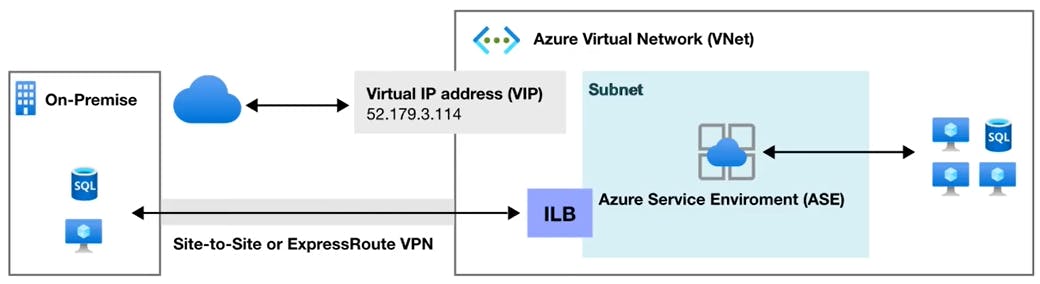
An ASE can be deployed either as external ASE with a public IP address, or as internal ASE, with an internal IP address belonging to the Internal Load Balancer (ILB).
External ASE
Internal ASE
Deploy to App Service
App Service supports both automated and manual deployment.
Automated deployment
The following options are available:
Azure DevOps: You can push your code to Azure DevOps, build your code in the cloud, run the tests, generate a release from the code, and finally, push your code to an Azure Web App.
GitHub: Azure supports automated deployment directly from GitHub. When you connect your GitHub repository to Azure for automated deployment, any changes you push to your production branch on GitHub will be automatically deployed for you.
Bitbucket: With its similarities to GitHub, you can configure an automated deployment with Bitbucket.
Manual deployment
There are a few options that you can use to manually push your code to Azure:
Git: App Service web apps feature a Git URL that you can add as a remote repository. Pushing to the remote repository will deploy your app.
CLI:
webapp upis a feature of theazcommand-line interface that packages your app and deploys it. Unlike other deployment methods,az webapp upcan create a new App Service web app for you if you haven't already created one.Zip deploy: Use
curlor a similar HTTP utility to send a ZIP of your application files to App Service.FTP/S: FTP or FTPS is a traditional way of pushing your code to many hosting environments, including App Service.
Use deployment slots
Whenever possible, use deployment slots when deploying a new production build. When using a Standard App Service Plan tier or better, you can deploy your app to a staging environment and then swap your staging and production slots. The swap operation warms up the necessary worker instances to match your production scale, thus eliminating downtime.
Webjobs
WebJobs is a feature of Azure App Service that enables you to run a program or script in the same instance as a web app, API app, or mobile app. There is no additional cost to use WebJobs.
You can use the Azure WebJobs SDK with WebJobs to simplify many programming tasks. WebJobs is not yet supported for App Service on Linux.
Supported file types for scripts or programs
The following file types are supported:
.cmd, .bat, .exe (using Windows cmd)
.ps1 (using PowerShell)
.sh (using Bash)
.php (using PHP)
.py (using Python)
.js (using Node.js)
.jar (using Java)
WebJob types
The following table describes the differences between continuous and triggered WebJobs.
| Continuous | Triggered |
| Starts immediately when the WebJob is created. To keep the job from ending, the program or script typically does its work inside an endless loop. If the job does end, you can restart it. Typically used with WebJobs SDK. | Starts only when triggered manually or on a schedule. |
| Runs on all instances that the web app runs on. You can optionally restrict the WebJob to a single instance. | Runs on a single instance that Azure selects for load balancing. |
| Supports remote debugging. | Doesn't support remote debugging. |
Code is deployed under \site\wwwroot\app_data\Jobs\Continuous. | Code is deployed under \site\wwwroot\app_data\Jobs\Triggered. |
Authentication and authorization in App Service
Azure App Service provides built-in authentication and authorization support, so you can sign in users and access data by writing minimal or no code in your web app, API, and mobile back end, and also Azure Functions.
The built-in authentication feature for App Service and Azure Functions can save you time and effort by providing out-of-the-box authentication with federated identity providers, allowing you to focus on the rest of your application.
Azure App Service allows you to integrate a variety of auth capabilities into your web app or API without implementing them yourself.
It’s built directly into the platform and doesn’t require any particular language, SDK, security expertise, or even any code to utilize.
You can integrate with multiple login providers. For example, Azure AD, Facebook, Google, Twitter.
Identity providers
App Service uses federated identity, in which a third-party identity provider manages the user identities and authentication flow for you. The following identity providers are available by default:
| Provider | Sign-in endpoint | How-To guidance |
| Microsoft Identity Platform | /.auth/login/aad | App Service Microsoft Identity Platform login |
/.auth/login/facebook | App Service Facebook login | |
/.auth/login/google | App Service Google login | |
/.auth/login/twitter | App Service Twitter login | |
| Any OpenID Connect provider | /.auth/login/<providerName> | App Service OpenID Connect login |
When you enable authentication and authorization with one of these providers, its sign-in endpoint is available for user authentication and for validation of authentication tokens from the provider. You can provide your users with any number of these sign-in options.
How it works
The authentication and authorization module runs in the same sandbox as your application code. When it's enabled, every incoming HTTP request passes through it before being handled by your application code. This module handles several things for your app:
Authenticates users with the specified provider
Validates, stores, and refreshes tokens
Manages the authenticated session
Injects identity information into request headers
The module runs separately from your application code and is configured using app settings. No SDKs, specific languages, or changes to your application code are required.
Authentication flow
The authentication flow is the same for all providers, but differs depending on whether you want to sign in with the provider's SDK.
Without provider SDK: The application delegates federated sign-in to App Service. This is typically the case with browser apps, which can present the provider's login page to the user. The server code manages the sign-in process, so it is also called server-directed flow or server flow.
With provider SDK: The application signs users in to the provider manually and then submits the authentication token to App Service for validation. This is typically the case with browser-less apps, which can't present the provider's sign-in page to the user. The application code manages the sign-in process, so it is also called client-directed flow or client flow. This applies to REST APIs, Azure Functions, JavaScript browser clients, and native mobile apps that sign users in using the provider's SDK.
The table below shows the steps of the authentication flow.
| Step | Without provider SDK | With provider SDK |
| Sign user in | Redirects client to /.auth/login/<provider>. | Client code signs user in directly with provider's SDK and receives an authentication token. For information, see the provider's documentation. |
| Post-authentication | Provider redirects client to /.auth/login/<provider>/callback. | Client code posts token from provider to /.auth/login/<provider> for validation. |
| Establish authenticated session | App Service adds authenticated cookie to response. | App Service returns its own authentication token to client code. |
| Serve authenticated content | Client includes authentication cookie in subsequent requests (automatically handled by browser). | Client code presents authentication token in X-ZUMO-AUTH header (automatically handled by Mobile Apps client SDKs). |
For client browsers, App Service can automatically direct all unauthenticated users to /.auth/login/<provider>. You can also present users with one or more /.auth/login/<provider> links to sign in to your app using their provider of choice.
Authorization behavior
In the Azure portal, you can configure App Service with a number of behaviors when an incoming request is not authenticated.
Allow unauthenticated requests: This option defers authorization of unauthenticated traffic to your application code. For authenticated requests, App Service also passes along authentication information in the HTTP headers.This option provides more flexibility in handling anonymous requests. It lets you present multiple sign-in providers to your users.
Require authentication: This option will reject any unauthenticated traffic to your application. This rejection can be a redirect action to one of the configured identity providers. In these cases, a browser client is redirected to
/.auth/login/<provider>for the provider you choose. If the anonymous request comes from a native mobile app, the returned response is anHTTP 401 Unauthorized. You can also configure the rejection to be anHTTP 401 UnauthorizedorHTTP 403 Forbiddenfor all requests.
App Service networking features
By default, apps hosted in App Service are accessible directly through the internet and can reach only internet-hosted endpoints. But for many applications, you need to control the inbound and outbound network traffic.
There are two main deployment types for Azure App Service.
The multitenant public service hosts App Service plans in the Free, Shared, Basic, Standard, Premium, PremiumV2, and PremiumV3 pricing SKUs.
There is also the single-tenant App Service Environment (ASE) hosts Isolated SKU App Service plans directly in your Azure virtual network.
Multi-tenant App Service networking features
Azure App Service is a distributed system.
The roles that handle incoming HTTP or HTTPS requests are called front ends.
The roles that host the customer workload are called workers.
All the roles in an App Service deployment exist in a multi-tenant network.
Because there are many different customers in the same App Service scale unit, you can't connect the App Service network directly to your network.
Instead of connecting the networks, you need features to handle the various aspects of application communication. The features that handle inbound requests to your app can't be used to solve problems when you're making outbound calls from your app, and vice versa.
| Inbound features | Outbound features |
| App-assigned address | Hybrid Connections |
| Access restrictions | Gateway-required virtual network integration |
| Service endpoints | Virtual network integration |
| Private endpoints |
You can mix the features to solve your problems with a few exceptions. The following inbound use cases are examples of how to use App Service networking features to control traffic inbound to your app.
| Inbound use case | Feature |
| Support IP-based SSL needs for your app | App-assigned address |
| Support unshared dedicated inbound address for your app | App-assigned address |
| Restrict access to your app from a set of well-defined addresses | Access restrictions |
Default networking behavior
Azure App Service scale units support many customers in each deployment. The Free and Shared SKU plans host customer workloads on multitenant workers. The Basic and higher plans host customer workloads that are dedicated to only one App Service plan. If you have a Standard App Service plan, all the apps in that plan will run on the same worker. If you scale out the worker, all the apps in that App Service plan will be replicated on a new worker for each instance in your App Service plan.
Outbound addresses
The worker VMs are broken down in large part by the App Service plans. The Free, Shared, Basic, Standard, and Premium plans all use the same worker VM type. The PremiumV2 plan uses another VM type. PremiumV3 uses yet another VM type. When you change the VM family, you get a different set of outbound addresses. If you scale from Standard to PremiumV2, your outbound addresses will change. If you scale from PremiumV2 to PremiumV3, your outbound addresses will change. In some older scale units, both the inbound and outbound addresses will change when you scale from Standard to PremiumV2.
There are a number of addresses that are used for outbound calls. The outbound addresses used by your app for making outbound calls are listed in the properties for your app. These addresses are shared by all the apps running on the same worker VM family in the App Service deployment. If you want to see all the addresses that your app might use in a scale unit, there's a property called possibleOutboundIpAddresses that will list them.
Find outbound IPs
To find the outbound IP addresses currently used by your app in the Azure portal, click Properties in your app's left-hand navigation.
You can find the same information by running the following command in the Cloud Shell. They are listed in the Additional Outbound IP Addresses field.
az webapp show \
    --resource-group <group_name> \
    --name <app_name> \
    --query outboundIpAddresses \
    --output tsv
To find all possible outbound IP addresses for your app, regardless of pricing tiers, run the following command in the Cloud Shell.
az webapp show \
    --resource-group <group_name> \
    --name <app_name> \
    --query possibleOutboundIpAddresses \
    --output tsv
PRACTICAL 05: Create a static HTML web app by using Azure Cloud Shell
Pre-requisite: You should have an active Azure subscription.
The az webapp up command makes it easy to create and update web apps. When executed it performs the following actions:
Create a default resource group if one isn't specified.
Create a default app service plan.
Create an app with the specified name.
Zip deploy files from the current working directory to the web app.
Step 1: Create a project directory and then navigate to it
mkdir htmlapp
cd htmlapp
Step 2: Clone sample app repository
Run the following git command to clone the sample app repository to your htmlapp directory.
git clone https://github.com/Azure-Samples/html-docs-hello-world.git
Step 3: Create variables to hold the resource group and app names
Below query fetches the resource group name and assigns it to the resourceGroup variable
resourceGroup=$(az group list --query "[].{id:name}" -o tsv)

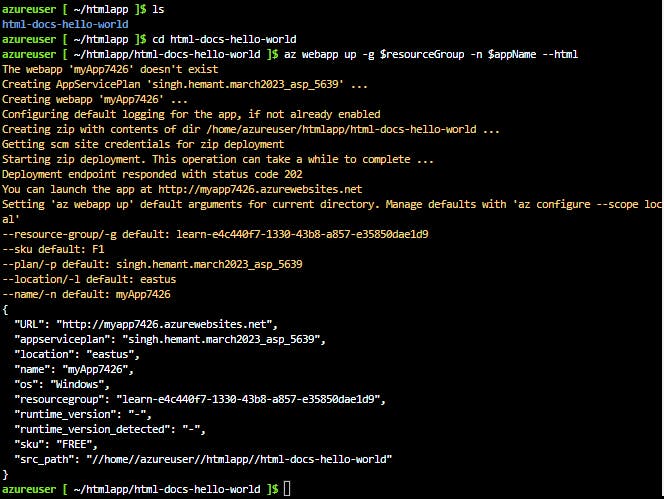
Step 4: Run the web app
Change to the directory that contains the sample code and run the az webapp up command. The --html means ignore app detection and deploy as an html app.
cd html-docs-hello-world
az webapp up -g $resourceGroup -n $appName --html
Step 5: Open the web app in browser
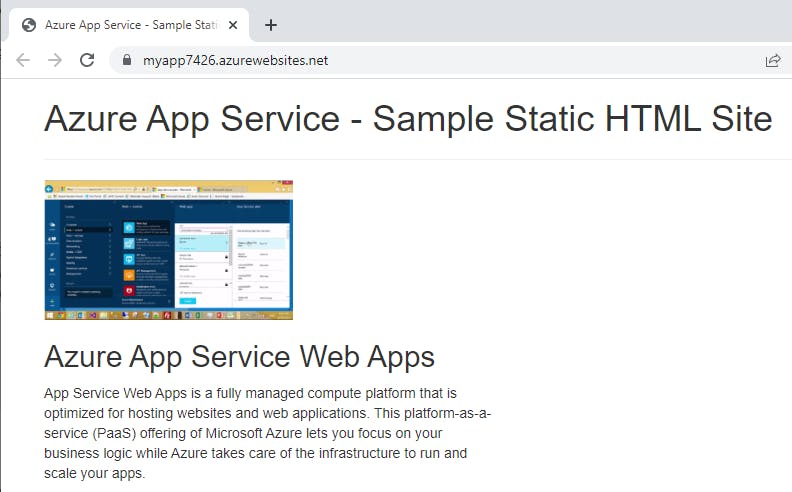
Open a new tab in your browser and navigate to the app URL (https://<myAppName>.azurewebsites.net) and verify the app is running - take note of the title at the top of the page. Leave the browser open on the app for the next section.
Step 6: Update html code and redeploy
In the Cloud Shell, type code index.html to open the editor. In the <h1> heading tag, change Azure App Service - Sample Static HTML Site to Azure App Service Updated - or to anything else that you'd like.
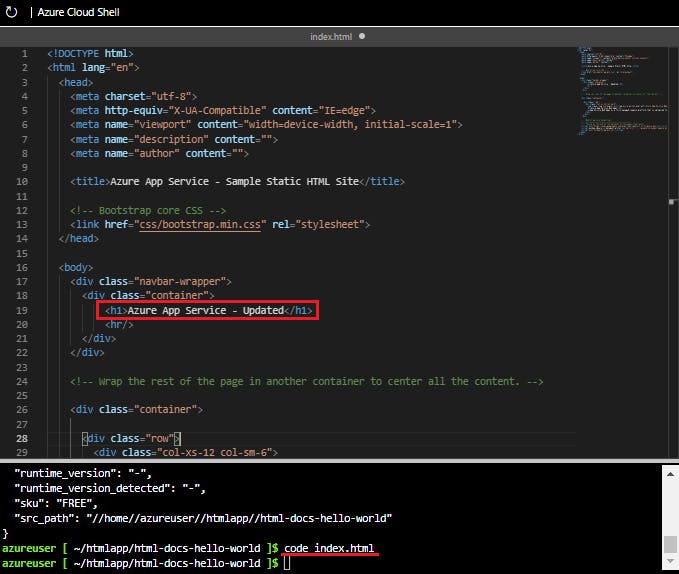
Use the commands ctrl-s to save and ctrl-q to exit.
Redeploy the app with the same az webapp up command you used earlier.
az webapp up -g $resourceGroup -n $appName --html
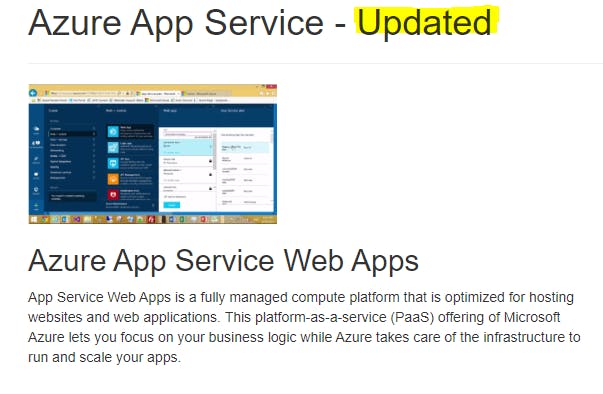
Refresh your browser to see the changed title
Step 7: Clean up resources
When no longer needed, you can use the below command to remove the resource group, the container registry, and the container images stored there.
az group delete --name demo-rg

Configure application settings
In App Service, app settings are passed as environment variables to the application code.
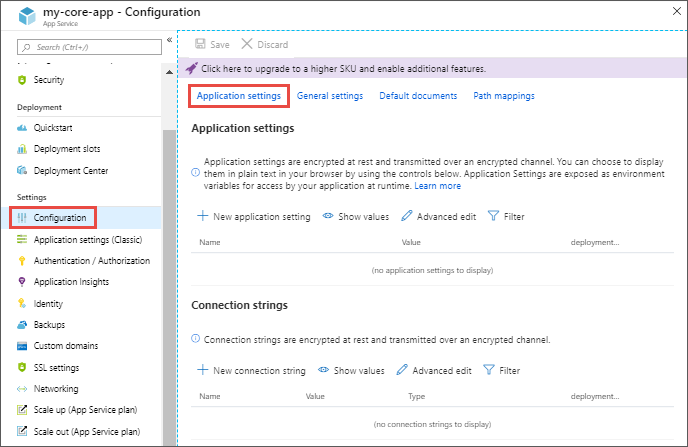
Application settings can be accessed by navigating to your app's management page and selecting Configuration > Application Settings.
For ASP.NET and ASP.NET Core developers, setting app settings in App Service are like setting them in <appSettings> in Web.config or appsettings.json, but the values in App Service override the ones in Web.config or appsettings.json.
App settings are always encrypted when stored (encrypted-at-rest).
Adding and editing settings
To add a new setting, click New application setting
To add or edit app settings in bulk, click the Advanced edit button
App settings have the following JSON formatting:
[
  {
    "name": "<key-1>",
    "value": "<value-1>",
    "slotSetting": false
  },
  {
    "name": "<key-2>",
    "value": "<value-2>",
    "slotSetting": false
  },
  ...
]
Configure connection strings
Adding and editing connection strings follow the same principles as other app settings and they can also be tied to deployment slots.
For ASP.NET and ASP.NET Core developers, the values you set in App Service override the ones in Web.config. For other language stacks, it's better to use app settings instead, because connection strings require special formatting in the variable keys in order to access the values.
There is one case where you may want to use connection strings instead of app settings for non-.NET languages: certain Azure database types are backed up along with the app only if you configure a connection string for the database in your App Service app.
Below is an example of connection strings in JSON formatting that you would use for bulk adding or editing.
[
  {
    "name": "name-1",
    "value": "conn-string-1",
    "type": "SQLServer",
    "slotSetting": false
  },
  {
    "name": "name-2",
    "value": "conn-string-2",
    "type": "PostgreSQL",
    "slotSetting": false
  },
  ...
]
Configure general settings
In the Configuration > General settings section you can configure some common settings for your app. Some settings require you to scale up to higher pricing tiers.
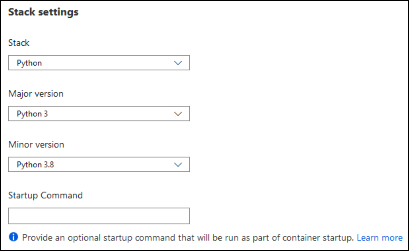
Stack settings
The software stack to run the app, including the language and SDK versions. For Linux apps and custom container apps, you can also set an optional start-up command or file.
Platform settings
Configure settings for the hosting platform:
Bitness: 32-bit or 64-bit.
WebSocket protocol: For ASP.NET SignalR or socket.io, for example.
Always On: Keep the app loaded even when there's no traffic. By default, Always On isn't enabled and the app is unloaded after 20 minutes without any incoming requests. It's required for continuous WebJobs or for WebJobs that are triggered using a CRON expression.
Managed pipeline version: The IIS pipeline mode. Set it to Classic if you have a legacy app that requires an older version of IIS.
HTTP version: Set to 2.0 to enable support for HTTPS/2 protocol.
ARR affinity: In a multi-instance deployment, ensure that the client is routed to the same instance for the life of the session. You can set this option to Off for stateless applications.
Debugging
Enable remote debugging for ASP.NET, ASP.NET Core, or Node.js apps. This option turns off automatically after 48 hours.
Incoming client certificates
Require client certificates in mutual authentication. TLS mutual authentication is used to restrict access to your app by enabling different types of authentication for it.
Configure path mappings
In the Configuration > Path mappings section you can configure handler mappings, and virtual application and directory mappings. The Path mappings page will display different options based on the OS type.
Windows apps (uncontainerized)
For Windows apps, you can customize the IIS handler mappings and virtual applications and directories.
Handler mappings let you add custom script processors to handle requests for specific file extensions. To add a custom handler, select New handler. Configure the handler as follows:
Extension: The file extension you want to handle, such as *.php or handler.fcgi.
Script processor: The absolute path of the script processor. Requests to files that match the file extension are processed by the script processor. Use the path
D:\home\site\wwwrootto refer to your app's root directory.Arguments: Optional command-line arguments for the script processor.
Each app has the default root path (/) mapped to D:\home\site\wwwroot, where your code is deployed by default. If your app root is in a different folder, or if your repository has more than one application, you can edit or add virtual applications and directories.
You can configure virtual applications and directories by specifying each virtual directory and its corresponding physical path relative to the website root (D:\home). To mark a virtual directory as a web application, clear the Directory check box.
Linux and containerized apps
You can add custom storage for your containerized app. Containerized apps include all Linux apps and also the Windows and Linux custom containers running on App Service. Click New Azure Storage Mount and configure your custom storage as follows:
Name: The display name.
Configuration options: Basic or Advanced.
Storage accounts: The storage account with the container you want.
Storage type: Azure Blobs or Azure Files. Windows container apps only support Azure Files.
Storage container: For basic configuration, the container you want.
Share name: For advanced configuration, the file share name.
Access key: For advanced configuration, the access key.
Mount path: The absolute path in your container to mount the custom storage.
Enable diagnostic logging in Web Apps
The table below shows the types of logging, the platforms supported, and where the logs can be stored and located for accessing the information.
| Type | Platform | Location | Description |
| Application logging | Windows, Linux | App Service file system and/or Azure Storage blobs | Logs messages generated by your application code. The messages can be generated by the web framework you choose, or from your application code directly using the standard logging pattern of your language. Each message is assigned one of the following categories: Critical, Error, Warning, Info, Debug, and Trace. |
| Web server logging | Windows | App Service file system or Azure Storage blobs | Raw HTTP request data in the W3C extended log file format. Each log message includes data like the HTTP method, resource URI, client IP, client port, user agent, response code, and so on. |
| Detailed error logging | Windows | App Service file system | Copies of the .html error pages that would have been sent to the client browser. For security reasons, detailed error pages shouldn't be sent to clients in production, but App Service can save the error page each time an application error occurs that has HTTP code 400 or greater. |
| Failed request tracing | Windows | App Service file system | Detailed tracing information on failed requests, including a trace of the IIS components used to process the request and the time taken in each component. One folder is generated for each failed request, which contains the XML log file, and the XSL stylesheet to view the log file with. |
| Deployment logging | Windows, Linux | App Service file system | Helps determine why a deployment failed. Deployment logging happens automatically and there are no configurable settings for deployment logging. |
Enable application logging (Windows)
To enable application logging for Windows apps in the Azure portal, navigate to your app and select App Service logs.
Select On for either Application Logging (Filesystem) or Application Logging (Blob), or both. The Filesystem option is for temporary debugging purposes, and turns itself off in 12 hours. The Blob option is for long-term logging, and needs a blob storage container to write logs to.
You can also set the Level of details included in the log as shown in the table below.
| Level | Included categories | | --- | --- | | Disabled | None | | Error | Error, Critical | | Warning | Warning, Error, Critical | | Information | Info, Warning, Error, Critical | | Verbose | Trace, Debug, Info, Warning, Error, Critical (all categories) |
When finished, select Save.
Enable application logging (Linux/Container)
In App Service logs set the Application logging option to File System.
In Quota (MB), specify the disk quota for the application logs. In Retention Period (Days), set the number of days the logs should be retained.
When finished, select Save.
Enable web server logging
For Web server logging, select Storage to store logs on blob storage, or File System to store logs on the App Service file system.
In Retention Period (Days), set the number of days the logs should be retained.
When finished, select Save.
Add log messages in code
In your application code, you use the usual logging facilities to send log messages to the application logs. For example:
ASP.NET applications can use the
System.Diagnostics.Traceclass to log information to the application diagnostics log. For example:System.Diagnostics.Trace.TraceError("If you're seeing this, something bad happened");By default, ASP.NET Core uses the
Microsoft.Extensions.Logging.AzureAppServiceslogging provider.
Stream logs
Before you stream logs in real time, enable the log type that you want. Any information written to files ending in .txt, .log, or .htm that are stored in the /LogFiles directory (d:/home/logfiles) is streamed by App Service.
Azure portal - To stream logs in the Azure portal, navigate to your app and select Log stream.
Azure CLI - To stream logs live in Cloud Shell, use the following command:
az webapp log tail --name appname --resource-group myResourceGroupLocal console - To stream logs in the local console, install Azure CLI and sign in to your account. Once signed in, follow the instructions for Azure CLI above.
Access log files
If you configure the Azure Storage blobs option for a log type, you need a client tool that works with Azure Storage.
For logs stored in the App Service file system, the easiest way is to download the ZIP file in the browser at:
Linux/container apps:
https://<app-name>.scm.azurewebsites.net/api/logs/docker/zipWindows apps:
https://<app-name>.scm.azurewebsites.net/api/dump
For Linux/container apps, the ZIP file contains console output logs for both the docker host and the docker container. For a scaled-out app, the ZIP file contains one set of logs for each instance. In the App Service file system, these log files are the contents of the /home/LogFiles directory.
Configure security certificates
You've been asked to help secure information being transmitted between your companies app and the customer. Azure App Service has tools that let you create, upload, or import a private certificate or a public certificate into App Service.
A certificate uploaded into an app is stored in a deployment unit that is bound to the app service plan's resource group and region combination (internally called a webspace). This makes the certificate accessible to other apps in the same resource group and region combination.
The table below details the options you have for adding certificates in App Service:
| Option | Description |
| Create a free App Service managed certificate | A private certificate that's free of charge and easy to use if you just need to secure your custom domain in App Service. |
| Purchase an App Service certificate | A private certificate that's managed by Azure. It combines the simplicity of automated certificate management and the flexibility of renewal and export options. |
| Import a certificate from Key Vault | Useful if you use Azure Key Vault to manage your certificates. |
| Upload a private certificate | If you already have a private certificate from a third-party provider, you can upload it. |
| Upload a public certificate | Public certificates aren't used to secure custom domains, but you can load them into your code if you need them to access remote resources. |
Private certificate requirements
The free App Service managed certificate and the App Service certificate already satisfy the requirements of App Service. If you want to use a private certificate in App Service, your certificate must meet the following requirements:
Exported as a password-protected PFX file, encrypted using triple DES.
Contains private key at least 2048 bits long
Contains all intermediate certificates in the certificate chain
To secure a custom domain in a TLS binding, the certificate has other requirements:
Contains an Extended Key Usage for server authentication (OID = 1.3.6.1.5.5.7.3.1)
Signed by a trusted certificate authority
Creating a free managed certificate
To create custom TLS/SSL bindings or enable client certificates for your App Service app, your App Service plan must be in the Basic, Standard, Premium, or Isolated tier.
The free App Service managed certificate is a turn-key solution for securing your custom DNS name in App Service. It's a TLS/SSL server certificate that's fully managed by App Service and renewed continuously and automatically in six-month increments, 45 days before expiration. You create the certificate and bind it to a custom domain, and let App Service do the rest.
The free certificate comes with the following limitations:
Doesn't support wildcard certificates.
Doesn't support usage as a client certificate by certificate thumbprint.
Isn't exportable.
Isn't supported on App Service Environment (ASE).
Isn't supported with root domains that are integrated with Traffic Manager.
If a certificate is for a CNAME-mapped domain, the CNAME must be mapped directly to
<app-name>.azurewebsites.net.
Import an App Service Certificate
If you purchase an App Service Certificate from Azure, Azure manages the following tasks:
Takes care of the purchase process from certificate provider.
Performs domain verification of the certificate.
Maintains the certificate in Azure Key Vault.
Manages certificate renewal.
Synchronize the certificate automatically with the imported copies in App Service apps.
If you already have a working App Service certificate, you can:
Import the certificate into App Service.
Manage the certificate, such as renew, rekey, and export it.
Upload a private certificate
If your certificate authority gives you multiple certificates in the certificate chain, you need to merge the certificates in order. Then you can Export your merged TLS/SSL certificate with the private key that your certificate request was generated with.
If you generated your certificate request using OpenSSL, then you've created a private key file. To export your certificate to PFX, run the following command. Replace the placeholders <private-key-file> and <merged-certificate-file> with the paths to your private key and your merged certificate file.
openssl pkcs12 -export -out myserver.pfx -inkey <private-key-file> -in <merged-certificate-file>
When prompted, define an export password. You'll use this password when uploading your TLS/SSL certificate to App Service.
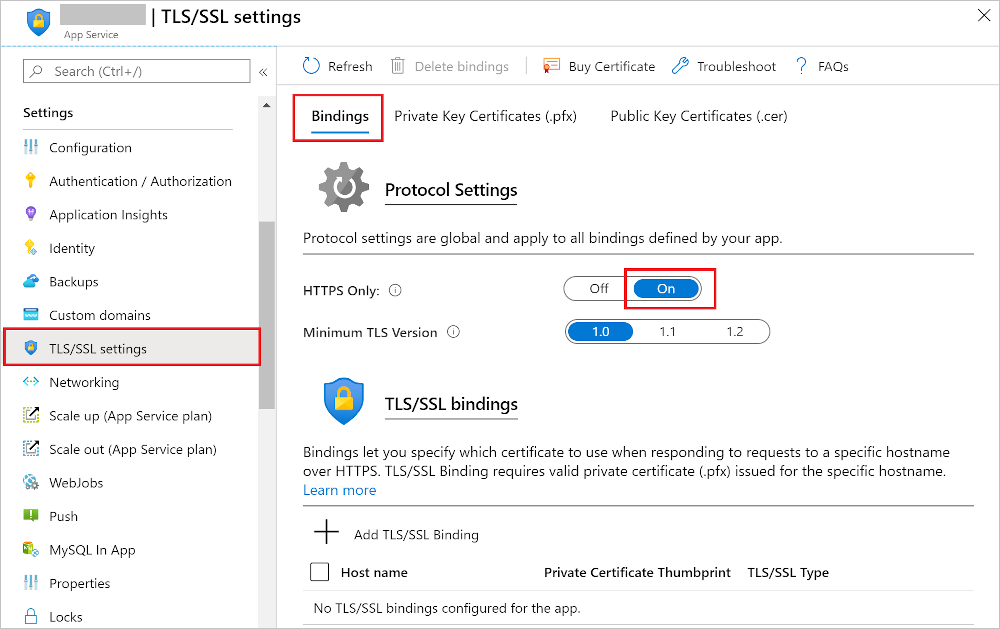
Enforce HTTPS
By default, anyone can still access your app using HTTP. You can redirect all HTTP requests to the HTTPS port by navigating to your app page and, in the left navigation, select TLS/SSL settings. Then, in HTTPS Only, select On.
Manage app features
Feature management is a modern software-development practice that decouples feature release from code deployment and enables quick changes to feature availability on demand. It uses a technique called feature flags (also known as feature toggles, feature switches, and so on) to dynamically administer a feature's lifecycle.
Basic concepts
Here are several new terms related to feature management:
Feature flag: A feature flag is a variable with a binary state of on or off. The feature flag also has an associated code block. The state of the feature flag triggers whether the code block runs or not.
Feature manager: A feature manager is an application package that handles the lifecycle of all the feature flags in an application. The feature manager typically provides additional functionality, such as caching feature flags and updating their states.
Filter: A filter is a rule for evaluating the state of a feature flag. A user group, a device or browser type, a geographic location, and a time window are all examples of what a filter can represent.
An effective implementation of feature management consists of at least two components working in concert:
An application that makes use of feature flags.
A separate repository that stores the feature flags and their current states.
How these components interact is illustrated in the following examples.
Feature flag usage in code
The basic pattern for implementing feature flags in an application is simple. You can think of a feature flag as a Boolean state variable used with an if conditional statement in your code:
if (featureFlag) {
    // Run the following code
}
In this case, if featureFlag is set to True, the enclosed code block is executed; otherwise, it's skipped. You can set the value of featureFlag statically, as in the following code example:
bool featureFlag = true;
You can also evaluate the flag's state based on certain rules:
bool featureFlag = isBetaUser();
A slightly more complicated feature flag pattern includes an else statement as well:
if (featureFlag) {
    // This following code will run if the featureFlag value is true
} else {
    // This following code will run if the featureFlag value is false
}
Feature flag declaration
Each feature flag has two parts: a name and a list of one or more filters that are used to evaluate if a feature's state is on (that is, when its value is True). A filter defines a use case for when a feature should be turned on.
When a feature flag has multiple filters, the filter list is traversed in order until one of the filters determines the feature should be enabled. At that point, the feature flag is on, and any remaining filter results are skipped. If no filter indicates the feature should be enabled, the feature flag is off.
The feature manager supports appsettings.json as a configuration source for feature flags. The following example shows how to set up feature flags in a JSON file:
"FeatureManagement": {
    "FeatureA": true, // Feature flag set to on
    "FeatureB": false, // Feature flag set to off
    "FeatureC": {
        "EnabledFor": [
            {
                "Name": "Percentage",
                "Parameters": {
                    "Value": 50
                }
            }
        ]
    }
}
Feature flag repository
To use feature flags effectively, you need to externalize all the feature flags used in an application. This approach allows you to change feature flag states without modifying and redeploying the application itself.
Azure App Configuration is designed to be a centralized repository for feature flags. You can use it to define different kinds of feature flags and manipulate their states quickly and confidently. You can then use the App Configuration libraries for various programming language frameworks to easily access these feature flags from your application.
Autoscaling
What is autoscaling?
It is a cloud system or process that adjusts available resources based on the current demand. Autoscaling can be triggered according to a schedule, or by assessing whether the system is running short on resources.
Autoscaling performs scaling in and out, as opposed to scaling up and down. It doesn't have any effect on the CPU power, memory, or storage capacity of the web servers powering the app, it only changes the number of web servers.
Azure App Service Autoscaling
Autoscaling monitors the resource metrics of a web app as it runs. It detects situations where additional resources are required to handle an increasing workload, and ensures those resources are available before the system becomes overloaded.
When should you consider autoscaling?
Autoscaling provides elasticity for your services: It's a suitable solution when hosting any application when you can't easily predict the workload in advance, or when the workload is likely to vary by date or time.
It improves availability and fault tolerance: It can help ensure that client requests to a service won't be denied because an instance is either not able to acknowledge the request in a timely manner, or because an overloaded instance has crashed.
It works by adding or removing web serves: If your web apps perform resource-intensive processing as part of each request, then autoscaling might not be an effective approach. In these situations, manually scaling up may be necessary. For example, if a request sent to a web app involves performing complex processing over a large dataset, depending on the instance size, this single request could exhaust the processing and memory capacity of the instance.
It isn't the best approach to handling long-term growth: You might have a web app that starts with a small number of users, but increases in popularity over time. Autoscaling has an overhead associated with monitoring resources and determining whether to trigger a scaling event. In this scenario, if you can anticipate the rate of growth, manually scaling the system over time may be a more cost effective approach.
The number of instances of a service is also a factor: You might expect to run only a few instances of a service most of the time. However, in this situation, your service will always be susceptible to downtime or lack of availability whether autoscaling is enabled or not. The fewer the number of instances initially, the less capacity you have to handle an increasing workload while autoscaling spins up additional instances.
Autoscale factors
You can configure autoscaling to detect when to scale in and out according to a combination of factors, based on resource usage. You can also configure autoscaling to occur according to a schedule.
Autoscaling and the App Service Plan
Autoscaling is a feature of the App Service Plan used by the web app. When the web app scales out, Azure starts new instances of the hardware defined by the App Service Plan to the app.
To prevent runaway autoscaling, an App Service Plan has an instance limit. Plans in more expensive pricing tiers have a higher limit. Autoscaling cannot create more instances than this limit.
Autoscale conditions
Azure provides two options for autoscaling:
Scale based on a metric, such as the length of the disk queue, or the number of HTTP requests awaiting processing.
Scale to a specific instance count according to a schedule. For example, you can arrange to scale out at a particular time of day, or on a specific date or day of the week. You also specify an end date, and the system will scale back in at this time.
If you need to scale out incrementally, you can combine metric and schedule-based autoscaling in the same autoscale condition. So, you could arrange for the system to scale out if the number of HTTP requests exceeds some threshold, but only between certain hours of the day.
You can create multiple autoscale conditions to handle different schedules and metrics. Azure will autoscale your service when any of these conditions apply. An App Service Plan also has a default condition that will be used if none of the other conditions are applicable. This condition is always active and doesn't have a schedule.
Metrics for autoscale rules
An autoscale rule specifies a metric to monitor, and how autoscaling should respond when this metric crosses a defined threshold. The metrics you can monitor for a web app are:
CPU Percentage. This metric is an indication of the CPU utilization across all instances. A high value shows that instances are becoming CPU-bound, which could cause delays in processing client requests.
Memory Percentage. This metric captures the memory occupancy of the application across all instances. A high value indicates that free memory could be running low, and could cause one or more instances to fail.
Disk Queue Length. This metric is a measure of the number of outstanding I/O requests across all instances. A high value means that disk contention could be occurring.
Http Queue Length. This metric shows how many client requests are waiting for processing by the web app. If this number is large, client requests might fail with HTTP 408 (Timeout) errors.
Data In. This metric is the number of bytes received across all instances.
Data Out. This metric is the number of bytes sent by all instances.
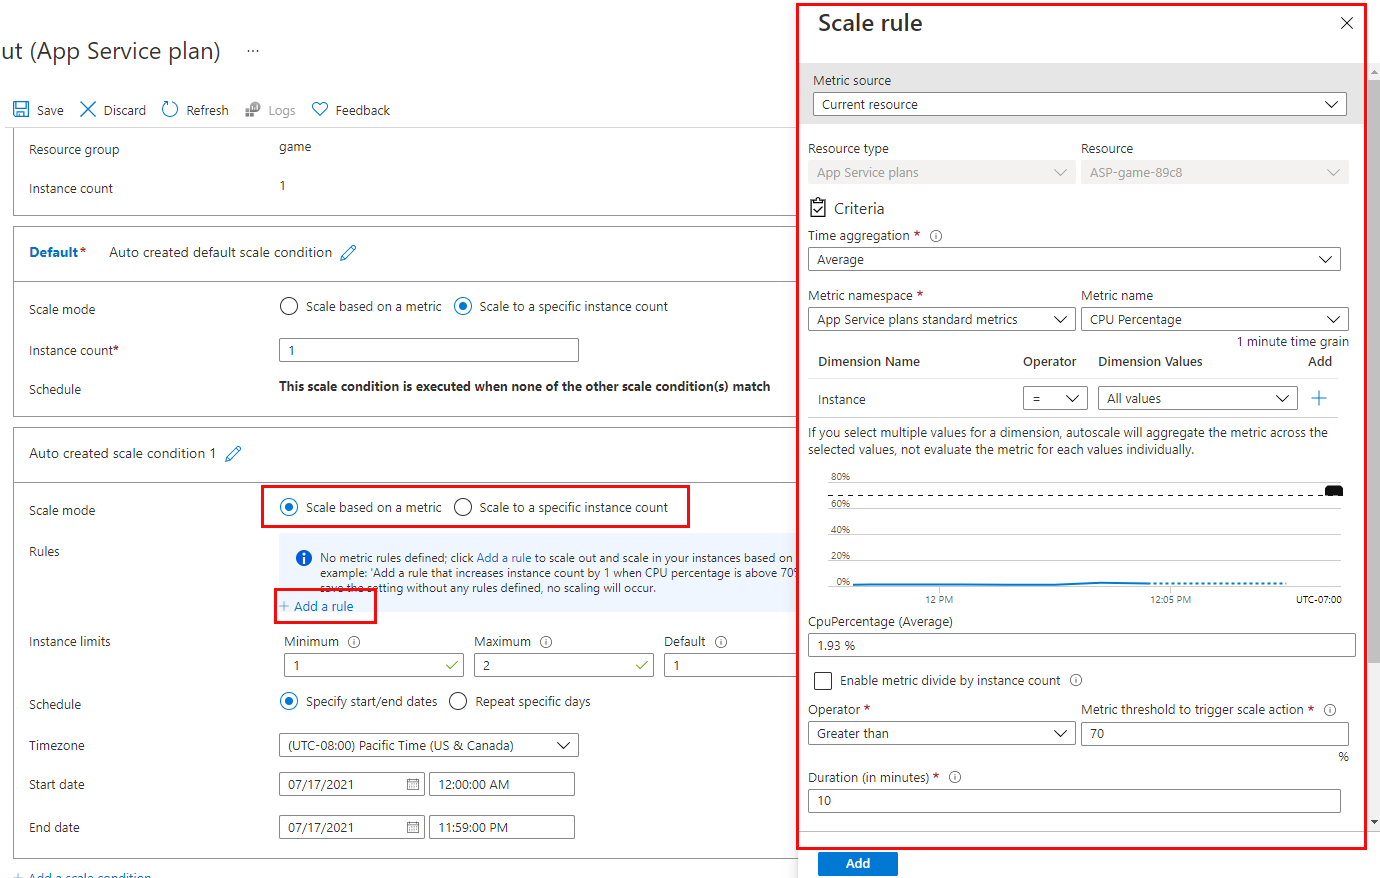
How an autoscale rule analyzes metrics
In the first step, an autoscale rule aggregates the values retrieved for a metric for all instances across a period of time known as the time grain. Each metric has its own intrinsic time grain, but in most cases this period is 1 minute. The aggregated value is known as the time aggregation. The options available are Average, Minimum, Maximum, Sum, Last, and Count.
An interval of one minute is a very short interval in which to determine whether any change in metric is long-lasting enough to make autoscaling worthwhile. So, an autoscale rule performs a second step that performs a further aggregation of the value calculated by the time aggregation over a longer, user-specified period, known as the Duration. The minimum Duration is 5 minutes. If the Duration is set to 10 minutes for example, the autoscale rule will aggregate the 10 values calculated for the time grain.
The aggregation calculation for the Duration can be different from that of the time grain. For example, if the time aggregation is Average and the statistic gathered is CPU Percentage across a one-minute time grain, each minute the average CPU percentage utilization across all instances for that minute will be calculated. If the time grain statistic is set to Maximum, and the Duration of the rule is set to 10 minutes, the maximum of the 10 average values for the CPU percentage utilization will be used to determine whether the rule threshold has been crossed.
Autoscale actions
When an autoscale rule detects that a metric has crossed a threshold, it can perform an autoscale action. An autoscale action can be scale-out or scale-in. An autoscale action uses an operator (such as less than, greater than, equal to, and so on) to determine how to react to the threshold. Scale-out actions typically use the greater than operator to compare the metric value to the threshold. Scale-in actions tend to compare the metric value to the threshold with the less than operator.
An autoscale action has a cool down period, specified in minutes. During this interval, the scale rule won't be triggered again. This is to allow the system to stabilize between autoscale events. The minimum cool down period is five minutes.
Combining autoscale rules
A single autoscale condition can contain several autoscale rules (for example, a scale-out rule and the corresponding scale-in rule). However, the autoscale rules in an autoscale condition don't have to be directly related. You could define the following four rules in the same autoscale condition:
If the HTTP queue length exceeds 10, scale out by 1
If the CPU utilization exceeds 70%, scale out by 1
If the HTTP queue length is zero, scale in by 1
If the CPU utilization drops below 50%, scale in by 1
When determining whether to scale out, the autoscale action will be performed if any of the scale-out rules are met (HTTP queue length exceeds 10 or CPU utilization exceeds 70%). When scaling in, the autoscale action will run only if all of the scale-in rules are met (HTTP queue length drops to zero and CPU utilization falls below 50%). If you need to scale in if only one of the scale-in rules are met, you must define the rules in separate autoscale conditions.
Enable Autoscale in App Service
Enable autoscaling
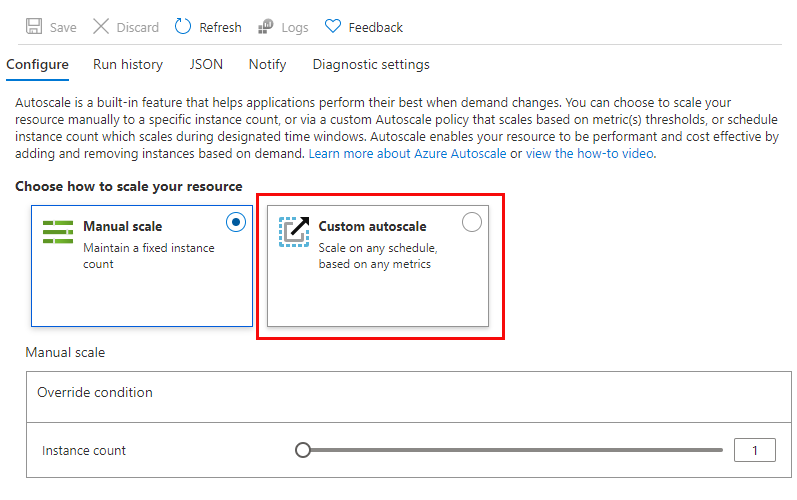
To get started with autoscaling, navigate to your App Service plan in the Azure portal and select Scale out (App Service plan) in the Settings group in the left navigation pane.
By default, an App Service Plan only implements manual scaling. Selecting Custom autoscale reveals condition groups you can use to manage your scale settings.
Add scale conditions
Once you enable autoscaling, you can edit the automatically created default scale condition, and you can add your own custom scale conditions.
The Default scale condition is executed when none of the other scale conditions are active.
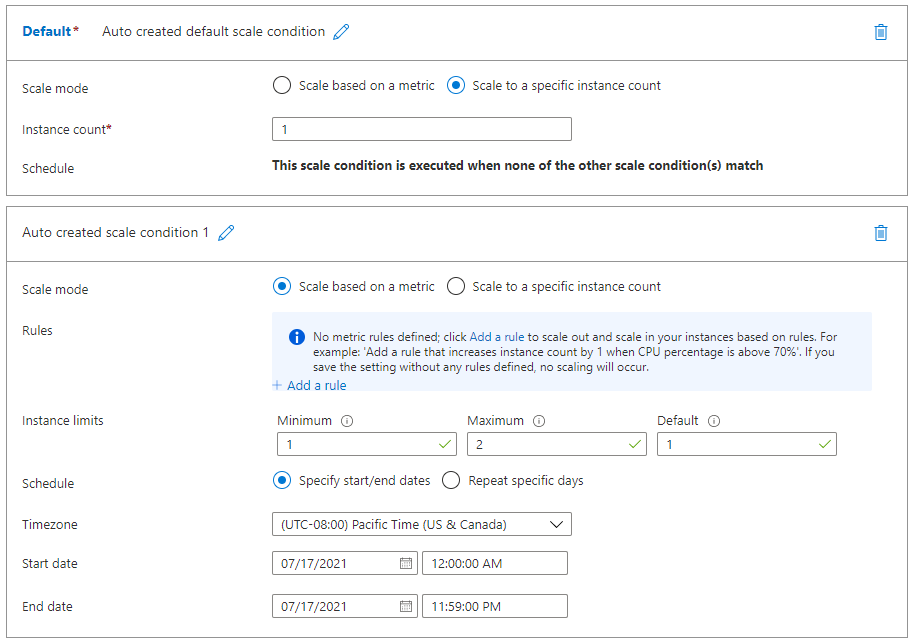
Each scale condition can either scale based on a metric, or scale to a specific instance count. A metric-based scale condition can also specify the minimum and maximum number of instances to create.
Create scale rules
A metric-based scale condition contains one or more scale rules. You use the Add a rule link to add your own custom rules
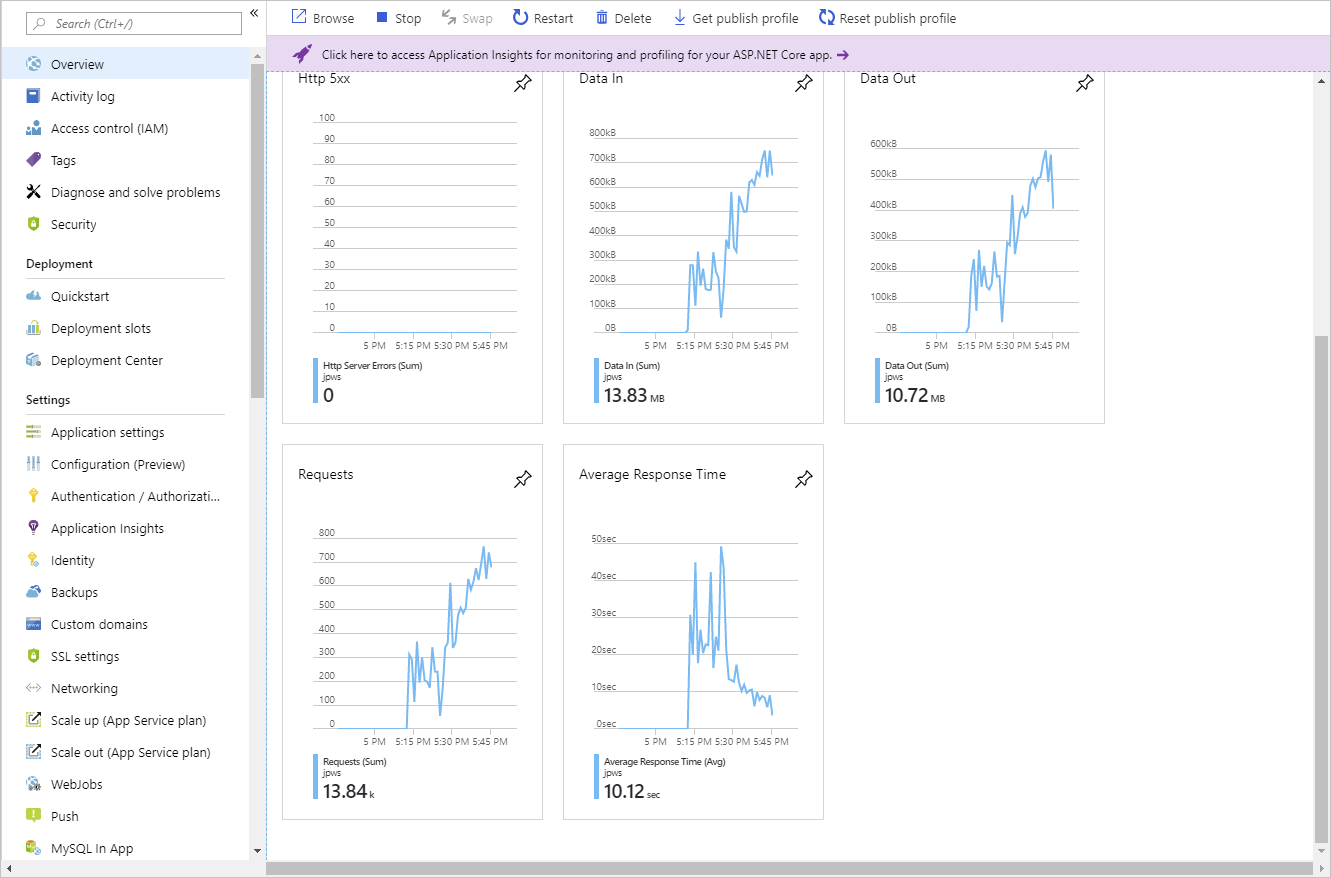
Monitor autoscaling activity
The Azure portal enables you to track when autoscaling has occurred through the Run history chart. This chart shows how the number of instances varies over time, and which autoscale conditions caused each change.

You can use the Run history chart in conjunction with the metrics shown on the Overview page to correlate the autoscaling events with resource utilization.
Autoscale best practices
Ensure the maximum and minimum values are different and have an adequate margin between them
Choose the appropriate statistic for your diagnostic metric: For diagnostics metrics, you can choose among Average, Minimum, Maximum and Total as a metric to scale by. The most common statistic is Average.
Choose the thresholds carefully for all metric types: Carefully choose different thresholds for scale out and scale-in based on practical situations. If you give the same threshold for scale out and scale-in, thenAzure performs Estimation during a scale-in to avoid "flapping" situations, where scale-in and scale out actions continually go back and forth. Keep this behavior in mind when you choose the same thresholds for scale out and in. Example of flapping, consider the following rule combination:
Increase instances by one count when Thread Count >= 600
Decrease instances by one count when Thread Count <= 600Assume there are two instances to begin with and then the average number of threads per instance grows to 625. Autoscale scales out adding a third instance.
Next, assume that the average thread count across instance falls to 575.
Before scaling in, autoscale tries to estimate what the final state will be if it scaled in. For example, 575 x 3 (current instance count) = 1,725 / 2 (final number of instances when scaled in) = 862.5 threads. This means autoscale would have to immediately scale out again even after it scaled in, if the average thread count remains the same or even falls only a small amount. However, if it scaled out again, the whole process would repeat, leading to an infinite loop.
It is recommended to choose an adequate margin between the scale out and in thresholds. As an example, consider the following better rule combination.
Increase instances by 1 count when CPU% >= 80
Decrease instances by 1 count when CPU% <= 60
Assume there are 2 instances to start with.
If the average CPU% across instances goes to 80, autoscale scales out adding a third instance.
Now assume that over time the CPU% falls to 60.
Autoscale's scale-in rule estimates the final state if it were to scale-in. For example, 60 x 3 (current instance count) = 180 / 2 (final number of instances when scaled in) = 90. So autoscale doesn't scale-in because it would have to scale out again immediately. Instead, it skips scaling in.
The next time autoscale checks, the CPU continues to fall to 50. It estimates again - 50 x 3 instance = 150 / 2 instances = 75, which is below the scale out threshold of 80, so it scales in successfully to 2 instances.
Considerations for scaling when multiple rules are configured in a profile: On scale out, autoscale runs if any rule is met. On scale-in, autoscale require all rules to be met. Assume that you have the following four autoscale rules:
If CPU < 30 %, scale-in by 1
If Memory < 50%, scale-in by 1
If CPU > 75%, scale out by 1
If Memory > 75%, scale out by 1
Then the following occurs:
If CPU is 76% and Memory is 50%, we scale out.
If CPU is 50% and Memory is 76% we scale out.
On the other hand, if CPU is 25% and memory is 51% autoscale doesn't scale-in. An automatic scale-in would occur if the CPU is 29% and the Memory is 49% since both of the scale-in rules would be true.
Always select a safe default instance count: The default instance count is important because autoscale scales your service to that count when metrics aren't available.
Configure autoscale notifications: Autoscale will post to the Activity Log if any of the following conditions occur:
Autoscale issues a scale operation
Autoscale service successfully completes a scale action
Autoscale service fails to take a scale action.
Metrics aren't available for autoscale service to make a scale decision.
Metrics are available (recovery) again to make a scale decision.
You can also use an Activity Log alert to monitor the health of the autoscale engine. In addition to using activity log alerts, you can also configure email or webhook notifications to get notified for successful scale actions via the notifications tab on the autoscale setting.
Azure App Service deployment slots
The deployment slot functionality in App Service is a powerful tool that enables you to preview, manage, test, and deploy your different development environments.
Staging environments
When you deploy your web app, you can use a separate deployment slot instead of the default production slot when you're running in the Standard, Premium, or Isolated App Service plan tier. Deployment slots are live apps with their own host names. App content and configurations elements can be swapped between two deployment slots, including the production slot.
Deploying your application to a non-production slot has the following benefits:
You can validate app changes in a staging deployment slot before swapping it with the production slot.
Deploying an app to a slot first and swapping it into production makes sure that all instances of the slot are warmed up before being swapped into production. This eliminates downtime when you deploy your app.
After a swap, the slot with previously staged app now has the previous production app. If the changes swapped into the production slot aren't as you expect, you can perform the same swap immediately to get your "last known good site" back.
Each App Service plan tier supports a different number of deployment slots. To scale your app to a different tier, make sure that the target tier supports the number of slots your app already uses. For example, if your app has more than five slots, you can't scale it down to the Standard tier, because the Standard tier supports only five deployment slots.
Slot swapping
When you swap slots, App Service does the following to ensure that the target slot doesn't experience downtime:
Apply the following settings from the target slot (for example, the production slot) to all instances of the source slot:
Slot-specific app settings and connection strings, if applicable.
Continuous deployment settings, if enabled.
App Service authentication settings, if enabled.
Any of these cases trigger all instances in the source slot to restart. During swap with preview, this marks the end of the first phase. The swap operation is paused, and you can validate that the source slot works correctly with the target slot's settings.
Wait for every instance in the source slot to complete its restart. If any instance fails to restart, the swap operation reverts all changes to the source slot and stops the operation.
If local cache is enabled, trigger local cache initialization by making an HTTP request to the application root ("/") on each instance of the source slot. Wait until each instance returns any HTTP response. Local cache initialization causes another restart on each instance.
If auto swap is enabled with custom warm-up, trigger Application Initiation by making an HTTP request to the application root ("/") on each instance of the source slot.
If
applicationInitializationisn't specified, trigger an HTTP request to the application root of the source slot on each instance.If an instance returns any HTTP response, it's considered to be warmed up.
If all instances on the source slot are warmed up successfully, swap the two slots by switching the routing rules for the two slots. After this step, the target slot (for example, the production slot) has the app that's previously warmed up in the source slot.
Now that the source slot has the pre-swap app previously in the target slot, perform the same operation by applying all settings and restarting the instances.
At any point of the swap operation, all work of initializing the swapped apps happens on the source slot. The target slot remains online while the source slot is being prepared and warmed up.
When you clone configuration from another deployment slot, the cloned configuration is editable. Some configuration elements follow the content across a swap (not slot specific), whereas other configuration elements stay in the same slot after a swap (slot specific). The following table shows the settings that change when you swap slots.
Settings that are swapped | Settings that aren't swapped |
|---|---|
General settings, such as framework version, 32/64-bit, web sockets | Publishing endpoints |
App settings (can be configured to stick to a slot) | Custom domain names |
Connection strings (can be configured to stick to a slot) | Non-public certificates and TLS/SSL settings |
Handler mappings | Scale settings |
Public certificates | WebJobs schedulers |
WebJobs content | IP restrictions |
Hybrid connections | Always On |
Virtual network integration | Diagnostic log settings |
Service endpoints | Cross-origin resource sharing (CORS) |
Azure Content Delivery Network |
Features marked with an asterisk (*) are planned to be unswapped. To make settings swappable, add the app setting WEBSITE_OVERRIDE_PRESERVE_DEFAULT_STICKY_SLOT_SETTINGS in every slot of the app and set its value to 0 or false. These settings are either all swappable or not at all. You can't make just some settings swappable and not the others. Managed identities are never swapped and are not affected by this override app setting.
To configure an app setting or connection string to stick to a specific slot (not swapped), go to the Configuration page for that slot. Add or edit a setting, and then select Deployment slot setting. Selecting this check box tells App Service that the setting is not swappable.
Swap deployment slots
Manually swapping deployment slots
To swap deployment slots:
Go to your app's Deployment slots page and select Swap. The Swap dialog box shows settings in the selected source and target slots that will be changed.
Select the desired Source and Target slots. Usually, the target is the production slot. Also, select the Source Changes and Target Changes tabs and verify that the configuration changes are expected. When you're finished, you can swap the slots immediately by selecting Swap.
To see how your target slot would run with the new settings before the swap actually happens, don't select Swap, but follow the instructions in Swap with preview below.
When you're finished, close the dialog box by selecting Close.
Swap with preview (multi-phase swap)
Before you swap into production as the target slot, validate that the app runs with the swapped settings. The source slot is also warmed up before the swap completion, which is desirable for mission-critical applications.
When you perform a swap with preview, App Service performs the same swap operation but pauses after the first step. You can then verify the result on the staging slot before completing the swap.
If you cancel the swap, App Service reapplies configuration elements to the source slot.
To swap with preview:
Follow the steps above in Swap deployment slots but select Perform swap with preview. The dialog box shows you how the configuration in the source slot changes in phase 1, and how the source and target slot change in phase 2.
When you're ready to start the swap, select Start Swap.
When phase 1 finishes, you're notified in the dialog box. Preview the swap in the source slot by going to
https://<app_name>-<source-slot-name>.azurewebsites.net.When you're ready to complete the pending swap, select Complete Swap in Swap action and select Complete Swap.
To cancel a pending swap, select Cancel Swap instead.
When you're finished, close the dialog box by selecting Close.
Configure auto swap
Auto swap streamlines Azure DevOps scenarios where you want to deploy your app continuously with zero cold starts and zero downtime for customers of the app. When auto swap is enabled from a slot into production, every time you push your code changes to that slot, App Service automatically swaps the app into production after it's warmed up in the source slot.
Note: Auto swap isn't currently supported in web apps on Linux.
To configure auto swap:
Go to your app's resource page and select the deployment slot you want to configure to auto swap. The setting is on the Configuration > General settings page.
Set Auto swap enabled to On. Then select the desired target slot for Auto swap deployment slot, and select Save on the command bar.
Execute a code push to the source slot. Auto swap happens after a short time, and the update is reflected at your target slot's URL.
Specify custom warm-up
Some apps might require custom warm-up actions before the swap. The applicationInitialization configuration element in web.config lets you specify custom initialization actions. The swap operation waits for this custom warm-up to finish before swapping with the target slot. Here's a sample web.config fragment.
<system.webServer>
    <applicationInitialization>
        <add initializationPage="/" hostName="[app hostname]" />
        <add initializationPage="/Home/About" hostName="[app hostname]" />
    </applicationInitialization>
</system.webServer>
You can also customize the warm-up behavior with one or both of the following app settings:
WEBSITE_SWAP_WARMUP_PING_PATH: The path to ping to warm up your site. Add this app setting by specifying a custom path that begins with a slash as the value. An example is/statuscheck. The default value is/.WEBSITE_SWAP_WARMUP_PING_STATUSES: Valid HTTP response codes for the warm-up operation. Add this app setting with a comma-separated list of HTTP codes. An example is200,202. If the returned status code isn't in the list, the warmup and swap operations are stopped. By default, all response codes are valid.
Roll back and monitor a swap
If any errors occur in the target slot (for example, the production slot) after a slot swap, restore the slots to their pre-swap states by swapping the same two slots immediately.
If the swap operation takes a long time to complete, you can get information on the swap operation in the activity log.
On your app's resource page in the portal, in the left pane, select Activity log.
A swap operation appears in the log query as Swap Web App Slots. You can expand it and select one of the suboperations or errors to see the details.
Route traffic in App Service
By default, all client requests to the app's production URL (http://<app_name>.azurewebsites.net) are routed to the production slot. You can route a portion of the traffic to another slot. This feature is useful if you need user feedback for a new update, but you're not ready to release it to production.
Route production traffic automatically
To route production traffic automatically:
Go to your app's resource page and select Deployment slots.
In the Traffic % column of the slot you want to route to, specify a percentage (between 0 and 100) to represent the amount of total traffic you want to route. Select Save.
After a client is automatically routed to a specific slot, it's "pinned" to that slot for the life of that client session. On the client browser, you can see which slot your session is pinned to by looking at the x-ms-routing-name cookie in your HTTP headers. A request that's routed to the "staging" slot has the cookie x-ms-routing-name=staging. A request that's routed to the production slot has the cookie x-ms-routing-name=self.
Route production traffic manually
This is useful when you want your users to be able to opt in to or opt out of your beta app. To route production traffic manually, you use the x-ms-routing-name query parameter.
To let users opt out of your beta app, for example, you can put this link on your webpage:
<a href="<webappname>.azurewebsites.net/?x-ms-routing-name=self">Go back to production app</a>
The string x-ms-routing-name=self specifies the production slot. After the client browser accesses the link, it's redirected to the production slot. Every subsequent request has the x-ms-routing-name=self cookie that pins the session to the production slot.
To let users opt in to your beta app, set the same query parameter to the name of the non-production slot. Here's an example:
<webappname>.azurewebsites.net/?x-ms-routing-name=staging
By default, new slots are given a routing rule of 0%, a default value is displayed in grey. When you explicitly set this value to 0% it is displayed in black, your users can access the staging slot manually by using the x-ms-routing-name query parameter. But they won't be routed to the slot automatically because the routing percentage is set to 0. This is an advanced scenario where you can "hide" your staging slot from the public while allowing internal teams to test changes on the slot.
Up Next - Azure Functions - Developing Solutions for Microsoft Azure - Part 1.3