

Photo by Benjamin Voros on Unsplash
Azure Cosmos DB - Developing Solutions for Microsoft Azure - Part 2.1


Table of contents
- 2. Develop for Azure Storage
- 2.1 Develop solutions that use Cosmos DB storage
- Azure Cosmos DB
- Resource Hierarchy
- Consistency Levels
- APIs in Azure Cosmos DB
- Request units
- PRACTICAL 07: Create Azure Cosmos DB resources by using the Azure portal
- Implement partitioning in Azure Cosmos DB
- Create a synthetic partition key
- Microsoft .NET SDK v3 for Azure Cosmos DB
- PRACTICAL 08: Create Cosmos DB resources by using the Microsoft .NET SDK v3
- Create stored procedures
- Create triggers and user-defined functions
All the notes on this page have been taken from Microsoft's learning portal - learn.microsoft.com. If any of this material is copyrighted, please let me know in the comments below and I will remove it. The main goal here is to learn and understand the concepts for developing solutions for Microsoft Azure. These notes may be helpful to prepare for the certification AZ-204: Developing Solutions for Microsoft Azure
Continuing from Azure Functions - Developing Solutions for Microsoft Azure - Part 1.3
2. Develop for Azure Storage
2.1 Develop solutions that use Cosmos DB storage
Azure Cosmos DB
Azure Cosmos DB is a fully managed NoSQL database designed to provide low latency, elastic scalability of throughput, well-defined semantics for data consistency, and high availability.
It is a globally distributed database system that allows you to read and write data from the local replicas of your database and it transparently replicates the data to all the regions associated with your Cosmos account.
With Azure Cosmos DB, you can add or remove the regions associated with your account at any time. Your application doesn't need to be paused or redeployed to add or remove a region.
Benefits of Azure Cosmos DB
1. Global replication
Automatic and synchronous multi-region replication supports automatic and manual failover. With its novel multi-master replication protocol, every region supports both writes and reads.
2. Varied consistency levels
Offers five consistency models. Provides control over performance-consistency tradeoffs, backed by comprehensive SLAs.
3. Low Latency
Serve <10 ms rad and <10 ms write requests at the 99th percentile.
4. Elastic scale-out
Elastically scale throughput from 10 to 100s of millions of requests/sec across multiple regions.
Resource Hierarchy
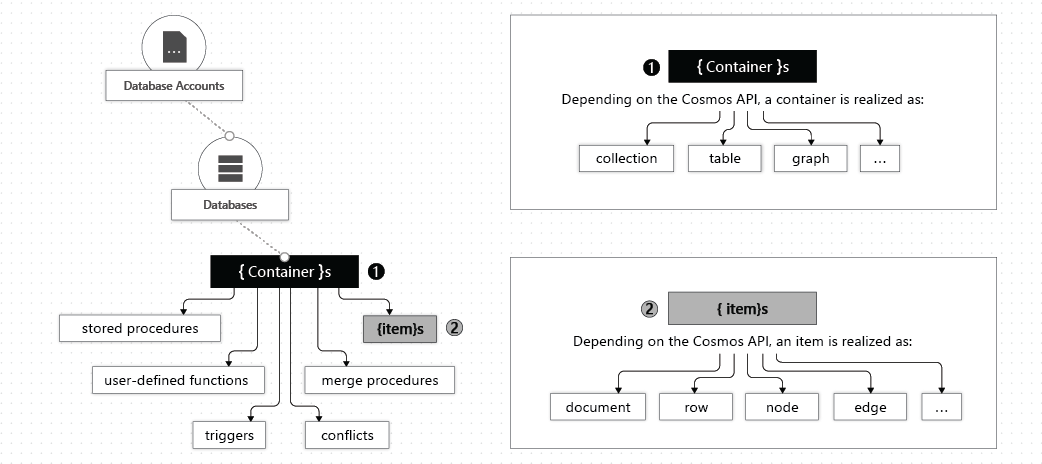
The following image shows the hierarchy of different resources in Azure Cosmos DB: Accounts --> Databases --> Containers --> Items
Azure Cosmos DB account
Currently, you can create a maximum of 50 Azure Cosmos DB accounts under an Azure subscription (this is a soft limit that can be increased via support request). After you create an account under your Azure subscription, you can manage the data in your account by creating databases, containers, and items. Your Azure Cosmos account contains a unique DNS name.
Azure Cosmos DB databases
You can create one or multiple Azure Cosmos DB databases under your account. A database is analogous to a namespace. A database is the unit of management for a set of Azure Cosmos DB containers.
Azure Cosmos DB containers
An Azure Cosmos DB container can represent either a collection, a table, or a graph.
An Azure Cosmos DB container is the unit of scalability both for provisioned throughput and storage. A container is horizontally partitioned and then replicated across multiple regions.
The items that you add to the container are automatically grouped into logical partitions, which are distributed across physical partitions, based on the partition key. The throughput on a container is evenly distributed across the physical partitions.
When you create a container, you configure throughput in one of the following modes:
Dedicated provisioned throughput mode: The throughput provisioned on a container is exclusively reserved for that container and it is backed by the SLAs.
Shared provisioned throughput mode: These containers share the provisioned throughput with the other containers in the same database (excluding containers that have been configured with dedicated provisioned throughput). In other words, the provisioned throughput on the database is shared among all the “shared throughput” containers.
A container is a schema-agnostic container of items. Items in a container can have arbitrary schemas. For example, an item that represents a person and an item that represents an automobile can be placed in the same container. By default, all items that you add to a container are automatically indexed without requiring explicit index or schema management.
Azure Cosmos DB items
Depending on which API you use, an Azure Cosmos DB item can represent either a document in a collection, a row in a table, or a node or edge in a graph.
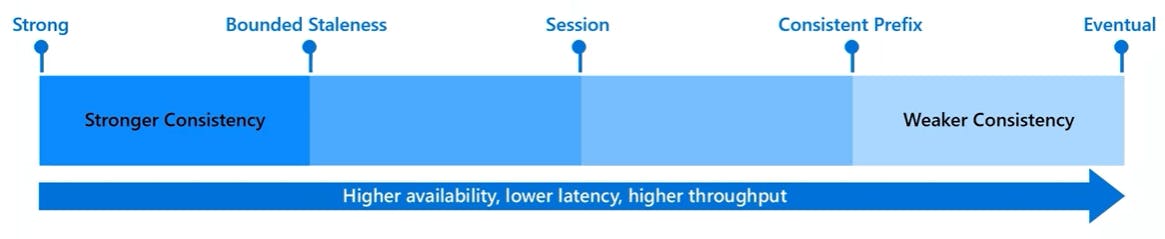
Consistency Levels
Azure Cosmos DB approaches data consistency as a spectrum of choices instead of two extremes. Each level provides availability and performance tradeoffs. The consistency levels are region-agnostic and are guaranteed for all operations.
1. Strong Consistency
When a write operation is performed on your primary database, the write operation is replicated to the replica instances. The write operation is committed (and visible) on the primary only after it has been committed and confirmed by all replicas.
Strong consistency offers a linearizability guarantee. Linearizability refers to serving requests concurrently. The reads are guaranteed to return the most recent committed version of an item. A client never sees an uncommitted or partial write. Users are always guaranteed to read the latest committed write.
2. Bounded Staleness Consistency
This level is similar to the Strong level with the major difference that you can configure how stale documents can be within replicas. Staleness refers to the quantity of time (or the version count) a replica document can be behind the primary document.
In other words, when you choose bounded staleness, the "staleness" can be configured in two ways:
The number of versions (K) of the item
The time interval (T) by which reads might lag behind the writes
For a single region account, the minimum value of K and T is 10 write operations or 5 seconds. For multi-region accounts the minimum value of K and T is 100,000 write operations or 300 seconds.
3. Session Consistency
This level guarantees that all read and write operations are consistent within a user session. Within the user session, all reads and writes are monotonic and guaranteed to be consistent across primary and replica instances.
4. Consistent Prefix Consistency
This level has loose consistency but guarantees that when updates show up in replicas, they will show up in the correct order (that is, as prefixes of other updates) without any gaps.
In consistent prefix, updates made as single document writes see eventual consistency. Updates made as a batch within a transaction, are returned consistent to the transaction in which they were committed. Write operations within a transaction of multiple documents are always visible together.
Assume two write operations are performed on documents Doc1 and Doc2, within transactions T1 and T2. When client does a read in any replica, the user will see either “Doc1 v1 and Doc2 v1” or “ Doc1 v2 and Doc2 v2”, but never “Doc1 v1 and Doc2 v2” or “Doc1 v2 and Doc2 v1” for the same read or query operation.
5. Eventual Consistency
In eventual consistency, there's no ordering guarantee for reads. In the absence of any further writes, the replicas eventually converge. Eventual consistency is the weakest form of consistency because a client may read the values that are older than the ones it had read before. Eventual consistency is ideal where the application does not require any ordering guarantees. Examples include count of Retweets, Likes, or non-threaded comments
It essentially commits any write operation against the primary immediately. Replica transactions are asynchronously handled and will eventually (over time) be consistent with the primary.
This tier has the best performance, because the primary database does not need to wait for replicas to commit to finalize its transactions.
APIs in Azure Cosmos DB
Azure Cosmos DB offers multiple database APIs, which include NoSQL, MongoDB, PostgreSQL, Cassandra, Gremlin, and Table. These APIs allow your applications to treat Azure Cosmos DB as if it were various other databases technologies, without the overhead of management, and scaling approaches.
API for NoSQL is native to Azure Cosmos DB. On the other hand, API for MongoDB, PostgreSQL, Cassandra, Gremlin, and Table implement the wire protocol of open-source database engines. These APIs are best suited if the following conditions are true:
If you have existing MongoDB, PostgreSQL Cassandra, or Gremlin applications
If you don't want to rewrite your entire data access layer
If you want to use the open-source developer ecosystem, client-drivers, expertise, and resources for your database
1. NoSQL API
This API stores data in document format. It offers the best end-to-end experience as we have full control over the interface, service, and the SDK client libraries. NoSQL accounts provide support for querying items using the Structured Query Language (SQL) syntax.
2. API for MongoDB
This API stores data in document structure, via BSON format. It is compatible with MongoDB wire protocol.
3. API for PostgreSQL
Azure Cosmos DB for PostgreSQL is a managed service for running PostgreSQL at any scale, with the Citus open source superpower of distributed tables. It stores data either on a single node, or distributed in a multi-node configuration.
4. Apache Cassandra API
This API stores data in column-oriented schema and is wire protocol compatible with Apache Cassandra. Apache Cassandra offers a highly distributed, horizontally scaling approach to storing large volumes of data while offering a flexible approach to a column-oriented schema. This API for Cassandra is wire protocol compatible with native Apache Cassandra.
5. Table API
This API stores data in key/value format. API for Table only supports OLTP scenarios.
6. Gremlin API
This API allows users to make graph queries and stores data as edges and vertices. Use the API for Gremlin for scenarios:
Involving dynamic data
Involving data with complex relations
Involving data that is too complex to be modeled with relational databases
If you want to use the existing Gremlin ecosystem and skills
Request units
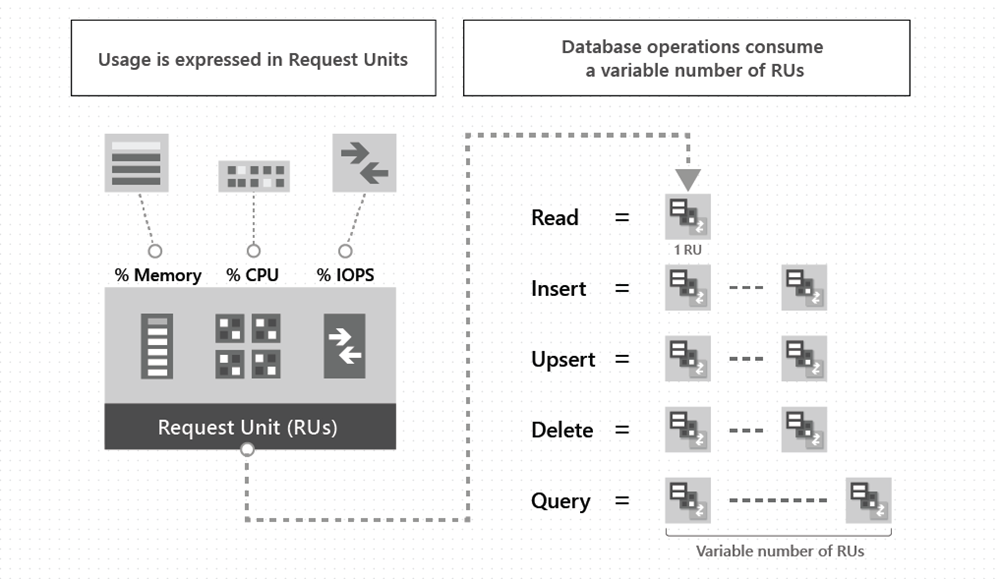
The cost of all database operations is normalized by Azure Cosmos DB and is expressed by request units (or RUs, for short). A request unit represents the system resources such as CPU, IOPS, and memory that are required to perform the database operations supported by Azure Cosmos DB.
The cost to do a point read, which is fetching a single item by its ID and partition key value, for a 1KB item is 1RU. All other database operations are similarly assigned a cost using RUs. No matter which API you use to interact with your Azure Cosmos container, costs are always measured by RUs. Whether the database operation is a write, point read, or query, costs are always measured in RUs.
The following image shows the high-level idea of RUs:
The type of Azure Cosmos DB account you're using determines the way consumed RUs get charged. There are three modes in which you can create an account:
Provisioned throughput mode: In this mode, you provision the number of RUs for your application on a per-second basis in increments of 100 RUs per second. To scale the provisioned throughput for your application, you can increase or decrease the number of RUs at any time in increments or decrements of 100 RUs. You can make your changes either programmatically or by using the Azure portal. You can provision throughput at container and database granularity level.
Serverless mode: In this mode, you don't have to provision any throughput when creating resources in your Azure Cosmos DB account. At the end of your billing period, you get billed for the amount of request units that has been consumed by your database operations.
Autoscale mode: In this mode, you can automatically and instantly scale the throughput (RU/s) of your database or container based on its usage. This mode is well suited for mission-critical workloads that have variable or unpredictable traffic patterns, and require SLAs on high performance and scale.
PRACTICAL 07: Create Azure Cosmos DB resources by using the Azure portal
Pre-requisite: You should have an active Azure subscription.
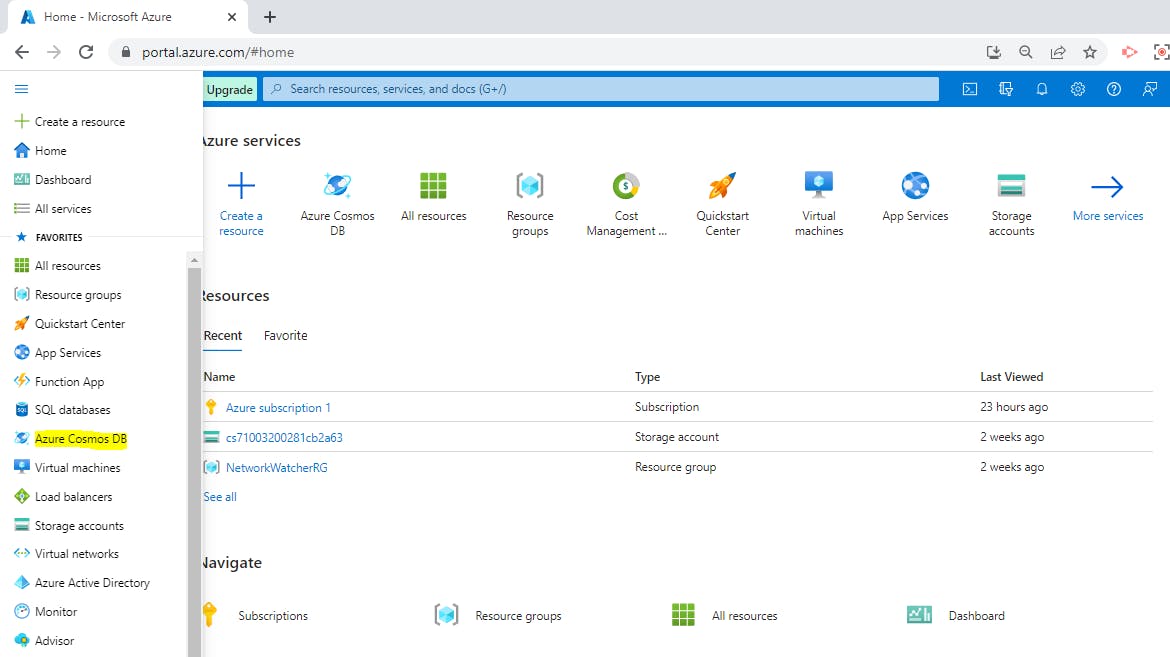
Step 1: Login to the Azure portal - portal.azure.com
Step 2: Create an Azure Cosmos DB account
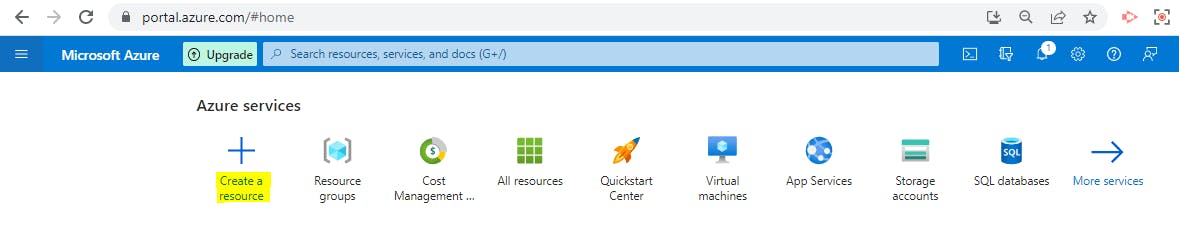
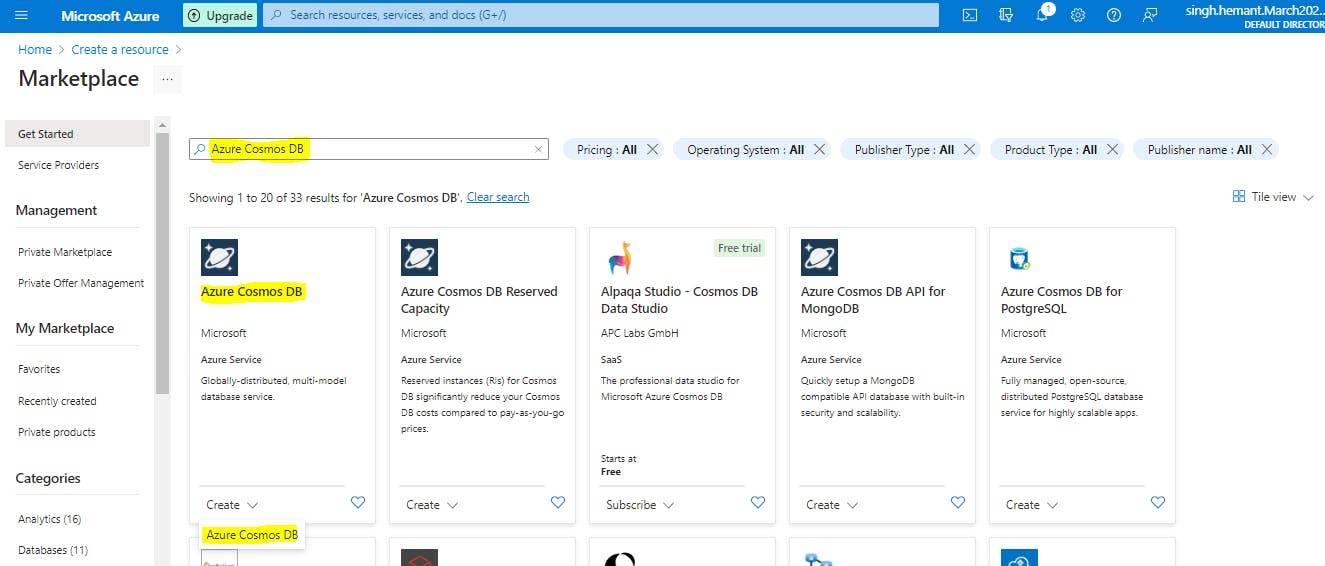
From the Azure portal navigation pane, select + Create a resource
Search for Azure Cosmos DB, then select Create --> Azure Cosmos DB to get started.
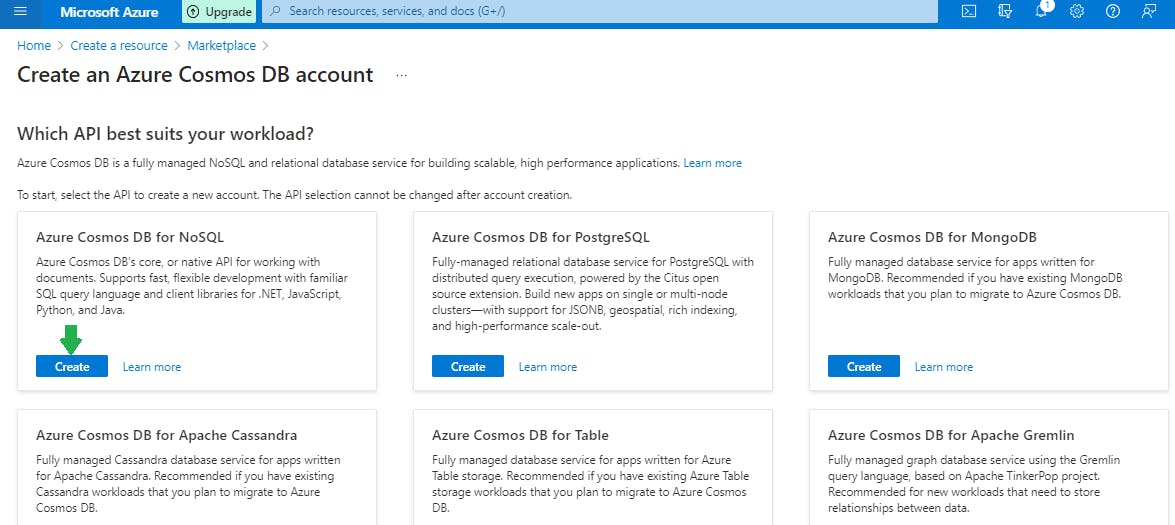
On the Which API best suits your workload? page, select Create in the Azure Cosmos DB for NoSQL box.
In the Create Azure Cosmos DB Account - Azure Cosmos DB for NoSQL page, enter the basic settings for the new Azure Cosmos DB account.
Subscription: Select the subscription you want to use.
Resource Group: Select Create new, then enter my-cosmos-rg.
Account Name: Enter a unique name to identify your Azure Cosmos account. The name can only contain lowercase letters, numbers, and the hyphen (-) character. It must be between 3-31 characters in length.
Location: Use the location that is closest to your users to give them the fastest access to the data.
Capacity mode: Select Serverless.
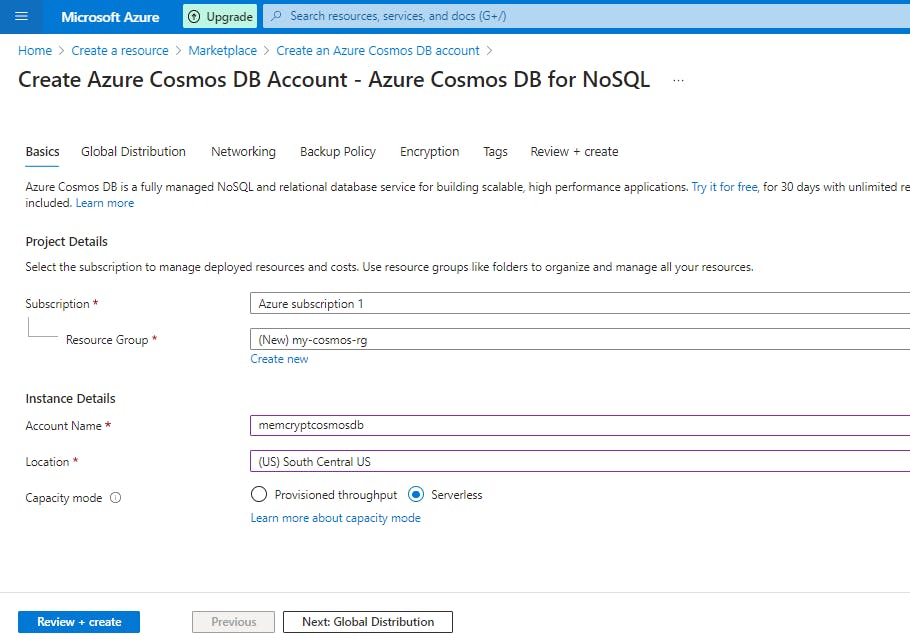
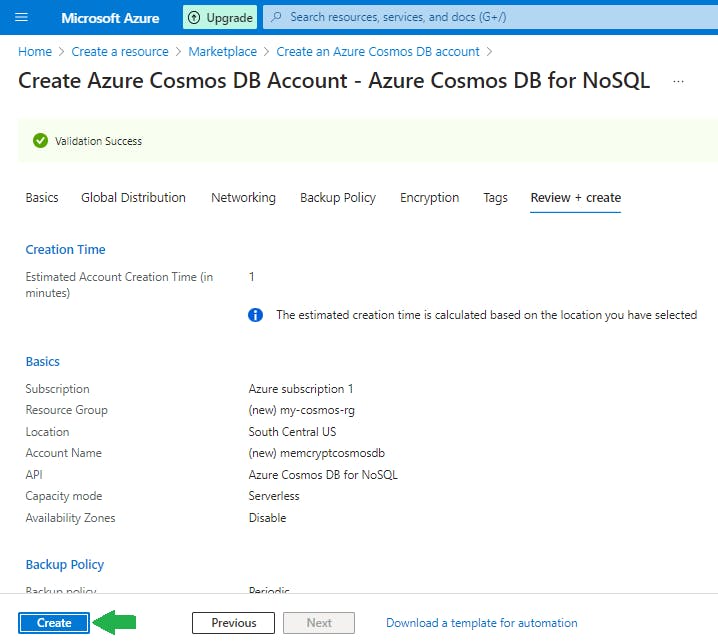
Select Review + create.
Review the account settings, and then select Create.
It takes a few minutes to create the account. Wait for the portal page to display Your deployment is complete.
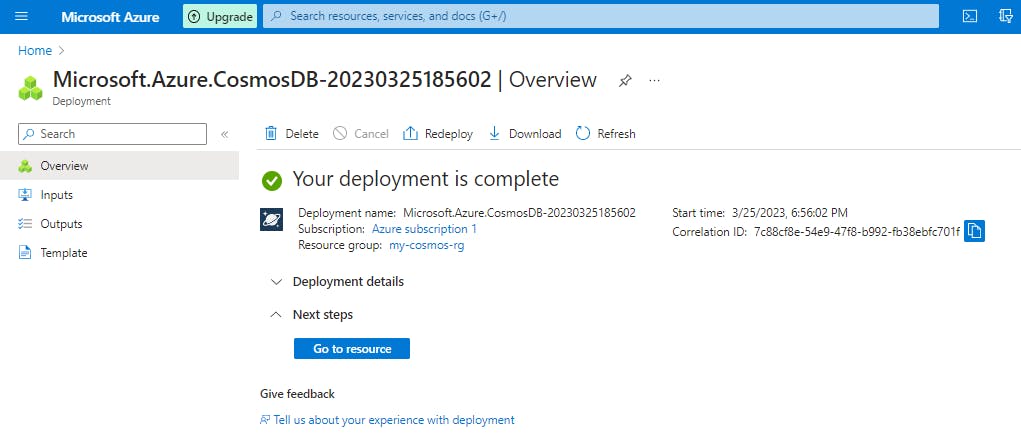
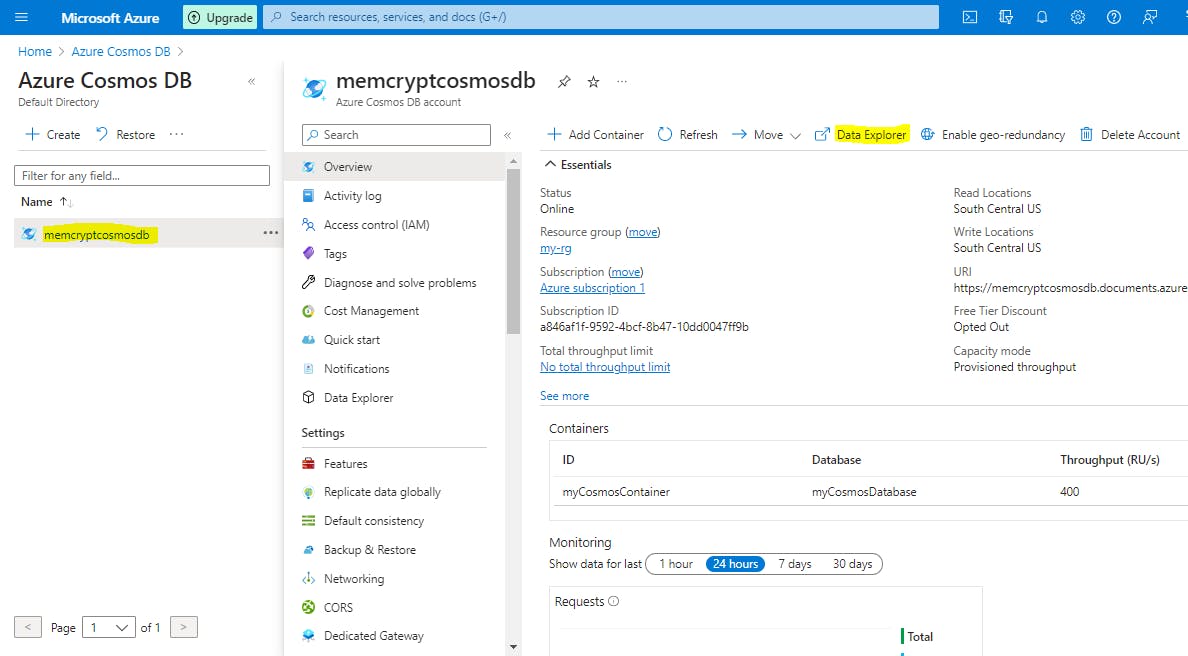
Select Go to resource to go to the Azure Cosmos DB account page.
Step 3: Add a database and a container
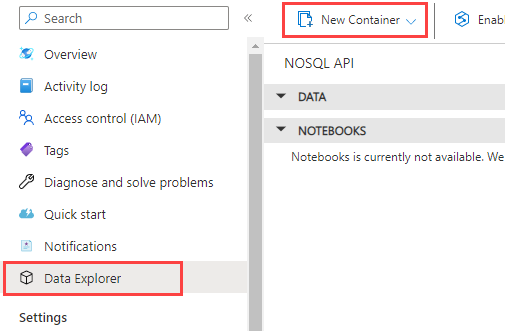
You can use the Data Explorer in the Azure portal to create a database and container.
Select Data Explorer from the left navigation on your Azure Cosmos DB account page, and then select New Container.
In the New container pane, enter the settings for the new container.
Database ID: Select Create new, and enter ToDoList.
Container ID: Enter Items
Partition key: Enter /category. The samples in this demo use /category as the partition key.
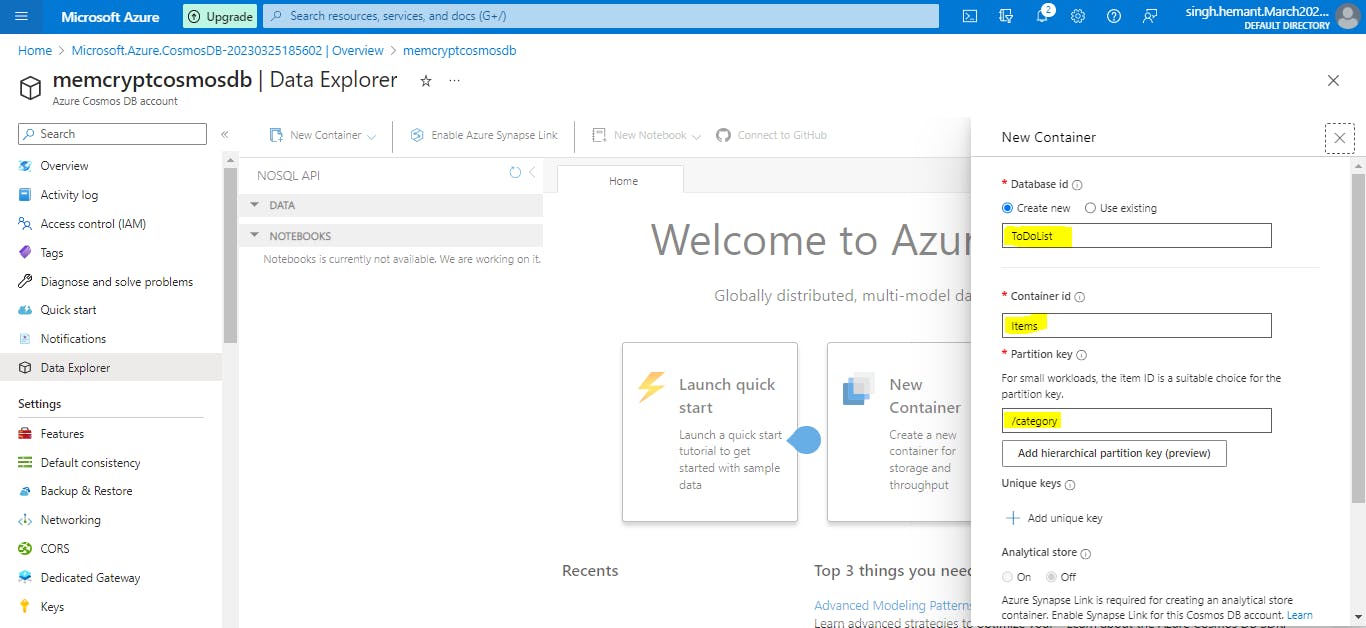
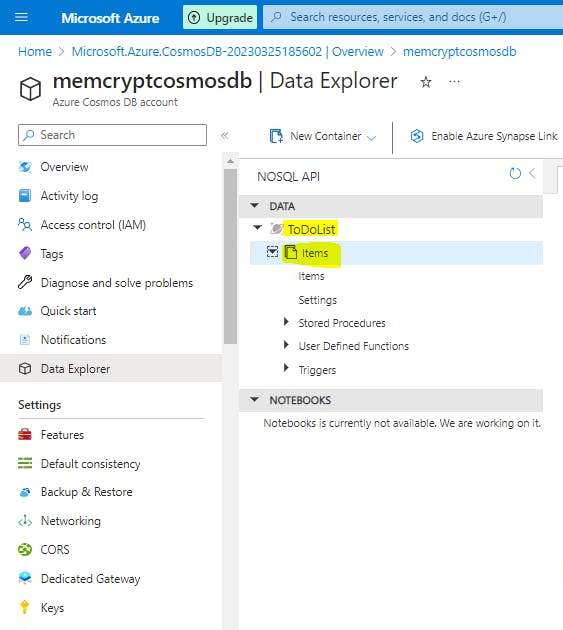
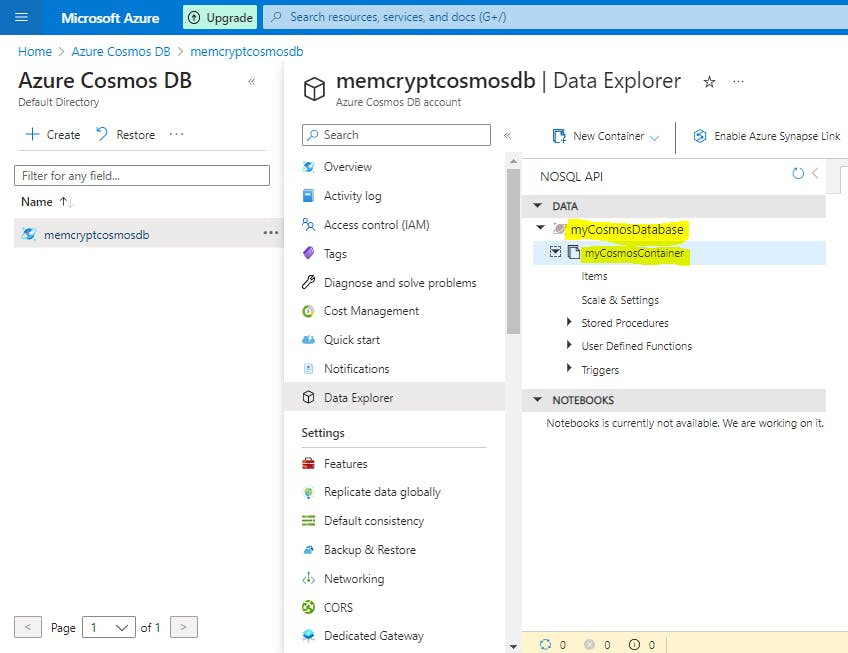
Select OK. The Data Explorer displays the new database and the container that you created.
Step 4: Add data to your database
Add data to your new database using Data Explorer.
In Data Explorer, expand the ToDoList database, and expand the Items container. Next, select Items, and then select New Item.
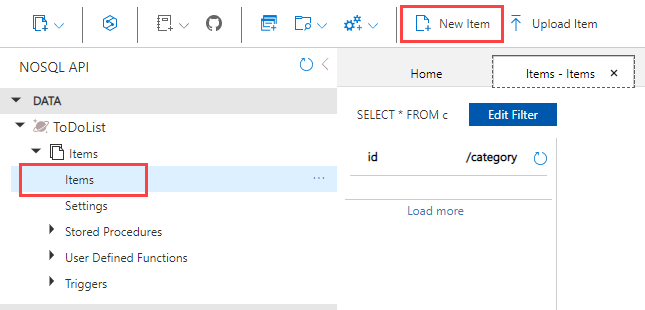
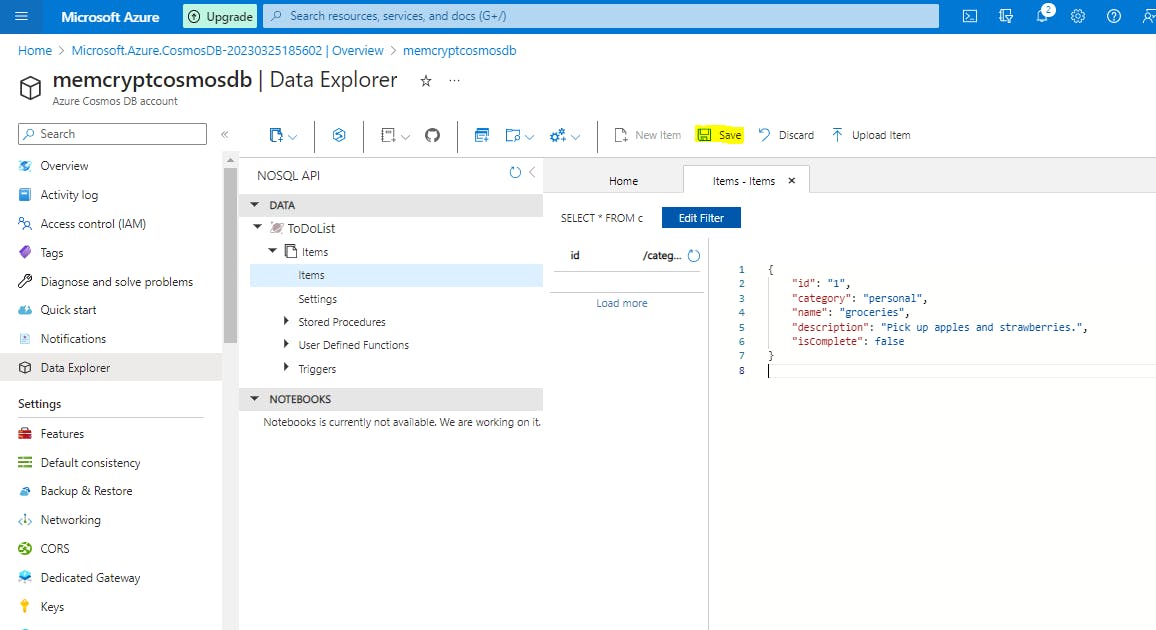
Add the following structure to the item on the right side of the Items pane:
 {
     "id": "1",
     "category": "personal",
     "name": "groceries",
     "description": "Pick up apples and strawberries.",
     "isComplete": false
 }
Select Save.
Select New Item again, and create and save another item with a unique
id, and any other properties and values you want. Your items can have any structure, because Azure Cosmos DB doesn't impose any schema on your data.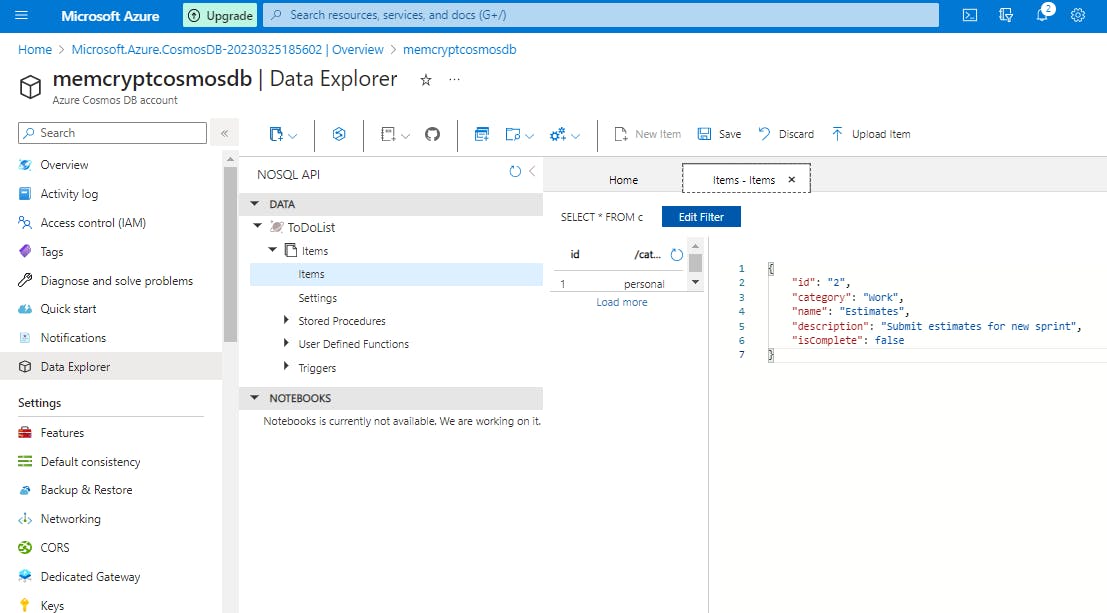
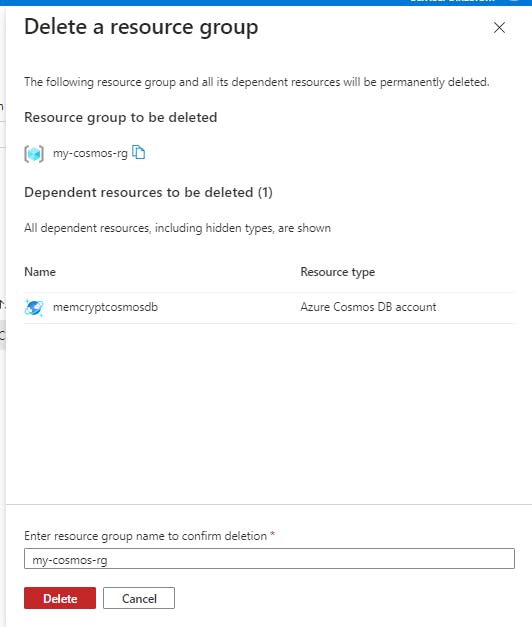
Step 5: Clean up resources
Select Overview from the left navigation on your Azure Cosmos DB account page.
Select the my-cosmos-rg resource group link in the Essentials group.
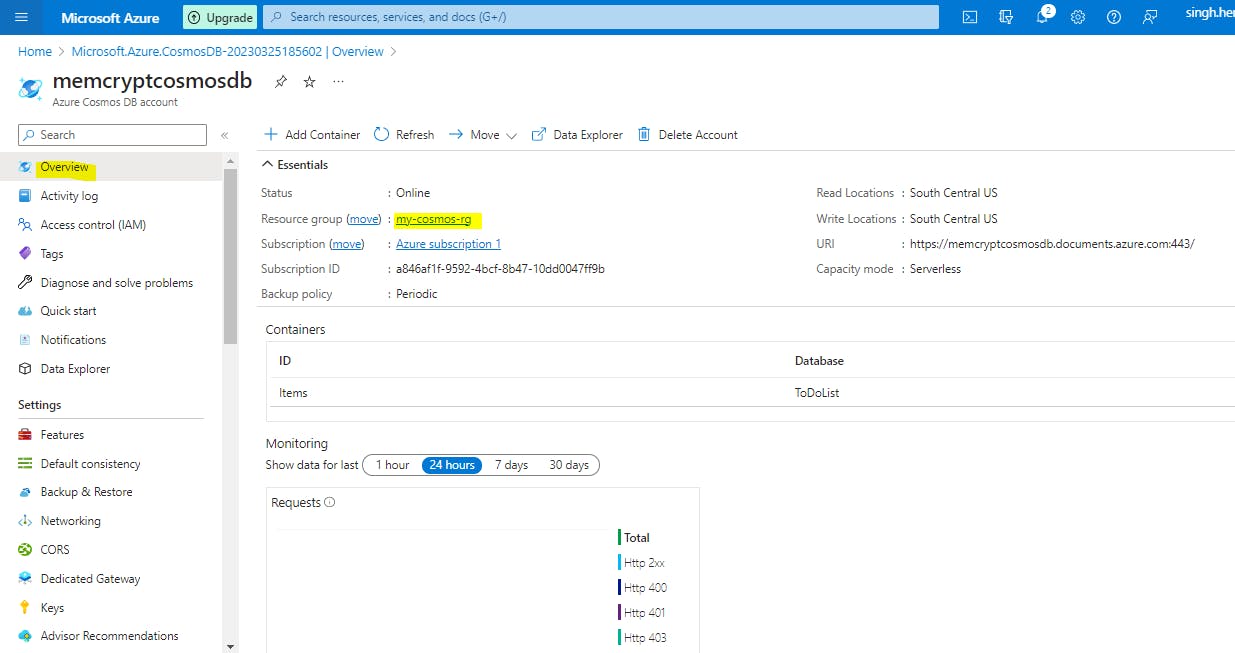
Select Delete resource group and follow the directions to delete the resource group and all of the resources it contains.

Implement partitioning in Azure Cosmos DB
Azure Cosmos DB uses partitioning to scale individual containers in a database to meet the performance needs of your application.
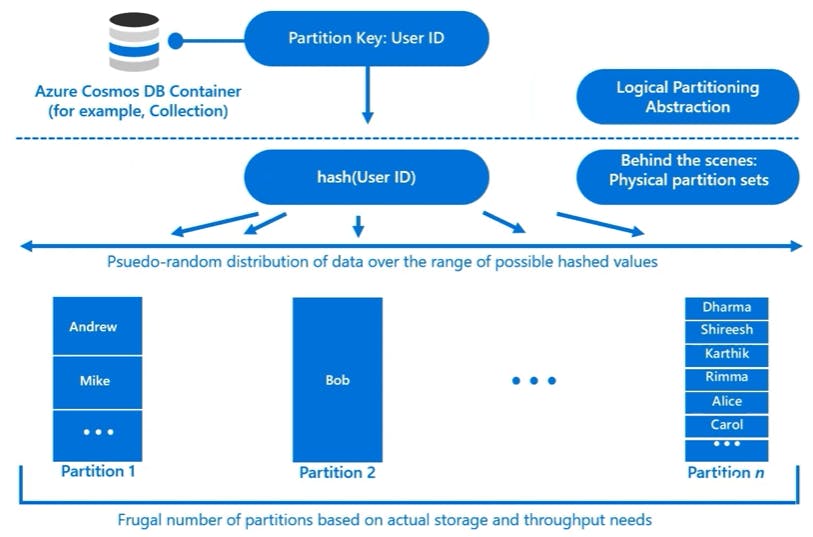
Logical partitions
A logical partition consists of a set of items that have the same partition key. For example, in a container that contains data about food nutrition, all items contain a foodGroup property. You can use foodGroup as the partition key for the container. Groups of items that have specific values for foodGroup, such as Beef Products, Baked Products, and Sausages and Luncheon Meats, form distinct logical partitions.
A logical partition also defines the scope of database transactions. You can update items within a logical partition by using a transaction with snapshot isolation. When new items are added to a container, new logical partitions are transparently created by the system. You don't have to worry about deleting a logical partition when the underlying data is deleted.
Physical partitions
One or more logical partitions are mapped to a single physical partition. Typically smaller containers have many logical partitions but they only require a single physical partition.
Physical partitions are an internal implementation of the system and they are entirely managed by Azure Cosmos DB.
A container is scaled by distributing data and throughput across physical partitions.
The number of physical partitions in your container depends on the following:
The number of throughput provisioned (each individual physical partition can provide a throughput of up to 10,000 request units per second). The 10,000 RU/s limit for physical partitions implies that logical partitions also have a 10,000 RU/s limit, as each logical partition is only mapped to one physical partition.
The total data storage (each individual physical partition can store up to 50GB data).
Note: When developing your solutions, don't focus on physical partitions because you can't control them. Instead, focus on your partition keys. If you choose a partition key that evenly distributes throughput consumption across logical partitions, you will ensure that throughput consumption across physical partitions is balanced.
Throughput provisioned for a container is divided evenly among physical partitions. A partition key design that doesn't distribute requests evenly might result in too many requests directed to a small subset of partitions that become "hot." Hot partitions lead to inefficient use of provisioned throughput, which might result in rate-limiting and higher costs.
Choosing a partition key
A partition key has two components: partition key path and the partition key value. For example, consider an item { "userId" : "Andrew", "worksFor": "Microsoft" } if you choose "userId" as the partition key, the following are the two partition key components:
The partition key path (for example: "/userId"). The partition key path accepts alphanumeric and underscore(_) characters. You can also use nested objects by using the standard path notation(/).
The partition key value (for example: "Andrew"). The partition key value can be of string or numeric types.
Once you select your partition key, it is not possible to change it in-place. If you need to change your partition key, you should move your data to a new container with your new desired partition key.
For all containers, your partition key should:
Be a property that has a value which does not change. If a property is your partition key, you can't update that property's value.
Have a high cardinality. In other words, the property should have a wide range of possible values.
Spread request unit (RU) consumption and data storage evenly across all logical partitions. This ensures even RU consumption and storage distribution across your physical partitions.
Partition keys for read-heavy containers
For large read-heavy containers you might want to choose a partition key that appears frequently as a filter in your queries. Queries can be efficiently routed to only the relevant physical partitions by including the partition key in the filter predicate.
If most of your workload's requests are queries and most of your queries have an equality filter on a specific property, then this property can be a good partition key choice.
If your container could grow to more than a few physical partitions, then you should make sure you pick a partition key that minimizes cross-partition queries. Your container will require more than a few physical partitions when either of the following are true:
Your container will have over 30,000 RUs provisioned
Your container will store over 100 GB of data
Using item ID as the partition key
If your container has a property that has a wide range of possible values, it is likely a great partition key choice. One possible example of such a property is the item ID. For small read-heavy containers or write-heavy containers of any size, the item ID is naturally a great choice for the partition key. The system property item ID exists in every item in your container.
The item ID is a great partition key choice for the following reasons:
There are a wide range of possible values (one unique item ID per item).
Because there is a unique item ID per item, the item ID does a great job at evenly balancing RU consumption and data storage.
You can easily do efficient point reads since you'll always know an item's partition key if you know its item ID.
Some things to consider when selecting the item ID as the partition key include:
If the item ID is the partition key, it will become a unique identifier throughout your entire container. You won't be able to have items that have a duplicate item ID.
If you have a read-heavy container that has a lot of physical partitions, queries will be more efficient if they have an equality filter with the item ID.
You can't run stored procedures or triggers across multiple logical partitions.
Create a synthetic partition key
It's the best practice to have a partition key with many distinct values, such as hundreds or thousands. If such a property doesn’t exist in your data, you can construct a synthetic partition key.
Concatenate multiple properties of an item
You can form a partition key by concatenating multiple property values into a single artificial partitionKey property. These keys are referred to as synthetic keys. For example, consider the following example document:
{
"deviceId": "abc-123",
"date": 2018
}
For the previous document, one option is to set /deviceId or /date as the partition key. Use this option, if you want to partition your container based on either device ID or date. Another option is to concatenate these two values into a synthetic partitionKey property that's used as the partition key.
{
"deviceId": "abc-123",
"date": 2018,
"partitionKey": "abc-123-2018"
}
In real-time scenarios, you can have thousands of items in a database. Instead of adding the synthetic key manually, define client-side logic to concatenate values and insert the synthetic key into the items in your Cosmos containers.
Use a partition key with a random suffix
Another possible strategy to distribute the workload more evenly is to append a random number at the end of the partition key value. When you distribute items in this way, you can perform parallel write operations across partitions.
An example is if a partition key represents a date. You might choose a random number between 1 and 400 and concatenate it as a suffix to the date. This method results in partition key values like 2018-08-09.1,2018-08-09.2, and so on, through 2018-08-09.400. Because you randomize the partition key, the write operations on the container on each day are spread evenly across multiple partitions. This method results in better parallelism and overall higher throughput.
Use a partition key with pre-calculated suffixes
The random suffix strategy can greatly improve write throughput, but it's difficult to read a specific item. You don't know the suffix value that was used when you wrote the item. To make it easier to read individual items, use the pre-calculated suffixes strategy. Instead of using a random number to distribute the items among the partitions, use a number that is calculated based on something that you want to query.
Consider the previous example, where a container uses a date as the partition key. Now suppose that each item has a Vehicle-Identification-Number (VIN) attribute that we want to access. Further, suppose that you often run queries to find items by the VIN, in addition to date. Before your application writes the item to the container, it can calculate a hash suffix based on the VIN and append it to the partition key date. The calculation might generate a number between 1 and 400 that is evenly distributed. This result is similar to the results produced by the random suffix strategy method. The partition key value is then the date concatenated with the calculated result.
With this strategy, the writes are evenly spread across the partition key values, and across the partitions. You can easily read a particular item and date, because you can calculate the partition key value for a specific Vehicle-Identification-Number. The benefit of this method is that you can avoid creating a single hot partition key, i.e., a partition key that takes all the workload.
Microsoft .NET SDK v3 for Azure Cosmos DB
We are going to use Azure Cosmos DB .NET SDK v3 for API for NoSQL. (Microsoft.Azure.Cosmos NuGet package).
CosmosClient
Creates a new CosmosClient with a connection string. CosmosClient is thread-safe. It's recommended to maintain a single instance of CosmosClient per lifetime of the application which enables efficient connection management and performance.
CosmosClient client = new CosmosClient(endpoint, key);
Create a database
The CosmosClient.CreateDatabaseIfNotExistsAsync checks if a database exists, and if it doesn't, creates it. Only the database id is used to verify if there's an existing database.
// An object containing relevant information about the response
DatabaseResponse databaseResponse = await client.CreateDatabaseIfNotExistsAsync(databaseId, 10000);
Read a database by ID
Reads a database from the Azure Cosmos DB service as an asynchronous operation by using ReadAsync.
DatabaseResponse readResponse = await database.ReadAsync();
Delete a database
Delete a Database as an asynchronous operation by using DeleteAsync .
await database.DeleteAsync();
Create a container
The Database.CreateContainerIfNotExistsAsync method checks if a container exists, and if it doesn't, it creates it. Only the container id is used to verify if there is an existing container.
// Set throughput to the minimum value of 400 RU/s
ContainerResponse simpleContainer = await database.CreateContainerIfNotExistsAsync(
    id: containerId,
    partitionKeyPath: partitionKey,
    throughput: 400);
Get a container by ID
Container container = database.GetContainer(containerId);
ContainerProperties containerProperties = await container.ReadContainerAsync();
Delete a container
Delete a Container as an asynchronous operation.
await database.GetContainer(containerId).DeleteContainerAsync();
Create an item
Use the Container.CreateItemAsync method to create an item. The method requires a JSON serializable object that must contain an id property, and a partitionKey.
ItemResponse<SalesOrder> response = await container.CreateItemAsync(salesOrder, new PartitionKey(salesOrder.AccountNumber));
Read an item
Use the Container.ReadItemAsync method to read an item. The method requires type to serialize the item to along with an id property, and a partitionKey.
string id = "[id]";
string accountNumber = "[partition-key]";
ItemResponse<SalesOrder> response = await container.ReadItemAsync(id, new PartitionKey(accountNumber));
Query an item
The Container.GetItemQueryIterator method creates a query for items under a container in an Azure Cosmos database using a SQL statement with parameterized values. It returns a FeedIterator.
QueryDefinition query = new QueryDefinition(
    "select * from sales s where s.AccountNumber = @AccountInput ")
    .WithParameter("@AccountInput", "Account1");

FeedIterator<SalesOrder> resultSet = container.GetItemQueryIterator<SalesOrder>(
    query,
    requestOptions: new QueryRequestOptions()
    {
        PartitionKey = new PartitionKey("Account1"),
        MaxItemCount = 1
    });
PRACTICAL 08: Create Cosmos DB resources by using the Microsoft .NET SDK v3
Pre-requisite:
You should have an active Azure subscription.
Visual Studio Code on one of the supported platforms.
.NET 6 is the target framework for the steps below.
The C# extension for Visual Studio Code.
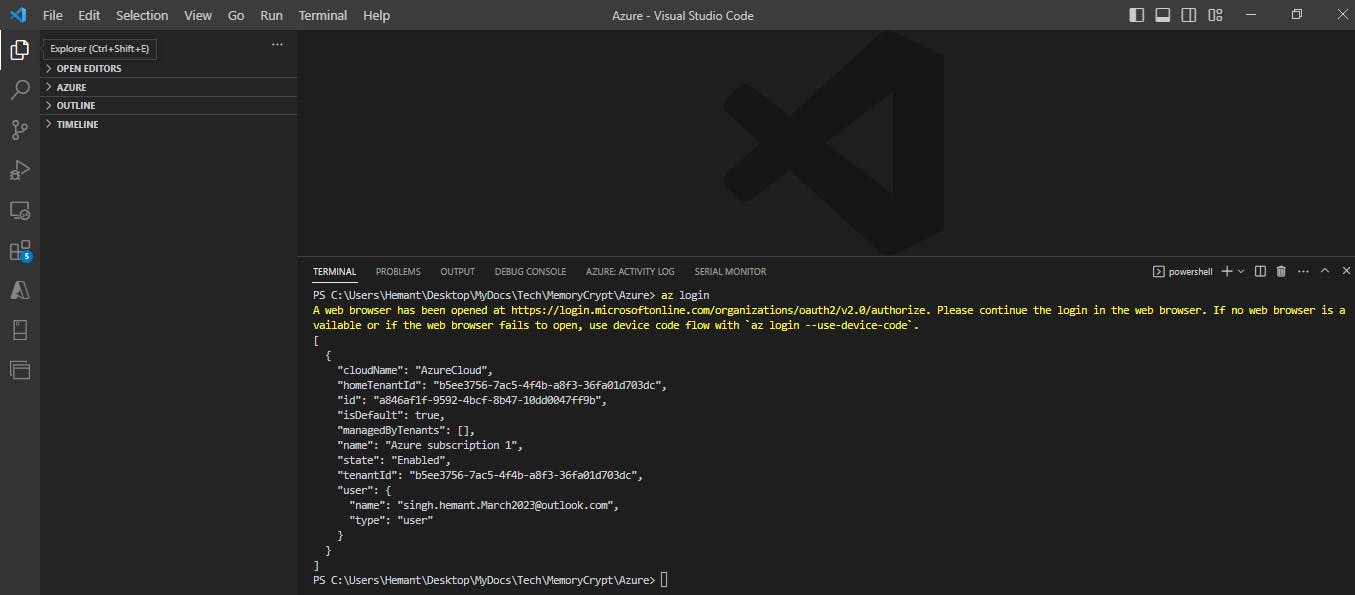
Step 1: Connect to Azure from VSCode
Start Visual Studio Code and open a terminal window by selecting Terminal from the top application bar, then choosing New Terminal.
Log in to Azure by using the command below. A browser window should open letting you choose which account to log in with.
Copy
az login
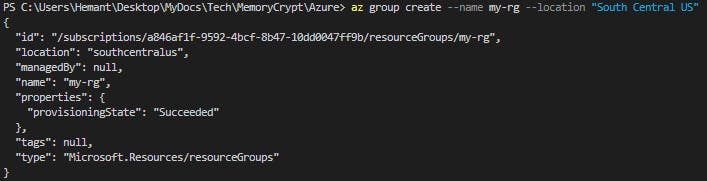
Step 2: Create a resource group
Create a resource group for the resources needed for this exercise. Replace <myLocation> with a region near you.
az group create --location <myLocation> --name my-rg
Step 3: Create an Azure Cosmos DB account
Create the Azure Cosmos DB account. Replace <myCosmosDBacct> with a unique name to identify your Azure Cosmos DB account. The name can only contain lowercase letters, numbers, and the hyphen (-) character. It must be between 3-31 characters in length. This command will take a few minutes to complete.
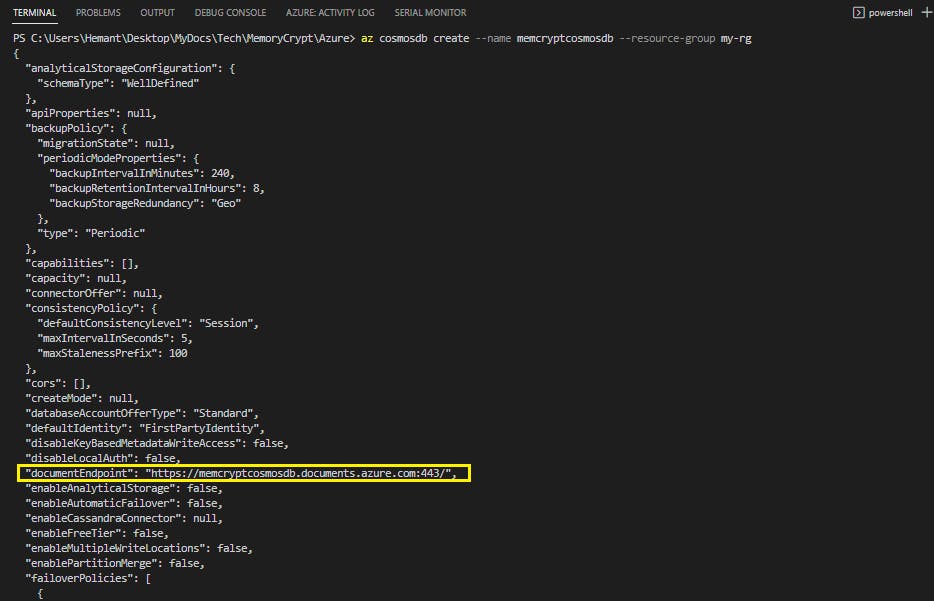
az cosmosdb create --name <myCosmosDBacct> --resource-group my-rg
Record the documentEndpoint shown in the JSON response, it will be used later:
Step 4: Retrieve the primary key for the Cosmos DB account
Retrieve the primary key for the account by using the command below. Record the primaryMasterKey from the command results it will be used later.
# Retrieve the primary key
az cosmosdb keys list --name <myCosmosDBacct> --resource-group my-rg

Step 5: Create a Console App
Now that the needed resources are deployed to Azure the next step is to set up the console application using the same terminal window in Visual Studio Code.
Create a folder for the project and change in to the folder.
 md cosmosDemo
 cd cosmosDemo
Create the .NET console app.
dotnet new consoleOpen the current folder in Visual Studio Code using the command below. The
-roption will open the folder without launching a new Visual Studio Code window.Copy
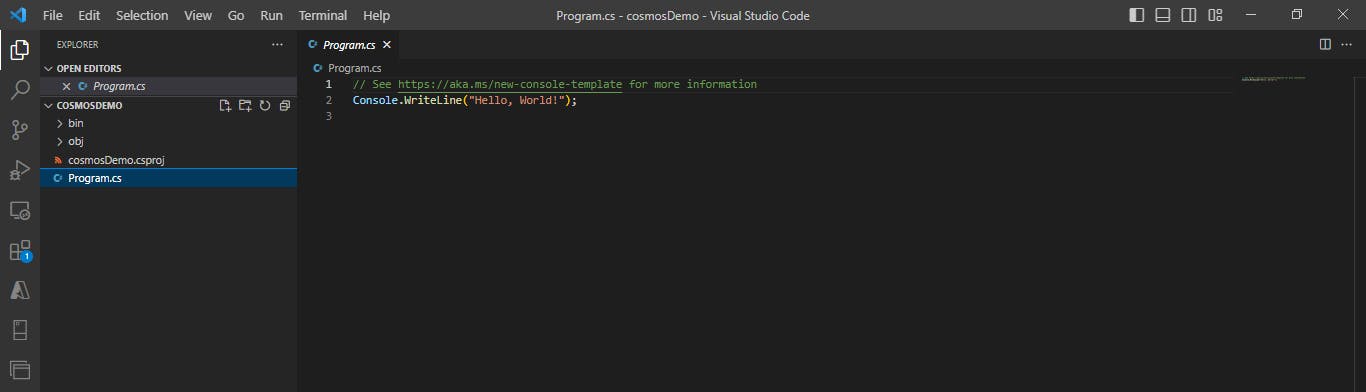
code . -rSelect the Program.cs file in the Explorer pane to open the file in the editor.
Step 6: Add packages and using statements
Open the terminal in Visual Studio Code and use the command below to add the
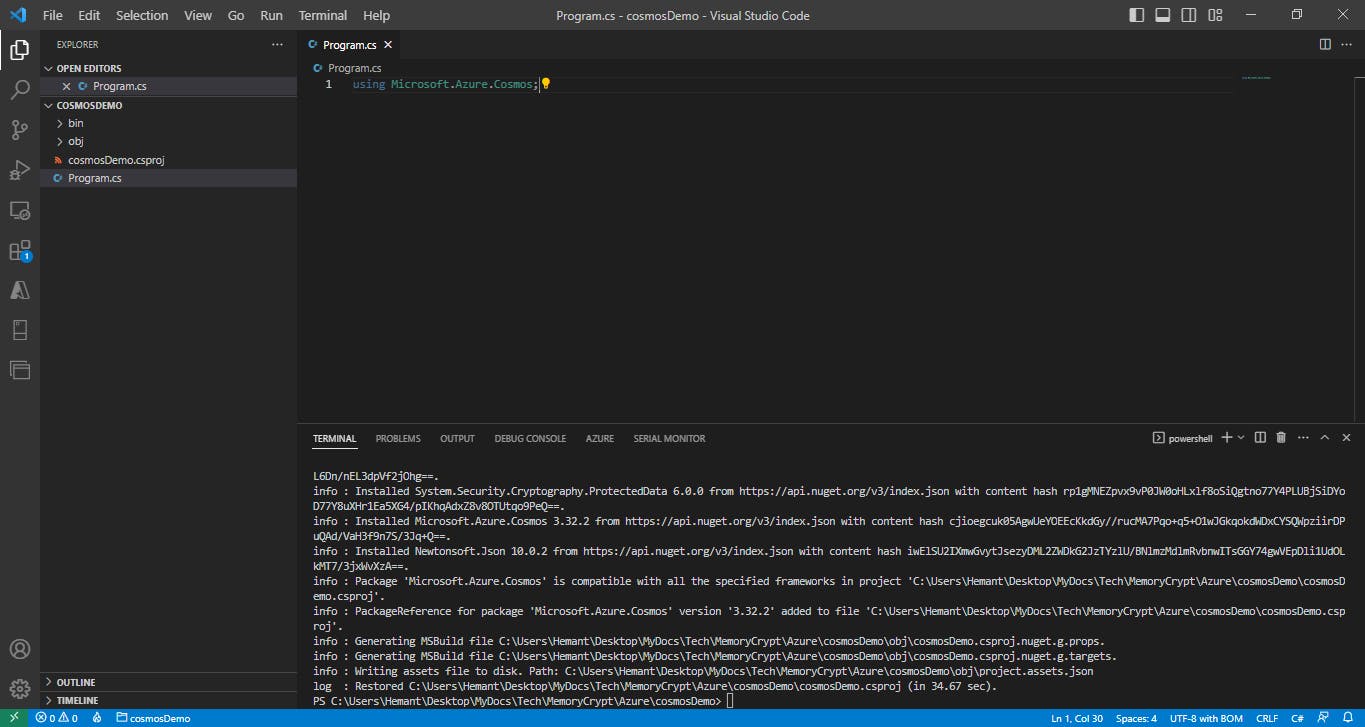
Microsoft.Azure.Cosmospackage to the project.dotnet add package Microsoft.Azure.CosmosDelete any existing code in the
Program.csfile and add theusing Microsoft.Azure.Cosmosstatement.using Microsoft.Azure.Cosmos;
Step 7: Add code to connect to an Azure Cosmos DB account
Add the code snippet below after the
usingstatement. The code snippet adds constants and variables into the class and adds some error checking. Be sure to replace the placeholder values forEndpointUriandPrimaryKeyfollowing the directions in the code comments.public class Program { // Replace <documentEndpoint> with the information created earlier private static readonly string EndpointUri = "<documentEndpoint>"; // Set variable to the Primary Key from earlier. private static readonly string PrimaryKey = "<your primary key>"; // The Cosmos client instance private CosmosClient cosmosClient; // The database we will create private Database database; // The container we will create. private Container container; // The names of the database and container we will create private string databaseId = "myCosmosDatabase"; private string containerId = "myCosmosContainer"; public static async Task Main(string[] args) { try { Console.WriteLine("Beginning operations...\n"); Program p = new Program(); await p.CosmosAsync(); } catch (CosmosException de) { Exception baseException = de.GetBaseException(); Console.WriteLine("{0} error occurred: {1}", de.StatusCode, de); } catch (Exception e) { Console.WriteLine("Error: {0}", e); } finally { Console.WriteLine("End of program, press any key to exit."); Console.ReadKey(); } } //The sample code gets added below this line public async Task CosmosAsync() { //TBD } }Inside the method
CosmosAsync, let us instantiate our newCosmosClientand add code to call the methods you'll add later to create a database and a container.public async Task CosmosAsync() { // Create a new instance of the Cosmos Client this.cosmosClient = new CosmosClient(EndpointUri, PrimaryKey); // Runs the CreateDatabaseAsync method await this.CreateDatabaseAsync(); // Run the CreateContainerAsync method await this.CreateContainerAsync(); }
Step 8: Create a database
Copy and paste the CreateDatabaseAsync method after the CosmosAsync method. CreateDatabaseAsync creates a new database with ID myCosmosDatabase if it doesn't already exist.
private async Task CreateDatabaseAsync()
{
    // Create a new database using the cosmosClient
    this.database = await this.cosmosClient.CreateDatabaseIfNotExistsAsync(databaseId);
    Console.WriteLine("Created Database: {0}\n", this.database.Id);
}
Step 9: Create a container
Copy and paste the CreateContainerAsync method below the CreateDatabaseAsync method.
private async Task CreateContainerAsync()
{
    // Create a new container
    this.container = await this.database.CreateContainerIfNotExistsAsync(containerId, "/LastName");
    Console.WriteLine("Created Container: {0}\n", this.container.Id);
}
Step 10: Run the application
Save your work and, in a terminal in Visual Studio Code, run the
dotnet runcommand. The console will display the following messages.Beginning operations... Created Database: myCosmosDatabase Created Container: myCosmosContainer End of program, press any key to exit.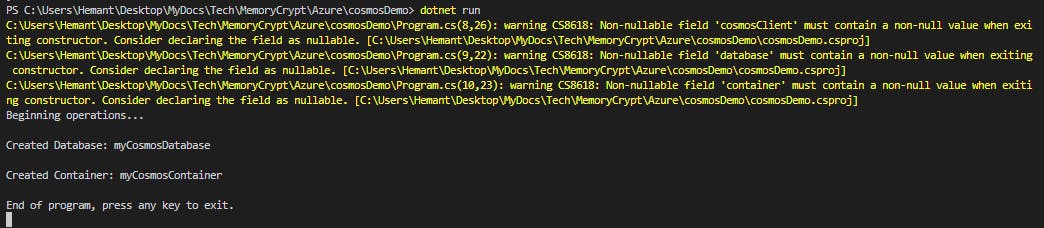
Verify the results by opening the Azure portal, navigating to your Azure Cosmos DB resource, and use the Data Explorer to view the database and container.
Step 10: Clean up Azure resources
You can now safely delete the my-rg resource group from your account by running the command below.
az group delete --name my-rg --no-wait
Create stored procedures
Azure Cosmos DB provides language-integrated, transactional execution of JavaScript that lets you write stored procedures, triggers, and user-defined functions (UDFs). To call a stored procedure, trigger, or user-defined function, you need to register it.
Writing stored procedures
Stored procedures can create, update, read, query, and delete items inside an Azure Cosmos container. Stored procedures are registered per collection, and can operate on any document or an attachment present in that collection.
Here's a simple stored procedure that returns a "Hello World" response.
var helloWorldStoredProc = {
    id: "helloWorld",
    serverScript: function () {
        var context = getContext();
        var response = context.getResponse();

        response.setBody("Hello, World");
    }
}
The context object provides access to all operations that can be performed in Azure Cosmos DB, and access to the request and response objects. In this case, you use the response object to set the body of the response to be sent back to the client.
Create an item using stored procedure
When you create an item by using stored procedure, it's inserted into the Azure Cosmos container and an ID for the newly created item is returned. Creating an item is an asynchronous operation and depends on the JavaScript callback functions. The callback function has two parameters:
The error object in case the operation fails
A return value
Inside the callback, you can either handle the exception or throw an error. In case a callback isn't provided and there's an error, the Azure Cosmos DB runtime will throw an error.
The stored procedure also includes a parameter to set the description, it's a boolean value. When the parameter is set to true and the description is missing, the stored procedure will throw an exception. Otherwise, the rest of the stored procedure continues to run.
This stored procedure takes as input documentToCreate, the body of a document to be created in the current collection. All such operations are asynchronous and depend on JavaScript function callbacks. The callback function has two parameters, one for the error object in case the operation fails, and one for the created object. Inside the callback, users can either handle the exception or throw an error. In case a callback isn't provided and there's an error, the DocumentDB runtime throws an error.
var createDocumentStoredProc = {
    id: "createMyDocument",
    body: function createMyDocument(documentToCreate) {
        var context = getContext();
        var collection = context.getCollection();
        var accepted = collection.createDocument(collection.getSelfLink(),
              documentToCreate,
              function (err, documentCreated) {
                  if (err) throw new Error('Error' + err.message);
                  context.getResponse().setBody(documentCreated.id)
              });
        if (!accepted) return;
    }
}
Arrays as input parameters for stored procedures
When defining a stored procedure in the Azure portal, input parameters are always sent as a string to the stored procedure. Even if you pass an array of strings as an input, the array is converted to string and sent to the stored procedure. To work around this, you can define a function within your stored procedure to parse the string as an array. The following code shows how to parse a string input parameter as an array:
function sample(arr) {
    if (typeof arr === "string") arr = JSON.parse(arr);

    arr.forEach(function(a) {
        // do something here
        console.log(a);
    });
}
Bounded execution
All Azure Cosmos DB operations must complete within a limited amount of time. Stored procedures have a limited amount of time to run on the server. All collection functions return a Boolean value that represents whether that operation will complete or not.
Transactions within stored procedures
You can implement transactions on items within a container by using a stored procedure. JavaScript functions can implement a continuation-based model to batch or resume execution. The continuation value can be any value of your choice and your applications can then use this value to resume a transaction from a new starting point. The diagram below depicts how the transaction continuation model can be used to repeat a server-side function until the function finishes its entire processing workload.

Register a stored procedure
The following example shows how to register a stored procedure by using the .NET SDK v3:
string storedProcedureId = "createDocumentStoredProc";
StoredProcedureResponse storedProcedureResponse = await client.GetContainer("myDatabase", "myContainer").Scripts.CreateStoredProcedureAsync(new StoredProcedureProperties
{
    Id = storedProcedureId,
    Body = File.ReadAllText($@"..\js\{storedProcedureId}.js")
});
Call a stored procedure
The following code shows how to call a stored procedure by using the .NET SDK v3:
dynamic[] newItems = new dynamic[]
{
    new {
        category = "Personal",
        name = "Groceries",
        description = "Pick up strawberries",
        isComplete = false
    },
    new {
        category = "Personal",
        name = "Doctor",
        description = "Make appointment for check up",
        isComplete = false
    }
};

var result = await client.GetContainer("database", "container").Scripts.ExecuteStoredProcedureAsync<string>("createDocumentStoredProc", new PartitionKey("Personal"), new[] { newItems });
Create triggers and user-defined functions
Azure Cosmos DB supports pre-triggers and post-triggers. Pre-triggers are executed before modifying a database item and post-triggers are executed after modifying a database item. Triggers are not automatically executed, they must be specified for each database operation where you want them to execute. After you define a trigger, you should register it by using the Azure Cosmos DB SDKs.
Pre-triggers
The following example shows how a pre-trigger is used to validate the properties of an Azure Cosmos item that is being created, it adds a timestamp property to a newly added item if it doesn't contain one.
function validateToDoItemTimestamp() {
    var context = getContext();
    var request = context.getRequest();

    // item to be created in the current operation
    var itemToCreate = request.getBody();

    // validate properties
    if (!("timestamp" in itemToCreate)) {
        var ts = new Date();
        itemToCreate["timestamp"] = ts.getTime();
    }

    // update the item that will be created
    request.setBody(itemToCreate);
}
Pre-triggers cannot have any input parameters. The request object in the trigger is used to manipulate the request message associated with the operation. In the previous example, the pre-trigger is run when creating an Azure Cosmos item, and the request message body contains the item to be created in JSON format.
When triggers are registered, you can specify the operations that it can run with. This trigger should be created with a TriggerOperation value of TriggerOperation.Create, which means using the trigger in a replace operation is not permitted.
For examples of how to register and call a pre-trigger, visit the pre-triggers article.
Register a pretrigger: The following code shows how to register a pretrigger using the .NET SDK v3:
await client.GetContainer("database", "container").Scripts.CreateTriggerAsync(new TriggerProperties
{
    Id = "trgPreValidateToDoItemTimestamp",
    Body = File.ReadAllText("@..\js\trgPreValidateToDoItemTimestamp.js"),
    TriggerOperation = TriggerOperation.Create,
    TriggerType = TriggerType.Pre
});
Call a pretrigger: The following code shows how to call a pretrigger using the .NET SDK v3:
dynamic newItem = new
{
    category = "Personal",
    name = "Groceries",
    description = "Pick up strawberries",
    isComplete = false
};

await client.GetContainer("database", "container").CreateItemAsync(newItem, null, new ItemRequestOptions { PreTriggers = new List<string> { "trgPreValidateToDoItemTimestamp" } });
Post-triggers
The following example shows a post-trigger. This trigger queries for the metadata item and updates it with details about the newly created item.
function updateMetadata() {
var context = getContext();
var container = context.getCollection();
var response = context.getResponse();

// item that was created
var createdItem = response.getBody();

// query for metadata document
var filterQuery = 'SELECT * FROM root r WHERE r.id = "_metadata"';
var accept = container.queryDocuments(container.getSelfLink(), filterQuery,
    updateMetadataCallback);
if(!accept) throw "Unable to update metadata, abort";

function updateMetadataCallback(err, items, responseOptions) {
    if(err) throw new Error("Error" + err.message);
        if(items.length != 1) throw 'Unable to find metadata document';

        var metadataItem = items[0];

        // update metadata
        metadataItem.createdItems += 1;
        metadataItem.createdNames += " " + createdItem.id;
        var accept = container.replaceDocument(metadataItem._self,
            metadataItem, function(err, itemReplaced) {
                    if(err) throw "Unable to update metadata, abort";
            });
        if(!accept) throw "Unable to update metadata, abort";
        return;
    }
}
One thing that is important to note is the transactional execution of triggers in Azure Cosmos DB. The post-trigger runs as part of the same transaction for the underlying item itself. An exception during the post-trigger execution will fail the whole transaction. Anything committed will be rolled back and an exception returned.
Register a post-trigger: The following code shows how to register a post-trigger using the .NET SDK v3:
await client.GetContainer("database", "container").Scripts.CreateTriggerAsync(new TriggerProperties
{
    Id = "trgPostUpdateMetadata",
    Body = File.ReadAllText(@"..\js\trgPostUpdateMetadata.js"),
    TriggerOperation = TriggerOperation.Create,
    TriggerType = TriggerType.Post
});
Call a post-trigger: The following code shows how to call a post-trigger using the .NET SDK v3:
var newItem = {
    name: "artist_profile_1023",
    artist: "The Band",
    albums: ["Hellujah", "Rotators", "Spinning Top"]
};

await client.GetContainer("database", "container").CreateItemAsync(newItem, null, new ItemRequestOptions { PostTriggers = new List<string> { "trgPostUpdateMetadata" } });
User-defined functions
The following sample creates a UDF to calculate income tax for various income brackets. This user-defined function would then be used inside a query. For the purposes of this example assume there is a container called "Incomes" with properties as follows:
{
   "name": "User One",
   "country": "USA",
   "income": 70000
}
The following is a function definition to calculate income tax for various income brackets:
function tax(income) {

        if(income == undefined)
            throw 'no input';

        if (income < 1000)
            return income * 0.1;
        else if (income < 10000)
            return income * 0.2;
        else
            return income * 0.4;
    }
Register a user-defined function: The following code shows how to register a user-defined function using the .NET SDK v3:
await client.GetContainer("database", "container").Scripts.CreateUserDefinedFunctionAsync(new UserDefinedFunctionProperties
{
    Id = "Tax",
    Body = File.ReadAllText(@"..\js\Tax.js")
});
Call a user-defined function: The following code shows how to call a user-defined function using the .NET SDK v3 (notice udf.Tax(t.income) in select query)
var iterator = client.GetContainer("database", "container").GetItemQueryIterator<dynamic>("SELECT * FROM Incomes t WHERE udf.Tax(t.income) > 20000");
while (iterator.HasMoreResults)
{
    var results = await iterator.ReadNextAsync();
    foreach (var result in results)
    {
        //iterate over results
    }
}
Up Next - Azure Blob storage - Developing Solutions for Microsoft Azure - Part 2.2